Lighting / Fixtures
Installation and User Manual for RZB LINEDO LED Module
Comprehensive installation and user guide for the RZB LINEDO LED module. Includes mounting instructions, wiring diagrams, safety precautions, and technical specifications.
Table of contents
Manual images
Click an image to enlargeQuick Guide
The RZB LINEDO LED module is a professional lighting fixture designed for various mounting configurations. This manual provides essential instructions for safe installation, electrical connection, and maintenance. Always ensure the ceiling and fastening elements are stable before installation. The light source is non-user replaceable and must be serviced by the manufacturer or a qualified technician.
Safety Information
- Electrical Connection: Must comply with all applicable national and international safety and accident prevention regulations.
- Damaged Luminaires: Do not operate if the luminaire is damaged.
- Ambient Temperature: Ensure the operating environment is between -25°C and +50°C. Exceeding this range reduces the product's lifecycle.
- ESD Prevention: Do not route feed-through wiring directly along the luminaire wiring to avoid electromagnetic interference.
- Modifications: Any unauthorized modification, reworking, or re-labeling of the product is strictly prohibited and voids warranty/liability.
Installation
The LINEDO system supports multiple mounting types, including pendant and ceiling mounting. Ensure the mounting surface can support the weight of the fixture.
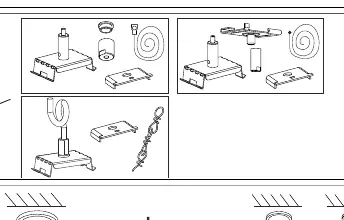
Mounting Steps
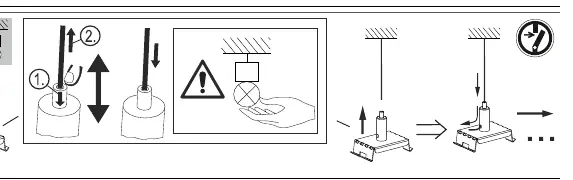
- Prepare the mounting surface and ensure the ceiling stability.
- Follow the specific diagrams for pendant or ceiling mounting provided in the manual (pages 8-9).
- Use the appropriate tools (SW 7, SW 14, T25) as indicated.
- Ensure the protective shield is intact; replace immediately if cracked according to DIN EN 60598.
Wiring and Connection
The luminaire supports through-wiring. Ensure that control inputs for dimmable luminaires are connected using standard cables suitable for the power supply voltage.
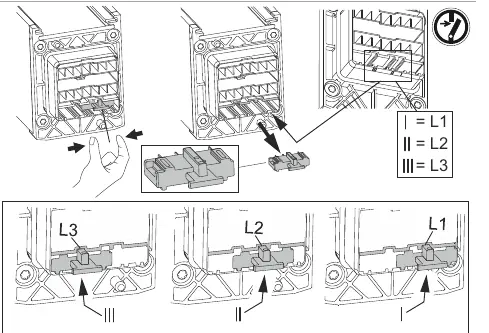
- Factory Setting: The system is set to L1 by default.
- Phase Selection: The wiring block allows selection between L1, L2, and L3 phases.
- Connection: Follow the wiring diagram on page 10 to correctly connect the phases (L1, L2, L3) and Neutral (N).
Maintenance and Disposal
The light source contained in this luminaire shall only be replaced by the manufacturer, their service agent, or a similarly qualified person. Do not attempt to replace the LED module yourself. Dispose of the product according to local regulations for electronic waste.
Technical Specifications
- Protection Rating: IP 54, IK03
- Voltage: 220 - 240 V, 0/50/60 Hz
- Power: 31 W
- Luminous Flux: 4950 lm
- Color Temperature: 5000 K
- CRI: 80
Practical help
Common problems
Damaged protective shield
The shield must be replaced immediately according to DIN EN 60598.
Electromagnetic interference (EMV)
Do not route feed-through wiring directly along the luminaire wiring.
Light source failure
The light source must only be replaced by the manufacturer or a qualified service technician.
Before use
- Verify the ceiling and fastening elements are stable and can support the weight.
- Ensure the ambient temperature is within the -25°C to +50°C range.
- Check that the electrical connection complies with local safety standards.
- Confirm the protective shield is not cracked or damaged.
Images and diagrams
- Wiring diagrams illustrate the connection of phases L1, L2, L3, and Neutral.
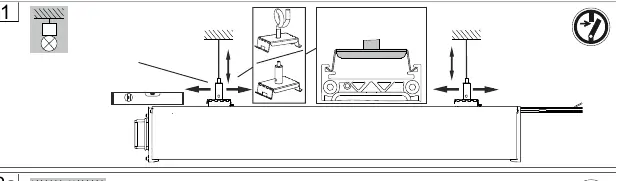
- Installation diagrams show the sequence for pendant and ceiling mounting.
Model compatibility
- Control inputs for dimmable luminaires require standard cables suitable for the power supply voltage.

Manual page author
Michael Turner
Technical manual editor
Reviews PDF manuals for structure, safety notes, and practical product details so readers can find the right information quickly.