Lighting / Fixtures
User Manual for Signature Hardware Bankloft Semi-Flush Mount Light (SKU 440803)
Quick guide for installing the Signature Hardware Bankloft Semi-Flush Mount Light (SKU 440803). Includes wiring instructions, tool requirements, and safety warnings.
Table of contents
Manual images
Click an image to enlargeQuick guide from the manual
This document provides installation instructions for the Bankloft Semi-Flush Mount Light (SKU 440803). Before beginning, ensure you have all necessary tools and that the electricity is turned off at the circuit breaker. The fixture requires an A19 bulb with a maximum of 100 watts. Do not install this fixture on ceilings with radiant heating systems.
Safety Warnings
- Power Off: Always turn off electricity at the fuse or circuit breaker before starting work.
- Professional Advice: If you are unfamiliar with electrical installations, consult a qualified electrician.
- Installation Restrictions: Do not hang the fixture by electrical wires. Do not install on ceilings containing radiant heating systems.
Tools and Materials
You will need the following tools for installation:
- Phillips screwdriver
- Flathead screwdriver
- Wire strippers
- Wire cutters
- Electrical tape
- Step ladder
- Safety glasses
Installation
Assembly (Fig. 1)
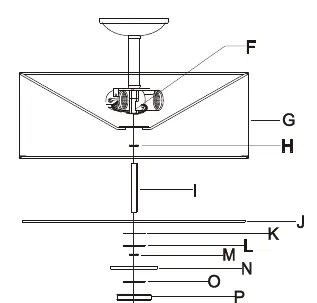
- Thread the nut (H) onto the nipple (I) and thread the nipple (I) through the saddle of the shade (G) into the coupling (F).
- Slide the glass (J), plastic washer (K), and metal washer (L) onto the nipple (I), then secure with the nut (M).
- Slide the cap (N), plastic washer (O), crystal (P), tube (Q), and plastic washer (R) onto the nipple (I), then secure with the finial (S).
Wiring (Fig. 2)
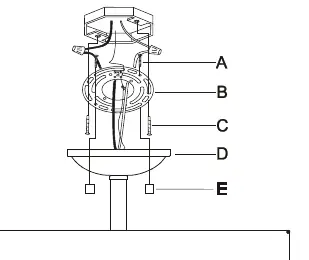
- Thread the mounting screws (A) into the circular strap (B).
- Secure the circular strap (B) to the outlet box using the outlet box screws (C).
- Connect the white wire from the fixture to the white wire from the outlet box.
- Connect the black wire from the fixture to the black wire from the outlet box.
- Secure connections with the provided wire connectors and wrap with electrical tape.
- Connect the copper ground wires from the fixture and the outlet box to the ground screw on the mounting bar.
- Tuck wires into the outlet box, raise the canopy (D), and secure it with the ball nuts (E).
Bulb Installation
Install an A19 light bulb (not provided). Do not exceed the maximum wattage capacity recommended on the socket (100 watts maximum).
Manufacturer information
Signature Hardware
Practical help
Common problems
Fixture does not turn on
Verify that the circuit breaker is on and the bulb is properly installed and functional.
Unsure about grounding methods
Consult your local electrical code for approved grounding methods if you have questions.
Before use
- Turn off electricity at the fuse or circuit breaker.
- Gather required tools: screwdrivers, wire strippers, wire cutters, electrical tape, and a ladder.
- Inspect the product for any shipping damage.
- Verify the ceiling does not have a radiant heating system.
- Ensure you have an A19 bulb (max 100W).
Specs in practice
- A19 100W max
- The maximum wattage allowed for the light bulb to prevent overheating and damage to the socket.
Images and diagrams
- Fig 1: Shows the assembly sequence of the shade, glass, washers, and finial onto the central nipple.
- Fig 2: Illustrates the wiring connections, including the mounting strap, ground wire attachment, and canopy installation.
Model compatibility
- Not suitable for installation on ceilings with radiant heating systems.

Manual page author
Michael Turner
Technical manual editor
Reviews PDF manuals for structure, safety notes, and practical product details so readers can find the right information quickly.