Lighting / Fixtures
Signature Hardware Turnberry 1-Light Outdoor Flush Mount Light
Install and maintain your Turnberry 1-Light Outdoor Flush Mount Light with this comprehensive guide. Includes safety precautions, wiring instructions, and care tips.
Table of contents
Product Overview
The Turnberry 1-Light Outdoor Flush Mount Light is a stylish and durable lighting fixture designed for outdoor use. This manual provides essential instructions for the safe installation, operation, and maintenance of your new light fixture. Before beginning the installation process, ensure you have all the necessary tools and materials on hand. If you are unfamiliar with electrical installations, it is highly recommended to consult with a professional electrician to ensure safety and compliance with local building and electrical codes.
Safety Precautions
Safety is paramount when dealing with electrical fixtures. Always shut off the main power supply at the circuit breaker before starting any installation or maintenance work, including cleaning the fixture or changing light bulbs. The glass components of this fixture are fragile; handle the glass shades and bulbs with extreme care to avoid breakage or injury. Do not use abrasive cleaners or products containing alcohol, as these can damage the finish of the fixture.
Installation Steps
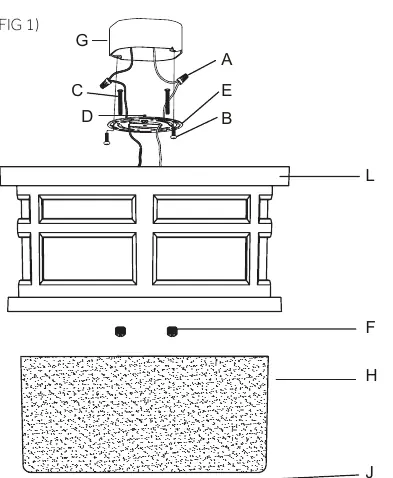
Begin by carefully unpacking the fixture and laying out all components in a clear workspace. Remove the old fixture and its crossbar from the outlet box. Attach the mounting plate to your existing outlet box using the provided screws. Connect the electrical wires: the black fixture wire to the black (hot) house wire, and the white fixture wire to the white (neutral) house wire. Ensure all wire nuts are securely fastened and consider wrapping connections with electrical tape for added security. If your outlet box has a ground wire, connect the fixture's ground wire to it; otherwise, attach the ground wire directly to the mounting plate using the provided green screw. Carefully tuck all wire connections into the junction box. Finally, secure the cage to the mounting plate using the ball nut, then attach the glass shade to the cage, securing it with the provided rubber washer and cap nut.
Care and Maintenance
To keep your Turnberry light looking its best, clean it periodically by wiping it down with a soft, damp cloth. Avoid the use of harsh chemicals, abrasive materials, or cleaners that contain alcohol, as these can degrade the surface finish over time. Always ensure the power is off before performing any cleaning tasks.
Manufacturer information
Signature Hardware
Practical help
Common problems
Fixture does not light up after installation
Check that the circuit breaker is on and all wire connections are secure and correctly matched.
Glass shade feels loose
Ensure the rubber washer and cap nut are tightened properly against the glass.
Before use
- Consult a professional if unfamiliar with electrical work
- Verify all local plumbing and building codes
- Unpack and inspect for shipping damage
- Gather all required tools and materials
- Shut off main power supply at the circuit breaker
Images and diagrams
- G: Outlet box
- E: Mounting plate
- B: Mounting screws
- H: Glass shade
Model compatibility
- Requires an existing outlet box for installation
- Suitable for outdoor use

Manual page author
Emily Carter
User documentation editor
Prepares concise manual descriptions and highlights the most useful setup, operation, and maintenance information for readers.