Home Appliances / Sewing Machines
User Manual for Singer 12K221-12K225 Sewing Machines
Comprehensive user and maintenance guide for Singer 12K221, 12K222, 12K223, 12K224, and 12K225 sewing machines. Includes detailed instructions on threading, bobbin winding, oiling, tension adjustment, and mechanical maintenance.
Table of contents
Quick Guide from the Manual
This manual provides operating and maintenance instructions for the Singer 12K series sewing machines. The recommended maximum operating speed for these machines is 600 R.P.M. Always ensure the correct needle is used: Catalogue No. 4401 for models 12K221-12K224, and Catalogue No. 3303 for model 12K225.
Machine Description
The 12K series consists of several variants designed for specific sewing tasks:
- 12K221: Features a high arm, flat bed, and horizontal-axis sewing hook.
- 12K222: Similar to 12K221 but includes an auxiliary plunger operated by a knee lever for stretching pads.
- 12K223: Designed for basting shoulder pads; features a specially shaped narrow bed mounted transversely.
- 12K224: Designed for tacking coat pads and basting; features a cylinder bed.
- 12K225: Similar to 12K221 but with 5/8 inch clearance under the needle stripper.
Oiling and Maintenance
Proper lubrication is essential for smooth operation. In continuous use, oil the machine at least twice daily at all points indicated by arrows in the diagrams (Figs 3, 4, 5, and 6). Use only Singer Type B or Type D oil. If the machine runs hard after standing idle, use a little paraffin or benzine to clean the oiling points, run the machine rapidly for a minute, wipe clean, and re-oil.
Threading and Sewing
Threading the Needle: Place the spool on the holder. Pass the thread through the thread guide, between tension discs, around the controller, through the take-up lever, and down through the guides to the needle eye. Ensure the needle is inserted with the short groove facing the upright part of the arm.
Bobbin Winding: Place the bobbin on the winder spindle. Pass the thread through the tension bracket and wind a few times around the bobbin. Push the winder pulley against the machine belt to start. The winder stops automatically when full.
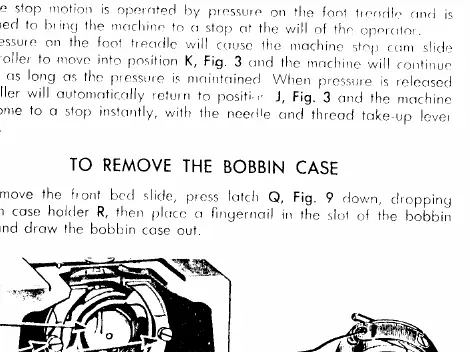
Commencing Sewing: Use the stop motion device to make one stitch, catching the bobbin thread. Draw both threads back, place the material under the needle stripper, and begin sewing.
Adjustments for Mechanics
Tensions: The needle and bobbin threads should lock in the center of the material. Adjust the thumb nut on the tension discs to regulate needle thread tension. Adjust the screw on the bobbin case to regulate bobbin thread tension.
Thread Controller: The thread controller spring holds back the slack of the upper thread. Adjust the tension of this spring by loosening the set screw and rotating the controller stud.
Needle Bar and Hook Timing: If timing is required, the needle bar must be set so that when at its lowest point, the timing marks are visible. The hook must be timed to catch the needle thread at the correct position relative to the needle eye.
Manufacturer information
SINGER
Practical help
Common problems
Machine runs hard after standing idle
Clean oiling points with paraffin or benzine, run the machine rapidly for a minute, wipe clean, and re-oil.
Thread not winding evenly on bobbin
Loosen screw A on the tension bracket and move the bracket to the right or left as needed.
Stitches not forming correctly
Check that the needle is the correct size and type, and ensure the thread is smooth and of appropriate size for the needle eye.
Needle thread tension too tight
Turn the thumb nut on the tension discs to the left to decrease tension.
Before use
- Verify the correct needle catalogue number (4401 or 3303) is installed.
- Ensure the machine is oiled at all designated points (Figs 3-6).
- Check that the thread is of the correct size for the needle eye.
- Ensure the bobbin is wound evenly.
- Check that the needle is inserted with the short groove toward the arm.
Specs in practice
- Needle Cat 4401
- Required for models 12K221, 12K222, 12K223, 12K224.
- Needle Cat 3303
- Required for model 12K225.
Images and diagrams
- Fig 3-6: Oiling points and adjustment locations.
- Fig 8: Step-by-step threading path for the needle.
- Fig 11: Bobbin winding procedure.
- Fig 12-14: Visual guide to perfect vs. incorrect stitch tension.
Model compatibility
- 12K221: Standard flat bed.
- 12K222: Includes auxiliary plunger for pad stretching.
- 12K223: Narrow bed for shoulder pads.
- 12K224: Cylinder bed.

Manual page author
Michael Turner
Technical manual editor
Reviews PDF manuals for structure, safety notes, and practical product details so readers can find the right information quickly.