Home Appliances / Sewing Machines
User Manual for Singer Sewing Machine 144w204 and 144w304
Comprehensive user guide for Singer 144w204 and 144w304 industrial sewing machines. Includes detailed instructions for lubrication, threading, needle setting, stitch length adjustment, hook timing, and safety clutch operation.
Table of contents
Manual images
Click an image to enlargeQuick guide from the manual
This manual provides essential operating and maintenance instructions for the Singer 144w204 and 144w304 sewing machines. Key maintenance tasks include daily lubrication using Singer Type B or D oil, correct needle selection (7x3 or 7x19), and proper threading. If the machine jams, the safety clutch may need to be re-engaged. Always ensure the machine is properly oiled before use.
Machine Description
The 144w204 is a single-needle lock stitch machine with compound feed and high-lift alternating pressers, featuring a 20-inch working space. The 144w304 is a long-arm variant with a 30-inch working space. Both machines are designed for heavy-duty work such as automobile upholstery, tents, and awnings. Recommended maximum speed is 1500 RPM.
Lubrication
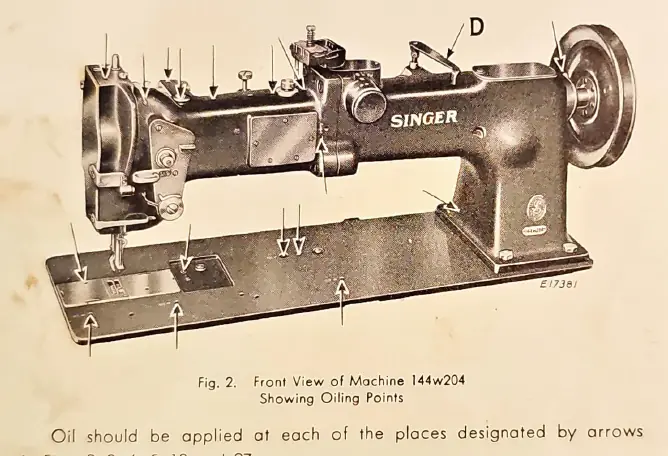
Proper lubrication is critical for machine longevity. Use only Singer Type B or Type D manufacturing machine oil. In continuous use, the machine should be oiled at least twice a day at all points indicated by arrows in the diagrams. Use Singer gear lubricant for gears and ball-bearing lubricant for motors and transmitters.
Threading and Needles
Needles: Use Class 7x3 needles for cloth and 7x19 for cardboard or fiber door panels. Ensure the needle is inserted as far as it will go with the long groove facing left.
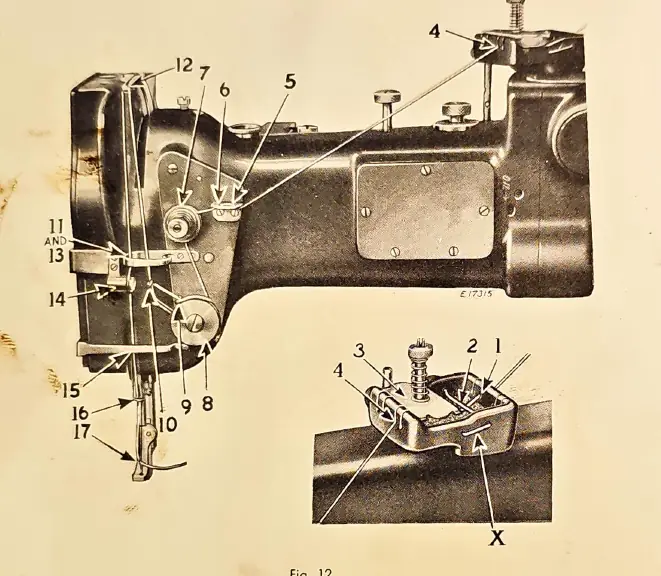
Threading: Pass the thread from the unwinder through the oiler, tension discs, thread controller, take-up lever, and finally through the needle eye from left to right. Refer to the threading diagram for the specific path through the guides.
Operation
Winding the Bobbin: Place the bobbin on the winder spindle, ensuring the stud enters the bobbin hole. Pass thread through tension discs, wind a few turns, and engage the pulley against the machine belt. The winder stops automatically when full.

Starting: Pull up the bobbin thread through the feed dog hole before placing material under the presser feet. Turn the balance wheel toward the operator.
Adjustments
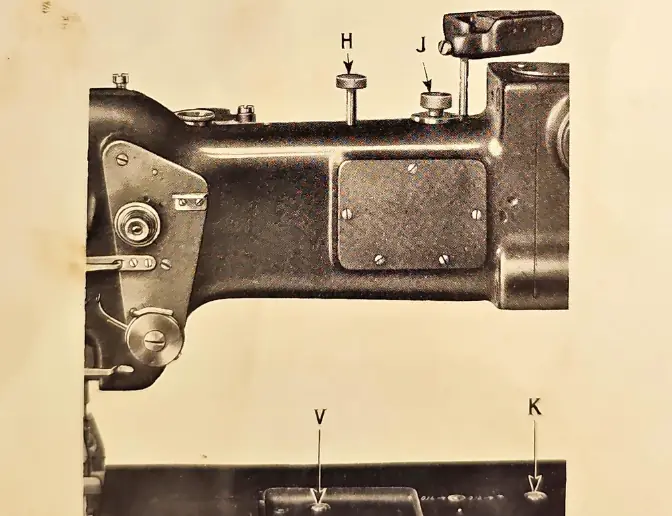
Stitch Length: Press the knurled plunger (J) and the button (K) simultaneously. Turn the balance wheel to adjust the length. Ensure both plungers are disengaged before operating.

Hook Timing: If the sewing hook is out of time, remove the throat plate, turn the balance wheel to the timing mark, and adjust the hook driving gear (T) until the hook point is at the center of the needle.
Safety Clutch: If the machine jams, the safety clutch releases to prevent damage. To re-engage, press the lock stud (V), turn the balance wheel until the locking lever (J2) snaps into the notch (K2), then release the stud.
Manufacturer information
SINGER
Practical help
Common problems
Thread not winding evenly on bobbin
Loosen the screw (A) in the tension bracket and move the bracket to the right or left as required.
Machine jammed or hook out of time
Re-engage the safety clutch by pressing the lock stud (V) and turning the balance wheel until the locking lever snaps into the notch.
Needle bar not correctly set
Align the upper mark on the needle bar with the end of the needle bar frame when the bar is at its lowest position.
Stitch length adjustment difficult
Ensure both the plunger (J) and button (K) are fully depressed before attempting to adjust.
Before use
- Clean and oil the machine thoroughly.
- Ensure the correct needle (7x3 or 7x19) is installed.
- Verify the thread twist (left twist for needle).
- Check that the bobbin is wound correctly.
- Ensure presser feet are properly adjusted for material thickness.
Specs in practice
- Needle Class 7x3
- Standard needle for cloth; available in sizes 21-27.
- Needle Class 7x19
- Needle for stitching cardboard and fiber door panels; sizes 22-27.
- Presser Foot Lift
- 7/8 inch.
Images and diagrams
- Oiling points are marked with arrows on the machine body.
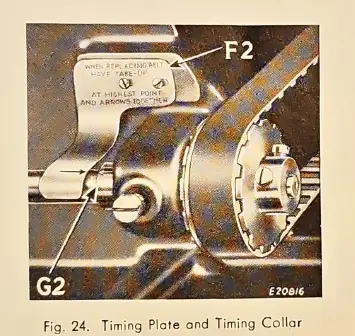
- Timing plate (F2) and collar (G2) arrows must align for correct feed timing.
- Safety clutch mechanism prevents damage during strain.
Model compatibility
- Use only Singer Type B or Type D oil.
- Use only Singer needles marked SIMANCO.
- Do not pinch the connection belt during handling to avoid kinking wire reinforcements.

Manual page author
Emily Carter
User documentation editor
Prepares concise manual descriptions and highlights the most useful setup, operation, and maintenance information for readers.