Tools / Air Tools
User Manual for SIP Industrial 10mm Air Belt Sander 07401
Quick guide for the SIP Industrial 10mm Air Belt Sander 07401. Includes setup, belt replacement, lubrication, safety warnings, and technical specifications.
Table of contents
Manual images
Click an image to enlargeQuick guide from the manual
The SIP Industrial 10mm Air Belt Sander (07401) is a pneumatic tool designed for sanding applications. Before operation, ensure the air supply is clean, regulated to 90psi, and that you have read all safety instructions. Daily lubrication is essential to prevent internal corrosion and tool failure.
Getting to know your belt sander
The tool consists of several key components:
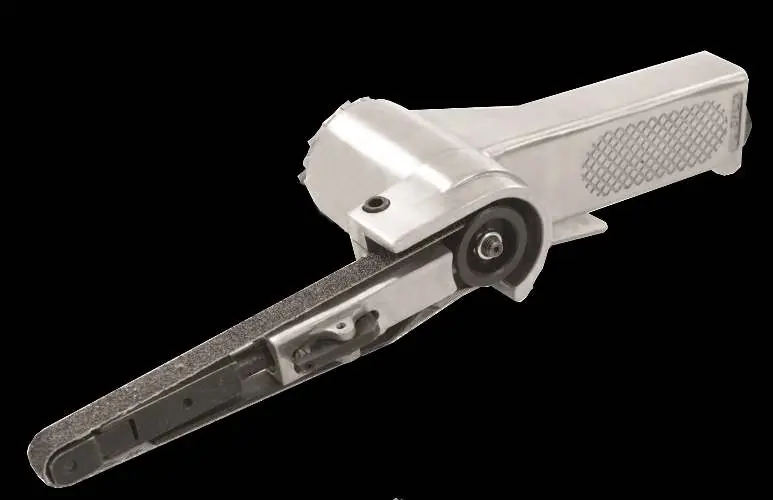
- Handle: The main grip area.
- Throttle / Trigger: Used to operate the sander.
- Sander Arm: The extension holding the belt.
- Belt Tensioning Lever: Used to release/tighten the belt for replacement.
- Angle Adjusting Screw: Allows adjustment of the sander arm angle.
- Air Inlet: 1/4 inch connection for the air supply.
Operating instructions
Fitting the sanding belt
- Lift the belt tensioning lever.
- Fit the sanding belt over the pulley and drive pulley.
- Press the tension lever down to secure the belt.
- Ensure the rotation direction arrow on the abrasive belt is correct.
- Use the angle adjusting screw to alter the angle of the sander arm as needed.
Operating the sander
- Ensure the throttle lever is not depressed before connecting to the air supply.
- Connect the air supply to the 1/4 inch air inlet.
- Press the throttle lever to start the sander.
- Release the throttle lever to stop the sander.
Maintenance and lubrication
Proper maintenance is critical for the longevity of the tool:
- Daily Lubrication: Add a few drops of air tool oil into the air inlet daily.
- In-line Lubricator: An automatic in-line filter-regulator-lubricator is recommended.
- Cleaning: Clean the tool after each use.
- Storage: If storing for an extended period, apply a generous amount of lubrication and run the tool for 30 seconds to distribute the oil. Store in a clean, dry environment.
- Inspection: Check hoses and fittings for wear or damage before each use.
Technical specifications
- Model: 07401
- No Load Speed: 18000 rpm
- Belt Size: 10 x 330 mm
- Max Pressure: 6 Bar / 90 psi
- Air Consumption: 4 CFM / 113 L/min
- Air Inlet: 1/4 inch BSPP
- Weight: 0.75 kg
Safety instructions
- Always wear safety goggles, ear protection, and a face mask/respiratory equipment when operating.
- Do not exceed 90psi air pressure.
- Keep children and untrained personnel away from the work area.
- Do not dismantle or tamper with the tool.
- Ensure the workpiece is firmly secured before starting.
- Disconnect from air supply before changing accessories or performing maintenance.
Practical help
Common problems
Tool not working properly or parts wearing prematurely
Ensure the tool is properly lubricated daily and the air line lubricator is filled and adjusted correctly.
Excessive wear or tool casing splitting
Do not exceed the manufacturer's recommended air pressure (90psi).
Water damage to the tool
Drain the compressor air tank daily to prevent water from entering the air line.
Before use
- Ensure the air supply is clean and regulated to 90psi.
- Check that the throttle lever is not depressed before connecting to the air supply.
- Verify the sanding belt is correctly fitted and tensioned.
- Wear appropriate PPE (eye, ear, and respiratory protection).
- Ensure the workpiece is firmly secured.
- Check hoses and fittings for wear or damage.
Specs in practice
- Max Pressure: 6 Bar / 90 psi
- The maximum safe operating pressure; exceeding this can damage the tool.
- No Load Speed: 18000 rpm
- The rotational speed of the tool when not under load.
- Air Inlet: 1/4 inch BSPP
- The standard size for the air hose connection fitting.
Images and diagrams
- The sander features a belt tensioning lever to facilitate quick belt changes.
- The angle adjusting screw allows the user to change the orientation of the sander arm.
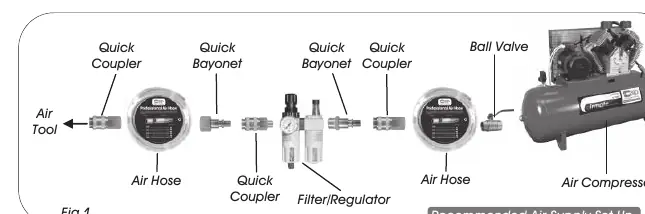
- The air supply setup should include a filter/regulator/lubricator for optimal tool life.
Model compatibility
- Requires 1/4 inch BSPP air inlet connection.
- Use only recommended lubricants specifically made for pneumatic applications; substitutes may damage O-rings.

Manual page author
David Miller
Documentation analyst
Organizes user manual content into clear summaries, with attention to model details, product context, and everyday usability.