Tools / Power Tools
User Manual for Mirka PBS 10NV & 13NV Pneumatic Belt Sanders
Quick guide for Mirka PBS 10NV & 13NV pneumatic belt sanders. Includes setup, operation, belt replacement, maintenance, and troubleshooting.
Table of contents
Manual images
Click an image to enlargeQuick guide from the manual
The Mirka PBS 10NV and 13NV are pneumatic belt sanders designed for sanding various materials including metal, wood, stone, and plastic. Always ensure the tool is used with a clean, lubricated air supply and that the operator is standing on a solid floor with a firm grip on the tool.

Safety
Always wear required personal protective equipment (PPE) including face mask, safety gloves, ear protection, and safety glasses. Do not operate the tool if you are tired or under the influence of drugs, alcohol, or medication. Ensure the workpiece is firmly fixed before sanding.
Setup and Operation
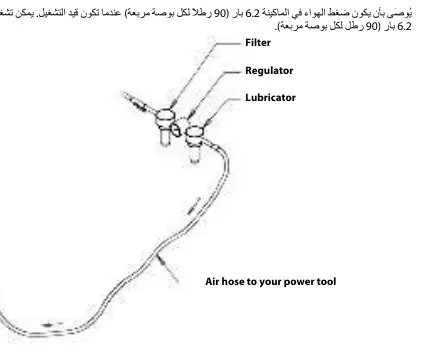
It is strongly recommended to use an air filter, regulator, and lubricator (FRL) unit to supply clean, lubricated air at the correct pressure. The recommended air pressure is 6.2 bar (90 psig). Do not exceed this pressure. If an FRL is not used, the tool must be lubricated manually by adding 2-3 drops of oil into the air inlet daily.

Belt Replacement
PBS 10
- Disconnect the air supply.
- Push the tension arm towards the steel protect cover to release the lock function.
- Open the steel protect cover by loosening the cover knob.
- Replace the belt, ensuring it is centered.
- Close the steel protect cover and tighten the knob.
- Press the lock function on the tension arm towards the steel cover to engage tension.
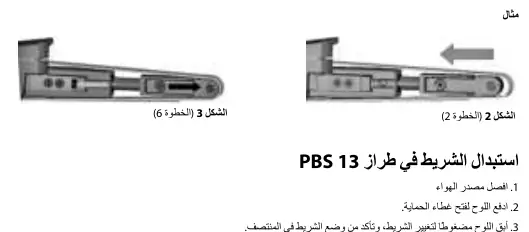
PBS 13
- Disconnect the air supply.
- Push the plate to open the protect cover.
- Keep the plate compressed to change the belt, ensuring it is centered.
- Release the push plate to engage tension.
- Close the steel protect cover.
Maintenance and Troubleshooting
All maintenance must be carried out by trained personnel. If the tool malfunctions, stop use immediately and arrange for service. Common issues like low power or vibration are often caused by low air pressure, clogged inlet screens, or worn motor bearings. Refer to the troubleshooting guide in the manual for specific solutions.
Practical help
Common problems
Low power or low free speed
Check air supply, ensure speed control is not set to low, clean or replace inlet screen.
Air leakage at speed control
Disassemble and inspect valve spring, valve, or valve seat; ensure correct assembly.
Vibration or rough operation
Check for worn or broken motor bearings; increase motor speed with flow regulator.
Before use
- Check tool for transport damage
- Ensure air supply is clean and lubricated
- Install FRL unit
- Wear required PPE
- Ensure workpiece is firmly fixed
Specs in practice
- Air Pressure
- 6.2 bar (90 psig) recommended for optimal performance.
Images and diagrams
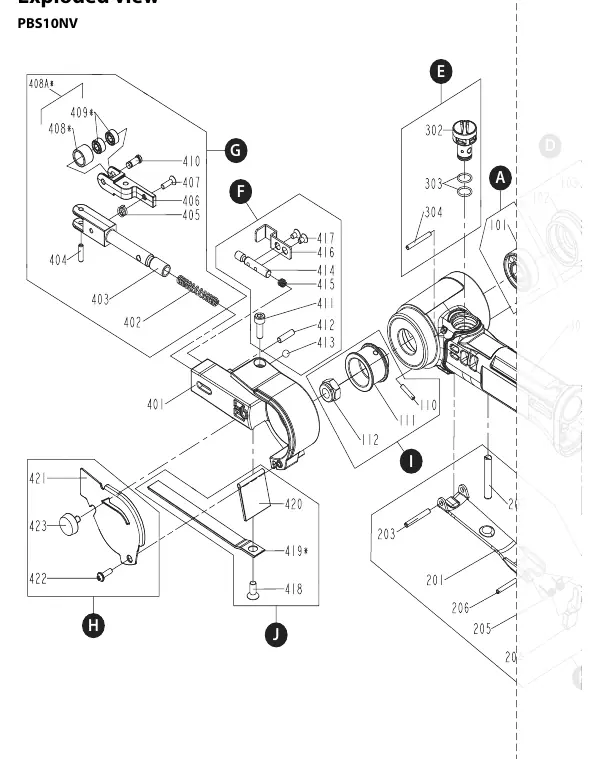
- Figure 1: FRL setup diagram showing filter, regulator, and lubricator connection.
- Exploded views: Detailed diagrams for PBS 10NV and PBS 13NV for parts identification.
Model compatibility
- PBS 10NV uses 10x330mm belts.
- PBS 13NV uses 12.7x457mm belts.

Manual page author
Emily Carter
User documentation editor
Prepares concise manual descriptions and highlights the most useful setup, operation, and maintenance information for readers.