Industrial / Air Sampling Pumps
Operating Instructions for SKC 224-G5 Sorbent Tube
A comprehensive guide for the SKC 224-G5 Sorbent Tube. This manual covers essential preparation, sampling techniques, storage requirements, and analysis procedures to ensure accurate air monitoring results.
Quick answers from the manual
Quick answer
- The SKC 224-G5 is a sorbent tube for air sampling. Key operational requirements include breaking tube ends to a minimum 2mm hole, maintaining a vertical position during sampling, and analyzing both tube sections independently to check for breakthrough. p. 1, 2
Key actions
- Break tube ends p. 1
- Positioning p. 1
Problems and fixes
Breakthrough
If the backup section contains more than 25% of the amount of analyte present on the main section, breakthrough has taken place.
p. 2Show 2 more answers Show less
Technical specifications
| Parameter | Value | Meaning | Pages |
|---|---|---|---|
| 6 x 70mm | 500 ml/min | Maximum Flow Rate | p. 1 |
| 6 x 110mm | 500 ml/min | Maximum Flow Rate | p. 1 |
| 8 x 110mm | 1000 ml/min | Maximum Flow Rate | p. 1 |
Where to find it in the PDF
- Operating Instructions p. 1
- Analysis and Components p. 2
Table of contents
Quick guide from the manual
The SKC 224-G5 Sorbent Tube is designed for air sampling. To ensure accurate results, always use the tube in a vertical position to prevent sample channelling. When preparing the tube, ensure a minimum hole diameter of 2mm at the ends. During analysis, always test both sections of the tube independently to check for breakthrough; if the backup section contains more than 25% of the analyte found in the main section, breakthrough has occurred.
Flow Rates
Ensure your sampling pump is set within the appropriate flow rate limits for your specific tube size:
- 6 x 70mm: Maximum 500 ml/min (Typical 10-100 ml/min)
- 6 x 110mm: Maximum 500 ml/min (Typical 20-100 ml/min)
- 8 x 110mm: Maximum 1000 ml/min (Typical 20-200 ml/min)
Preparation
Proper preparation is critical to avoid pre-sample contamination:
- Breaking ends: Ensure a minimum hole diameter of 2mm or half the diameter of the tube body.
- Contamination avoidance: Never calibrate or fit tubes in areas where chemicals are present. Ensure clothing (especially lab coats) is free from contamination.
- Capping: After breaking the ends, cap the sampling end until ready for use. Use only a light press for temporary capping; pushing caps fully home makes them difficult to remove.
Sampling
- Orientation: Always use the tube in a vertical position.
- Direction: The arrow on the glass tube indicates air flow direction and must point toward the tube holder. If no arrow is present, the smallest sorbent section should be nearest the holder.
- Post-sampling: Immediately cap both ends with the supplied red plastic caps, pressing them fully home to ensure a good seal.
- Moisture: If high moisture is present, use a trap tube before the sorbent tube.
Storage
- Environment: Never store used tubes in areas where chemicals are present, even if capped.
- Temperature: If storing for more than a few hours, place tubes in a refrigerator at 0°C. Exposed tubes can be stored for up to 1 week, depending on the analyte.
- Blanks: Always store a 'blank' (a tube with ends broken off but capped) in the same way as the samples to confirm no contamination occurred during storage.
Analysis
- GCMS: Use only tubes with glass wool separators.
- Breakthrough Check: Tubes have two sections. Test both independently. If the backup section contains >25% of the analyte present on the main section, breakthrough has occurred.
- Sorbent Removal: Ensure all sorbent is removed from the tube using a charcoal pick if necessary, as some man-made sorbents may stick to the glass.
Practical help
Common problems
Sample channelling
Always use the tube in a vertical position during sampling.
Pre-sample contamination
Ensure lab coats and clothing are clean; do not prepare or calibrate tubes in areas where chemicals are present.
Breakthrough detected
If the backup section contains more than 25% of the analyte found in the main section, the result is invalid due to breakthrough.
Before use
- Ensure tube ends are broken to a minimum 2mm hole diameter.
- Verify the arrow on the tube points toward the tube holder.
- Check that the preparation area is free of chemical contaminants.
- Cap the sampling end immediately after breaking the tube ends.
- If high moisture is expected, prepare a trap tube.
Show more Show less
Images and diagrams
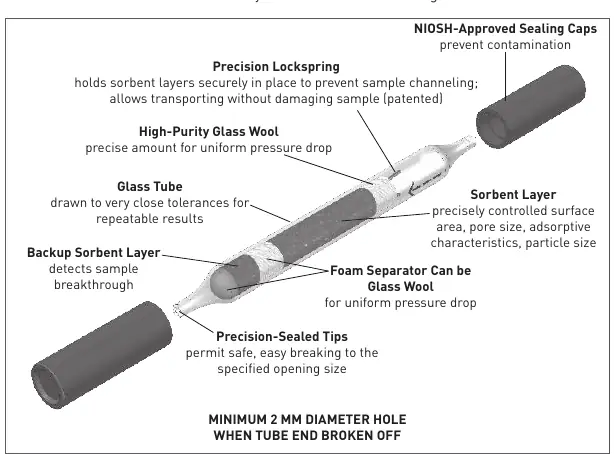
- Precision Lockspring: Holds sorbent layers securely to prevent channeling.
- NIOSH-Approved Sealing Caps: Prevent contamination.
- Backup Sorbent Layer: Used to detect sample breakthrough.
- Precision-Sealed Tips: Designed for safe breaking to the specified opening size.
Model compatibility
- GCMS analysis requires tubes with glass wool separators.
- High temperature/moisture can affect adsorption characteristics.

Manual page author
David Miller
Documentation analyst