HVAC / Heaters & Fireplaces
Stelpro Bella BA Series Baseboard Heater User Guide
Quick guide for the Stelpro Bella BA Series baseboard heater. Includes installation instructions, wiring diagrams, maintenance tips, troubleshooting, and technical specifications.
Table of contents
Manual images
Click an image to enlargeQuick Guide from the Manual
The Stelpro Bella BA Series is a high-end baseboard heater designed for residential heating. Proper installation is critical for safety and performance. Key requirements include grounding the unit, ensuring correct line voltage, and maintaining specific clearances from furniture and walls to prevent fire hazards. The unit must be installed by a certified electrician in accordance with local electrical and building codes.
Safety Instructions
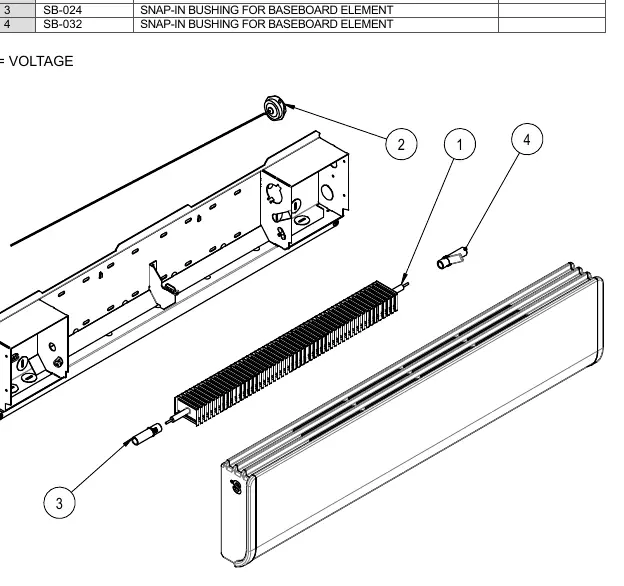
- Grounding: The unit must be grounded by connecting the bare ground wire to the green screw inside the junction box.
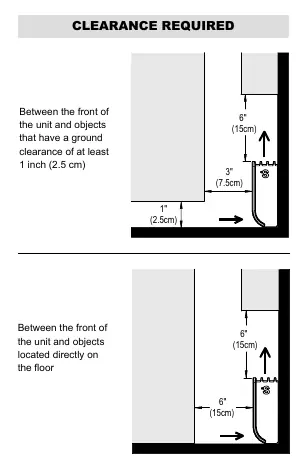
- Clearances: Maintain at least 3 inches (7.5 cm) between the front of the unit and objects with ground clearance of at least 1 inch. If objects are directly on the floor, maintain at least 6 inches (15 cm). Keep at least 6 inches (15 cm) of space above the unit.
- Environment: Do not install on walls made of synthetic materials like carpet or wallpaper. Do not install behind a door. Keep the unit away from water sources and flammable liquids.
- Operation: Never block air vents. Do not use on soft surfaces like beds.
Installation
Before proceeding, cut off the power supply at the circuit breaker or fuse. The baseboard can be wired to a power supply from either end of the junction box.
- Wiring: Remove the twist-on connector from the selected junction box and secure the power leads. For multiple heaters, ensure ground continuity is maintained between units.
- Mounting: After tightening the heater to the wall using the provided mounting holes, loosen the mounting screws half a turn to allow for metal expansion.
- Thermostats: If installing a thermostat kit or relay, refer to the specific user guide for that accessory.
Maintenance
The unit should be cleaned at least once a year to maintain the warranty. Ensure power is off and the heating element has cooled before cleaning.
- Cleaning: Use a soft rag and non-abrasive dish soap. Wipe off cleaning products thoroughly to avoid discoloration. Do not use abrasive or chemical cleaners.
- Dusty Areas: If used in a very dusty location, use a vacuum brush to remove dust from the grilles.
- Front Panel: If the front panel is removed for cleaning or lubrication, ensure it is replaced and secured with the original screws before restoring power.
Troubleshooting
If the unit fails to operate, check the following:
- Unit does not work: Check for a defective thermostat, incorrect thermostat setting, open circuit breaker/fuse, activated thermal protection, or faulty connections.
- Unit runs continuously: Check thermostat settings or heat losses in the room.
- Enclosure is extremely hot: Check for blocked air vents or defective thermal protection.
- Breaker trips: Check for faulty connections or voltage higher than the nameplate rating.
Technical Specifications
The junction box volume is 52.5 cubic inches (860.3 cm³). The unit is available in various wattages and lengths. Please refer to the specifications table in the manual for the exact model (BA or BAL series) and its corresponding wattage and dimensions. Note that the width of units may vary by approximately 1/16 inch (0.15 cm).
Practical help
Common problems
Unit does not work
Check thermostat setting, circuit breaker/fuse, thermal protection status, and electrical connections.
Unit runs continuously
Verify thermostat setting and check for excessive heat losses in the room.
Enclosure is extremely hot
Ensure air vents are not blocked and check for defective thermal protection.
Breaker trips when turned on
Inspect for faulty connections and verify that the supply voltage matches the unit's nameplate.
Before use
- Ensure the unit is properly grounded.
- Verify that the line voltage matches the unit's nameplate.
- Confirm that the installation is performed by a certified electrician.
- Check that all required clearances (3" front, 6" top) are maintained.
- Ensure no flammable materials or furniture are blocking the airflow.
- Check that the unit is not installed on synthetic wall coverings.
Specs in practice
- Density 250 W/ft
- High-density heating element configuration.
- Density 150 W/ft
- Low-density heating element configuration.
- Junction box volume
- 52.5 cubic inches (860.3 cm³) available for wiring.
Images and diagrams
- Clearance diagrams show the required distances from floors, walls, and furniture.
- Wiring diagrams illustrate connections for single units and multiple units on the same circuit.
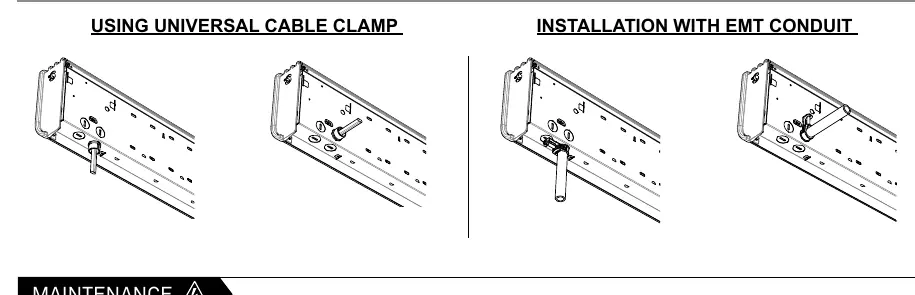
- Installation diagrams show the use of cable clamps and EMT conduit.
Model compatibility
- Compatible with various voltages: 120V, 208V, 240V, 277V, 347V, 480V, and 600V depending on the specific model.
- Must be installed in accordance with local electrical and building codes.

Manual page author
David Miller
Documentation analyst
Organizes user manual content into clear summaries, with attention to model details, product context, and everyday usability.