Lighting / Controllers & Dimmers
User Manual for Cooper 1200W Halogen Heater 11155
Quick guide for the Cooper 1200W Halogen Heater (11155). Includes assembly, operation, safety warnings, bulb replacement, and maintenance instructions.
Table of contents
Manual images
Click an image to enlargeQuick Guide
The Cooper 1200W Halogen Heater is designed for well-insulated spaces or occasional use. It features three heat settings and an oscillation mode. Always ensure the heater is placed on a flat, level surface and kept away from children, pets, and flammable materials. Do not cover the heater or use it in draughty locations, bathrooms, or near water.
Assembly
Follow these steps to assemble the base plate:
- Remove the butterfly nuts from the lower part of the main heater body.
- Insert the power cord through the slot in the middle of the base plate.
- Attach the main heater body to the base plate.
- Secure the body using the previously removed butterfly nuts.
- Fix the power cord in place using the clamp.
Operation
Plug the heater into a suitable power supply and place it on a flat surface. Use the switches on the top of the unit to control heat output:
- First Switch: Activates the 400W setting (Master switch).
- Second Switch: Activates the 800W setting (two elements).
- Third Switch: Activates the 1200W setting (three elements).
The oscillation mode rotates the heater through approximately 75 degrees. The first power switch must be on to control other elements and oscillation.
Safety Features
The appliance is equipped with a safety tilt switch located in the lower part of the radiator. This device automatically disconnects the appliance if it is tilted or tipped over.
Bulb Replacement
Warning: Always unplug the heater and allow it to fully cool before attempting any maintenance. While bulbs are replaceable, it is recommended that this be done by a professional electrician. Replacement bulbs are available under item code 11156.
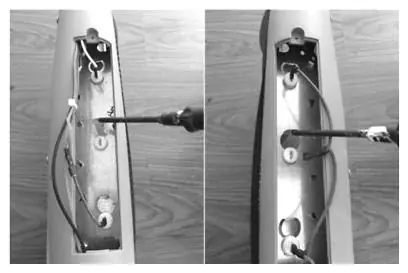
To replace the tubes:
- Remove screws on both sides of the unit.
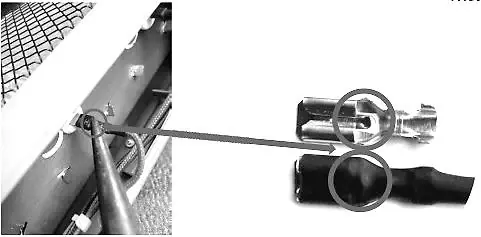
- Use pliers to clamp the internal lock of the latch.
- Disconnect wires from the tube terminals.
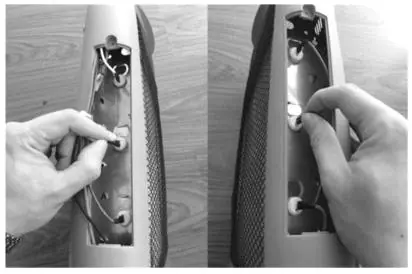
- Open tube holders, remove old tubes, and insert new ones.
- Close holders, reconnect wires, and fix panels with screws.
Cleaning and Maintenance
- Always unplug the appliance and allow it to cool before cleaning.
- Clean only with a lightly dampened rag.
- Never use abrasive powders or solvents.
- NEVER IMMERSE THE HEATER IN WATER.
Wiring and Safety
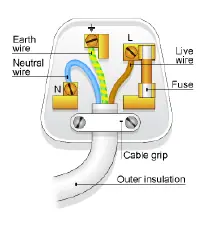
This appliance is fitted with a BS 1363 13-amp plug. If the fuse needs replacing, use an ASTA or BSI approved 13-amp fuse. The cable contains three wires: Blue (Neutral), Brown (Live), and Green & Yellow (Earth). Keep the heater at least 1 meter away from combustible materials like furniture, curtains, and bedding.
Practical help
Common problems
Heater does not turn on
Check if the unit is plugged in, the master power switch is on, and the heater is on a flat surface (tilt switch may be activated).
Bulb failure
Bulbs are replaceable (item code 11156), but professional installation is recommended.
Overheating or safety risk
Ensure the heater is not covered, ventilation holes are clear, and it is at least 1m away from flammable materials.
Before use
- Check the appliance and power cable for damage.
- Ensure the voltage matches your home supply.
- Place on a flat, level surface.
- Ensure 1m clearance from combustible materials.
- Verify the heater is not placed immediately below a socket-outlet.
Specs in practice
- Power Output
- 1200W total, adjustable via 3 switches (400W, 800W, 1200W).
Images and diagrams
- Wiring diagram for the 3-pin UK plug.
- Step-by-step visual guide for replacing halogen tubes.
- Assembly sequence for the base plate.
Model compatibility
- Not suitable for deep pile carpet.
- Not recommended for draughty locations.
- Do not use in bathrooms, showers, or near swimming pools.
- Not for use in closed cupboards or near laundry.

Manual page author
Emily Carter
User documentation editor
Prepares concise manual descriptions and highlights the most useful setup, operation, and maintenance information for readers.