Lighting / Fixtures
Strands Ize LED Lighthouse Warning Light Beacon 135MM
Quick guide for the Strands Ize LED Lighthouse Warning Light Beacon 135MM. Includes wiring instructions, installation tips, maintenance advice, and safety warnings.
Table of contents
Manual images
Click an image to enlargeQuick guide from the manual
This document provides essential information for the installation and maintenance of the Strands Ize LED Lighthouse Warning Light Beacon 135MM (Part No: 905003). The device features a rotating flash pattern and requires careful handling during installation to maintain its waterproof integrity.
Wiring and connection
Proper electrical connection is critical for the operation of the beacon:
- Red cable: Positive (+)
- Black cable: Negative (-)
Installation
Before installing, check with state or local authorities regarding laws governing the usage and mounting of warning lights. The package includes M4 screws, ST4 self-tapping screws, nuts, washers, a rubber pad, and one extra belt.
When mounting the unit:
- Tighten screws and bolts securely so they do not loosen or chafe.
- Do not overtighten screws, as this may break the protective bearings on the product.
- Ensure the mounting surface is prepared according to the provided dimensional diagrams.
Maintenance and care
To ensure the longevity of the product, keep the lens and heat-sink clean. Dirt accumulation can shorten the product's lifetime.
- Use lukewarm water and alkaline degreasing for cleaning.
- Rinse gently with cold or lukewarm water at low pressure.
- Warning: Do not use high water pressure close to the product, as this can force water into the unit.
- Warning: Avoid strong chemicals. If chemicals accidentally contact the product, rinse immediately with plenty of water. Solvents in some chemicals can dissolve sealing adhesives and compromise waterproofness, or cause plastic and rubber components to become brittle.
Safety warnings
- Do not use higher voltage than specified in the product description.
- The light becomes hot during continuous use. Do not remove or touch the casing for at least 30 minutes after turning the lamp off.
Practical help
Common problems
Waterproofness compromised
Avoid using strong chemicals or solvents, as they can dissolve sealing adhesives and damage rubber components.
Product casing is hot
Do not touch the casing for at least 30 minutes after turning the lamp off to prevent burns.
Screws loosening or chafing
Tighten screws and bolts securely, but do not overtighten to avoid breaking the protective bearings.
Before use
- Check with local authorities for laws governing usage and mounting.
- Verify the voltage matches the product specifications.
- Ensure you have all included parts: M4 screws, ST4 self-tapping screws, nuts, washers, rubber pad, and extra belt.
- Read all instructions and study diagrams before painting or installing.
Specs in practice
- Flash pattern
- Rotating
Images and diagrams
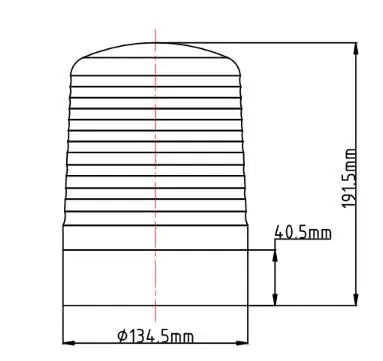
- The manual provides dimensional drawings showing the 135mm diameter and height specifications.
- A mounting diagram illustrates the 4-hole pattern for installation.
Model compatibility
- Ensure the mounting surface is suitable for the provided M4 and ST4 screws.

Manual page author
David Miller
Documentation analyst
Organizes user manual content into clear summaries, with attention to model details, product context, and everyday usability.