Industrial / Signaling Devices
User Manual for Strands Siberia Low Rider LED Light
Quick guide for the Strands Siberia Low Rider LED light. Includes wiring diagrams, installation instructions, grouping setup, and flash pattern configuration.
Table of contents
Manual images
Click an image to enlargeImportant Information
This document provides installation and configuration instructions for the Strands Siberia Low Rider LED light. Before installation, ensure you have read all instructions and studied the diagrams. Always check local laws regarding the usage and mounting of auxiliary lights.
Wiring Connections
Correct wiring is essential for the operation of the light. Connect the wires according to the following color code:
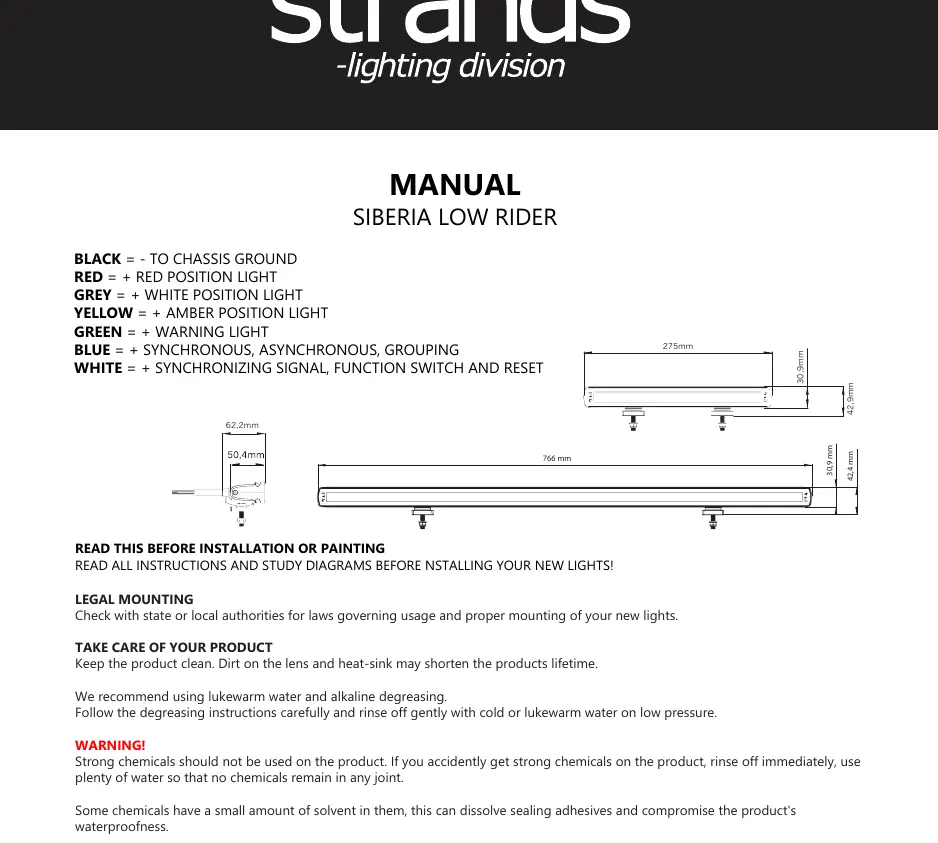
- Black: Chassis ground (-)
- Red: Red position light (+)
- Grey: White position light (+)
- Yellow: Amber position light (+)
- Green: Warning light (+)
- Blue: Synchronous, Asynchronous, Grouping
- White: Synchronizing signal, function switch, and reset
Installation Guidelines
- Connectors: Do not cut the connector on the product. Doing so will void the warranty.
- Cables: If the cable is shorter than 50 cm, do not cut it. If the cable is longer than 50 cm, it may be shortened, but not to less than 50 cm. Cutting the cable shorter than 50 cm voids the warranty.
- Mounting: Tighten screws and bolts securely to prevent loosening or chafing, but do not overtighten to avoid damaging protective bearings.
- Safety: The light becomes hot during continuous use. Do not touch or remove the casing for at least 30 minutes after turning the lamp off.
Grouping and Synchronization
You can group up to four Low Rider units into a maximum of two groups. It is possible to mix 10-inch and 30-inch models in one group.
Group A
- Connect all white wires together.
- Connect all blue wires together and connect to +V DC.
Group B
- Connect all white wires together.
- Connect all blue wires together (do not connect to +V DC).
Flash Pattern Configuration
The light features four different flash patterns. Settings are automatically saved.
Setting the Flash Pattern
Hold the white wire on +V DC for 0.5 to 3 seconds to cycle to the next flash pattern.
Resetting Flash Modes
- Reset Mode 1 (Synchronous double flash - ECE R65): Hold the white wire on +V DC for 3-4 seconds. The light will flash twice, then disconnect.
- Reset Mode 2 (Asynchronous double flash - ECE R65): Hold the white wire on +V DC for 10-11 seconds. The light will flash three times, then disconnect.
Maintenance
Keep the product clean, as dirt on the lens and heat-sink can shorten the product's lifetime. Use lukewarm water and alkaline degreasing. Do not use high-pressure water close to the product, as it may compromise waterproofing. Avoid strong chemicals, as they can dissolve sealing adhesives or damage plastic and rubber components.
Practical help
Common problems
Cable is too short
If the cable is cut shorter than 50 cm, the warranty is void. Ensure you do not cut the cable below this length.
Connector cut
Cutting the connector on the product voids the warranty.
Overheating
The casing gets hot during use. Wait at least 30 minutes after turning off the lamp before touching or removing the casing.
Before use
- Check state or local authorities for laws governing usage and mounting.
- Verify that the voltage used does not exceed the product description.
- Ensure all wiring connections match the color code provided.
- Clean the lens and heat-sink before installation.
Images and diagrams
- The wiring list defines the function of each colored wire.
- Grouping instructions require specific connections for the blue and white wires to distinguish between Group A and Group B.
Model compatibility
- Can mix 10-inch and 30-inch models in one group.
- Supports up to four units in a maximum of two groups.

Manual page author
Emily Carter
User documentation editor
Prepares concise manual descriptions and highlights the most useful setup, operation, and maintenance information for readers.