Automotive / Car Audio
User Manual for Strex SP176 Jump Starter
Quick guide for the Strex SP176 Jump Starter. Learn how to jump-start your vehicle, charge electronic devices, use the flashlight, and maintain your device safely.
Table of contents
Manual images
Click an image to enlargeQuick guide from the manual
The Strex SP176 Jump Starter is designed to boost 12V vehicle batteries. Before use, ensure the device has at least 30% power. Do not attempt to jump-start a vehicle if the battery is completely dead or damaged. Do not crank the engine for more than 4 continuous seconds. If the vehicle does not start, wait 1 minute before trying again. Do not exceed three consecutive attempts.
Product Overview
The device features a main power switch, a flashlight with SOS mode, a connection port for jumper cables, a 15V/1A input port, two USB output ports (5V/2.1A), and a 12/16/19V output port for laptops. The LED display indicates the battery level and output status.

Jump Starting Vehicles
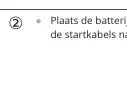
- Ensure the Jump Starter has at least 30% power and the vehicle battery is 12V. Remove the vehicle key from the ignition.
- Connect the jumper cables to the Jump Starter.
- Connect the red clamp to the positive (+) terminal and the black clamp to the negative (-) terminal of the vehicle battery. Ensure maximum contact.
- Turn on the jump starter, insert the vehicle key, and start the car.
- Once started, turn off the jump starter, disconnect the cables from the device, and then remove the clamps from the battery.
Charging Electronic Devices
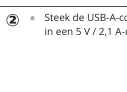
Cell Phones/Tablets: Connect the USB-A cable to the 5V/2.1A output on the Jump Starter and the other end to your device. Switch to ON and press the power button.
Laptops: Select the appropriate connector, plug the charging cable into the laptop output port on the Jump Starter, and connect to your laptop. Switch to ON and press the power button.
Charging the Jump Starter
You can charge the unit using the provided home charger (230V) or the car charger (cigarette lighter socket). Connect the DC connector to the 15V/1A input port. The indicator light will flicker while charging.

Flashlight Operation
Press and hold the power button for 3 seconds to turn on the flashlight. Press again to switch to SOS flashing mode, and press once more to turn it off.
Troubleshooting
If the device does not respond when pressing the button, the low voltage protection may be active; charge the unit. If the device shuts down while charging multiple electronics, the over-current protection is active; charge devices separately and keep the total output current within 3.5A.
Safety and Maintenance
Store the device in a dry, dust-free place away from direct sunlight. Recharge the battery every 3 months. Do not expose to extreme temperatures. The device is not waterproof. Do not disassemble or attempt to repair the unit yourself.
Practical help
Common problems
No response when pressing the push button
The low voltage protection is activated. Charge the unit using the home or car charger to deactivate the protection.
Jump Starter shuts down when charging multiple devices
The over-current protection is activated. Charge devices separately and ensure the total output current remains within 3.5A.
Before use
- Ensure the Jump Starter has at least 30% power.
- Verify the vehicle battery voltage is 12V.
- Remove the vehicle key from the ignition.
- Clean the battery terminals before connecting clamps.
- Ensure clamps are securely fastened to battery terminals.
Specs in practice
- Battery Capacity
- 18,000 mAh (Lithium-Ion) for multiple jump starts.
- Start Current
- 500A (<2s) for initial engine cranking.
- Peak Current
- 1000A for short-duration high-power bursts.
- Operating Temperature
- -20°C to +70°C; performance may degrade at low temperatures.
Images and diagrams
- The device includes a flashlight, SOS function, and a connection port for jumper cables.
- The LED display shows the battery percentage and voltage/current status of the charging ports.
Model compatibility
- Suitable for 12V gasoline engines up to 8.0L and diesel engines up to 6.0L.
- Not suitable for electric vehicles with built-in rechargeable batteries.

Manual page author
Michael Turner
Technical manual editor
Reviews PDF manuals for structure, safety notes, and practical product details so readers can find the right information quickly.