Lighting / Fixtures
Sunco 4" LED Retrofit Selectable Baffle Downlight
Quick guide for the Sunco 4" LED Retrofit Selectable Baffle Downlight. Includes installation steps, wiring instructions, color temperature selection, and troubleshooting tips.
Table of contents
Manual images
Click an image to enlargeQuick Guide
This guide provides essential information for installing and operating the Sunco 4" LED Retrofit Selectable Baffle Downlight. Always turn off the circuit breaker before beginning any installation work. This fixture is suitable for damp locations but should not be directly exposed to water. It is not compatible with 3rd party sensors, photo controls, occupancy sensors, or timing devices.
What's in the Box
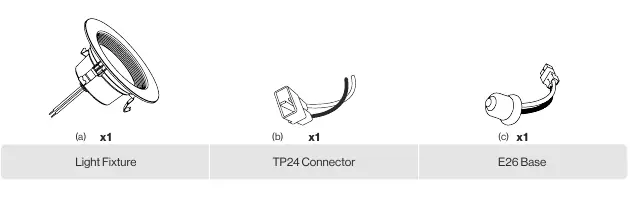
- 1x Light Fixture
- 1x TP24 Connector
- 1x E26 Base
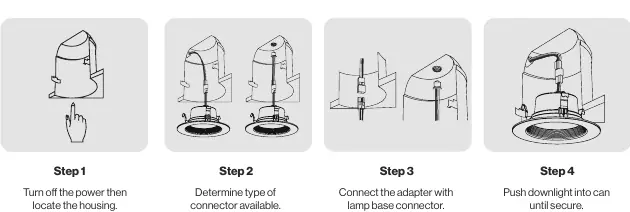
Installation
- Preparation: Turn off the circuit breaker. Locate the housing and remove the previous fixture. Allow the old fixture to cool if necessary.
- Connector Selection: Determine if your housing requires the TP24 Connector or the E26 Base.
- Wiring: Connect the appropriate adapter to the lamp base connector in the housing. Tuck all wires securely into the can. Ensure connections are tight.
- CCT Selection: Use the switch on the back of the retrofit to select one of five color temperatures (2700K, 3000K, 3500K, 4000K, 5000K). Turn off the light before finalizing installation.
- Finalizing: Line up the trim ring with the opening and push the downlight into the can until secure. The compression clips will hold it in place. Turn on the circuit breaker to test.
Specifications
- Voltage: 120V
- Wattage: 11W
- Frequency: 60Hz
- Beam Angle: 90°
- Lumens: 660 lm
- CRI: 90+
- Moisture Rating: Damp Rated
- Warranty: 7 Years
Troubleshooting
If you experience issues, check the following:
- Light not turning on: Ensure the fixture is properly connected and the circuit breaker has not tripped.
- Flickering: Check that wiring connections are secure, the circuit is not overloaded, and the dimmer switch is compatible.
- Buzzing: Ensure the light is connected to a surge protector if experiencing power outages, and check for interference from nearby electronic devices.
Practical help
Common problems
Light not turning on
Double check if the fixture is properly connected and the circuit breaker has not been tripped.
Light flickering
Check that wiring connections are secure, the circuit is not overloaded, and the dimmer switch is compatible.
Fixture buzzing
Verify the light is connected to a surge protector and check for interference from nearby appliances like televisions or radios.
Before use
- Turn off the circuit breaker before installation.
- Check for shipping damage before installing.
- Ensure the installation area is not directly exposed to water.
- Verify that the dimmer switch is compatible with the fixture.
- Ensure the fixture is properly grounded.
Specs in practice
- CCT (Color Temperature)
- Selectable between 2700K, 3000K, 3500K, 4000K, and 5000K using the switch on the back.
Images and diagrams
- The installation steps show the transition from removing the old fixture to connecting the adapter (TP24 or E26) and securing the unit with compression clips.
- The CCT switch is located on the back of the retrofit unit.
Model compatibility
- Not compatible with 3rd party sensors.
- Not compatible with photo controls.
- Not compatible with occupancy sensors.
- Not compatible with timing devices.

Manual page author
Emily Carter
User documentation editor
Prepares concise manual descriptions and highlights the most useful setup, operation, and maintenance information for readers.