Health / Personal Care
User Manual for Sunny 077GR Smart Upright Row-N-Ride Exerciser
Quick guide for the Sunny 077GR Smart Upright Row-N-Ride Exerciser. Includes assembly steps, adjustment instructions, meter functions, app connectivity, and maintenance tips.
Table of contents
Manual images
Click an image to enlargeImportant Safety Information
Before using the equipment, ensure you have read the entire manual. The maximum weight capacity is 330 lbs (150 kg). Always use the equipment on a solid, flat surface with a protective cover. Maintain at least 2 feet (60 cm) of free space around the unit. Ensure all nuts and bolts are securely tightened before each use. This equipment is for indoor, home use only.
Assembly Instructions
The assembly process involves 9 steps:
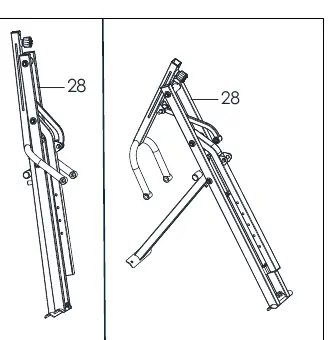
- Step 1: Open the Main Frame (No. 28).
- Step 2: Attach the Front Stabilizer (No. 36) and Rear Stabilizer (No. 38) to the Main Frame using the provided bolts, nuts, and washers.
- Step 3: Insert the Connecting Tube (No. 15) into the Seat Connecting Tube (No. 31) and secure with Bolt (No. 3) and Nut (No. 6).
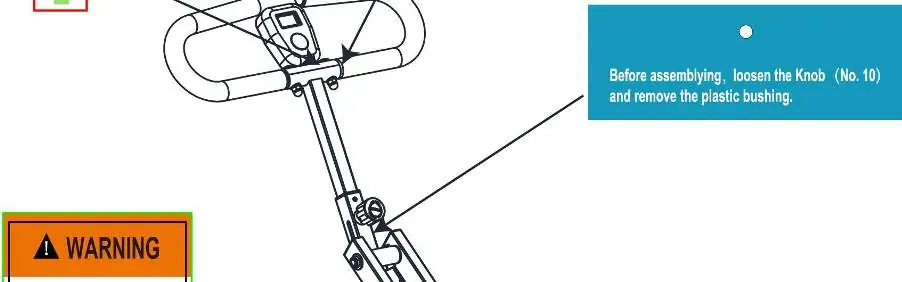
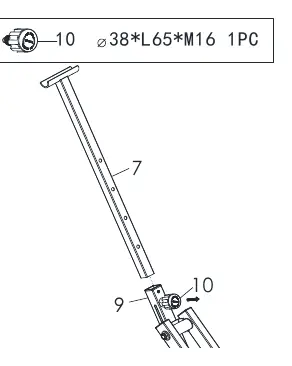
- Step 4: Insert the Handlebar Tube (No. 7) into the Pedal Connecting Tube (No. 9) and secure with the Knob (No. 10) at the desired height.
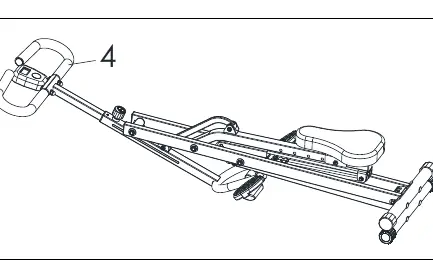
- Step 5: Attach the Handlebar (No. 4) to the Handlebar Tube (No. 7) using the preassembled hardware.
- Step 6: Insert the Meter (No. 41) onto the tab on the Handlebar (No. 4).
- Step 7: Attach the Fixed Iron Sheet (No. 19) to the Seat Connecting Tube (No. 31) and secure the Seat (No. 18) with the Knob (No. 21).
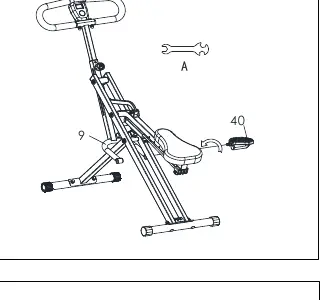
- Step 8: Attach the Left & Right Pedals (No. 13 & No. 40) to the Pedal Connecting Tube (No. 9) and tighten clockwise.
- Step 9: Connect the Resistance Bands (No. 42) to the hooks on the Main Frame (No. 28).
Adjustment Instructions

- Handlebar: Loosen Knob (No. 10) to raise or lower the Handlebar Tube (No. 7).
- Seat: Loosen Knob (No. 21) to move the Seat (No. 18) to the desired position.
- Seat Tube: Remove Pin (No. 29) to adjust the Seat Tube (No. 25) height. Do not extend past the MAX line.
- Exercise Band: Adjust difficulty by hooking Resistance Bands (No. 42) to either the Main Frame or the Seat Connecting Tube.
- Balance: Adjust the End Caps (No. 37) on the rear stabilizer if the bike is unbalanced.
Folding Instructions
- Adjust the Seat Tube (No. 25) to the lowest level using the Pin (No. 29). Ensure Resistance Bands are disconnected from the Main Frame.
- Adjust the Handlebar Tube (No. 7) to the lowest level using the Knob (No. 10).
- Hold the Handlebar (No. 4) and fold the product.
Battery Installation & Replacement
The meter requires 2 AA batteries. Press the buckle on the back of the Meter (No. 41) to remove the cover, install batteries observing polarity, and replace the cover. Always change both batteries at the same time.
Exercise Meter & App Connection
The meter tracks Time, Count (strokes), Calories, Total Count, and Pulse (requires compatible heart rate monitor). The Bluetooth icon flashes when the meter is active. To connect to the SunnyFit App, download the app, ensure Bluetooth is enabled on your mobile device, and follow the in-app instructions to search for and connect to your equipment. Hold the MODE key for 6 seconds to disconnect from the app and heart rate monitor.
Practical help
Common problems
Meter not connecting to App or Heart Rate Monitor
Hold the MODE key for 6 seconds to disconnect and reset. Ensure Bluetooth is enabled on your mobile device.
Bike feels unbalanced during use
Adjust the End Caps (No. 37) located on the rear stabilizer until the bike is level with the floor.
Resistance is too difficult or too easy
Unhook or hook the Resistance Bands (No. 42) to the hooks on the Main Frame or the Seat Connecting Tube to change the difficulty level.
Before use
- Ensure all nuts and bolts are securely tightened.
- Verify the Seat Tube is not extended past the 'MAX' line.
- Ensure the area has at least 2 feet (60 cm) of free space.
- Check that the floor surface is solid and flat.
- Verify batteries are installed in the meter.
Specs in practice
- Weight Capacity
- 330 lbs (150 kg)
- Connectivity
- Bluetooth LE
Images and diagrams
- Exploded Diagram: Shows all parts and their assembly positions for maintenance.
- Warning Labels: Indicates proper pin insertion and 'MAX' line limits for the Seat Tube.
Model compatibility
- Works with SunnyFit App.
- Wireless heart rate function works with SunnyFit Heart Rate Monitor HR200.

Manual page author
David Miller
Documentation analyst
Organizes user manual content into clear summaries, with attention to model details, product context, and everyday usability.