Garden / Garden Beds
Sunnydaze Decor Rope Hammock with 12-Foot Stand, Pad and Pillow
Quick guide for the Sunnydaze Decor Rope Hammock with 12-Foot Stand. Includes assembly steps, safe usage tips, cleaning instructions, and troubleshooting for stability.
Table of contents
Manual images
Click an image to enlargeImportant Information
Before using your hammock, please note the following critical safety and usage requirements:
- Weight Capacity: Never exceed 275 lbs (124.7 kg).
- Surface: Always use the stand on a smooth, level, and stable surface.
- Usage: This product is not a swing. Do not bounce, swing, or perform excessive movements.
- Supervision: Adult supervision is required for children.
- Storage: Store indoors when not in use to prevent damage from sun, rain, and moisture.
Assembly
Assemble components on a soft, clean surface to avoid scratching the finish.
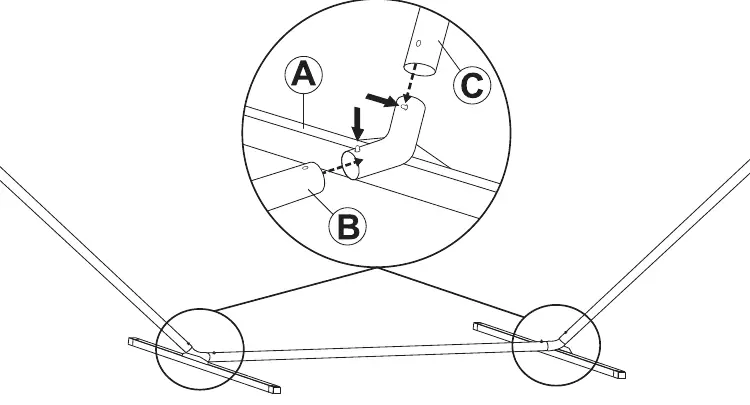
- Place the two Legs (A) on the ground, ensuring the elbow pipes are at a 120-degree angle.
- Align the hole on the Center Pole (B) with the spring button on Leg (A). Press the button down and slide the pole over it until it snaps into place. Repeat for the other leg.
- Align the hole on the Upright Pole (C) with the top spring button of the leg. Press the button down and slide the pole over it until it snaps into place. Repeat for the other upright pole.
Hanging Your Hammock
Once the stand is assembled:
- Hang the Hammock (D) on the stand using the pre-attached O-rings or chains.
- Adjust the chain length to tighten or loosen the hammock fit. Always leave some slack; if the hammock is too taut, it may become unstable.
- Tie the pad to the ropes in each corner and in the center of the hammock.
- Attach the pillow to your preferred end.
Safe Use
Getting in and out of the hammock requires care to prevent tipping:
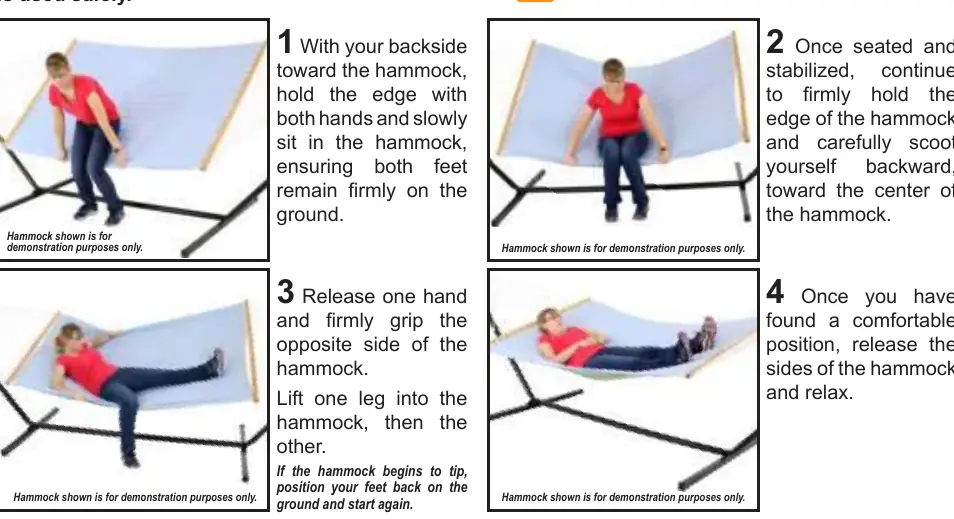
- Entering: With your backside toward the hammock, hold the edge with both hands and slowly sit, keeping both feet firmly on the ground.
- Positioning: Once seated, continue to hold the edge and carefully scoot backward toward the center.
- Relaxing: Once comfortable, release the sides.
- Exiting: Reverse the process, ensuring your feet are firmly on the ground before standing.
Cleaning and Care
- Hammock: Hand-wash ropes in a bathtub or kiddie pool using mild soap and a soft-bristled brush. Air-dry on a flat surface.
- Pad and Pillow: Spot clean only using a clean, damp cloth.
- Stand: Wipe down with a soft cloth and warm water.
- Maintenance: Inspect the stand before each use to ensure all connection points are secure. Check ropes, fabric, and spreader bars for wear.
Troubleshooting
If the stand seems unstable, ensure all components are assembled correctly and snap buttons are fully engaged. If the hammock hangs too low or too high, adjust the chain length. If you have further concerns, contact Sunnydaze Decor customer service at 833-982-1977 or via email at [email protected].
Practical help
Common problems
Stand seems unstable
Ensure all components are assembled correctly and snap buttons are fully engaged. Verify the stand is on a flat, level surface.
Hammock hangs too low or too high
Adjust the distance between the chains on the hammock and the hooks on the hammock stand.
Before use
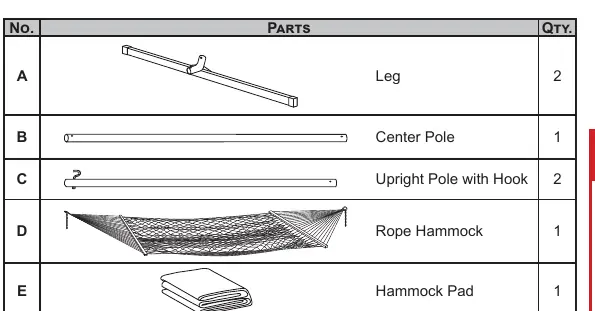
- Inspect all parts against the parts list before assembly.
- Ensure the assembly surface is smooth, clean, and level.
- Verify all snap buttons are fully engaged in the mounting holes.
- Check that the hammock is not used as a swing.
- Confirm the weight of the user does not exceed 275 lbs.
Specs in practice
- Weight Capacity
- 275 lbs (124.7 kg) - Do not exceed this limit to prevent injury or damage.
Images and diagrams
- Assembly diagram shows the connection of Leg (A), Center Pole (B), and Upright Pole (C) using spring buttons.
Model compatibility
- Designed for use on level, stable surfaces only.
- Not intended for use as a swing.

Manual page author
Michael Turner
Technical manual editor
Reviews PDF manuals for structure, safety notes, and practical product details so readers can find the right information quickly.