Home / Security
User Manual for Sygonix 10-Year Smoke Detector ZR150S
Quick guide for the Sygonix 10-Year Smoke Detector ZR150S. Includes installation instructions, battery replacement, testing procedures, and troubleshooting.
Table of contents
Manual images
Click an image to enlargeQuick Guide
The Sygonix 10-Year Smoke Detector (ZR150S) is designed for early smoke detection in private residential areas. It operates on the scattered light principle and features a 10-year battery life. Important: Test the device weekly. Do not install in kitchens, bathrooms, or areas with steam/vapour. If an alarm sounds, evacuate immediately and call the fire department.
Installation
Proper placement is critical for safety. Install detectors in every room for maximum protection, especially near bedrooms and along escape routes. Install at least one detector on each floor level.
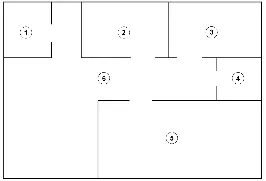
- Mounting: Use the mounting plate as a template to mark drill holes. Secure with screws and dowels. Do not use adhesive pads due to the weight of the device.
- Placement: Mount on the ceiling in the center of the room. Keep at least 50 cm away from sidewalls and 60 cm from corners.
- Avoid: Do not install near heaters, air conditioners, fluorescent lights (< 1.5 m), or in areas where temperatures fall below +5 °C or rise above +38 °C.
Operation
The device features a Test button with a red LED indicator.
- Normal Operation: The red LED flashes briefly every 40 seconds.
- Testing: Briefly press the 'Test' button. The device will emit two sets of three beeps, and the button will flash red.
- Standby Mode: If a false alarm occurs, you can silence the alarm for 9 minutes by pressing and holding the 'Test' button.
Battery Replacement
The device uses a CR123A battery. Replace the battery when the device indicates a low battery (1x red LED flash + 1x beep every 40 seconds).
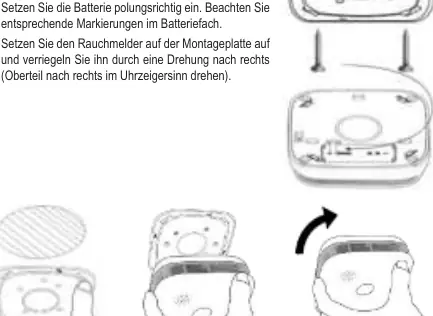
- Rotate the smoke detector counter-clockwise to detach it from the mounting plate.
- Remove the old battery and insert a new one, ensuring correct polarity.
- Reattach the detector to the mounting plate by rotating it clockwise until it locks.
- Perform a function test after replacement.
Troubleshooting
- Alarm immediately after switching on: Too much smoke. Remove battery and re-insert once the area is clear.
- No alarm during testing: Check battery polarity or replace the battery.
- Device error: If the LED flashes twice every 40 seconds and beeps twice, the internal circuit may be damaged. Replace the device.
Maintenance
The device is maintenance-free apart from battery changes. Clean the exterior with a soft, dry cloth. Remove dust annually using a soft brush or vacuum cleaner. Replace the entire unit after 8 years of operation.
Manufacturer information
Sygonix GmbH
Practical help
Common problems
Alarm sounds immediately after installation
There may be too much smoke in the area. Remove the battery and re-insert it once the smoke has cleared.
No alarm during testing
Check if the battery is inserted with the correct polarity. If the battery is low, replace it with a new one.
Device beeps twice every 40 seconds
This indicates an internal device error. The unit must be replaced.
False alarms
Avoid installing near kitchens, bathrooms, or areas with high dust/steam. Cigarette smoke blown directly into the sensor can also trigger an alarm.
Before use
- Ensure the battery is inserted with the correct polarity.
- Test the device by pressing the 'Test' button.
- Verify the mounting surface is dry and dust-free.
- Ensure the device is not installed near heaters, air conditioners, or fluorescent lights.
- Create an escape plan for your home.
Specs in practice
- Power supply
- 3V, CR123A battery.
- Alarm volume
- >= 85 dB at 3 meters.
- Battery life
- Approx. 10 years.
- Operating temperature
- -10 °C to 55 °C.
Images and diagrams
- The device features a 'Test' button with a red LED, a beeper opening, and a battery compartment.
- The mounting plate is used as a template for drilling holes.
Model compatibility
- Not suitable for kitchens, bathrooms, or areas with steam/vapour.
- Avoid installation near heaters, air conditioners, or fluorescent lights (< 1.5 m).

Manual page author
David Miller
Documentation analyst
Organizes user manual content into clear summaries, with attention to model details, product context, and everyday usability.