Electronics / Televisions
Sylvox 110-inch Cinema Pro TV User Manual
Quick guide for the Sylvox 110-inch Cinema Pro TV. Includes installation instructions, safety warnings, remote control setup, and troubleshooting tips.
Table of contents
Manual images
Click an image to enlargeImportant Information from the Manual
This manual provides essential instructions for the setup, operation, and maintenance of your Sylvox 110-inch TV. Due to the large size and weight of the screen, it is strongly advised that 6 people are involved in the installation process. Ensure the mounting surface is strong enough to support the weight of the screen.
Safety Instructions
- Do not install the TV on a ceiling or an inclined wall.
- Ensure the TV is installed in a well-ventilated area; do not enclose it in a sealed box or embed it in a wall.
- Do not expose the TV to direct sunlight, high temperatures, or high humidity.
- Disconnect the TV during extreme weather (storms, lightning) or long periods of inactivity.
- Use only the specified wall mounting screws and accessories.
- Do not place liquids or candles on the TV.
Installation
The installation requires teamwork. Follow these steps:
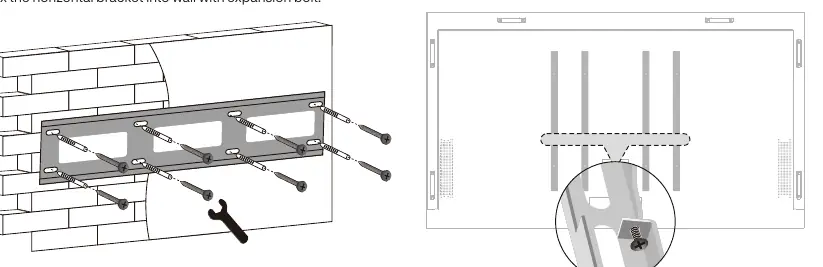

- Fix the horizontal mounting bracket to the wall using expansion bolts.
- Remove the four screws from the TV back bracket.
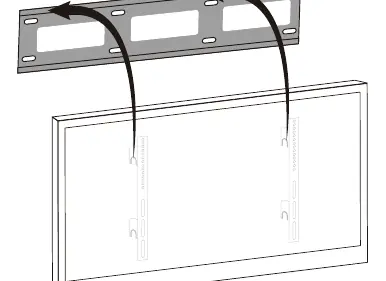
- With 6 people, carefully lift the TV. Two people support the lower and upper metal edges, while four people grip the handles on the sides.
- Mount the TV onto the wall bracket.
- Tighten the four screws on the TV back bracket to secure it.
Overview
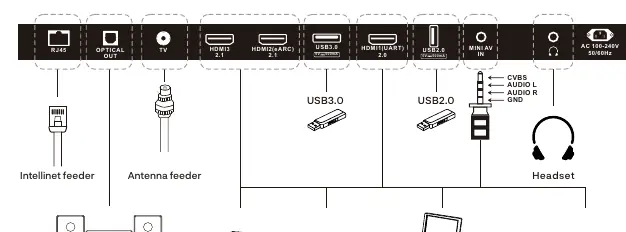
The TV features a remote control sensor and power indicator on the front. The connection ports are located on the back, accessible by removing the waterproof panel. Available ports include RJ45 (Ethernet), Optical Out, TV (Antenna), HDMI 1/2/3, USB 3.0/2.0, Mini AV, and Earphone Out.
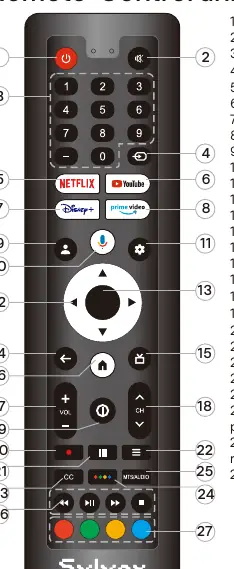
Remote Control
The remote control includes standard navigation, volume/channel controls, and dedicated buttons for Netflix, YouTube, Disney+, and Prime Video. It also features a Google Assistant button and color buttons for app-specific functions.
Initial Setup
Upon powering on, follow the on-screen wizard to pair the Bluetooth remote, select the system language, and connect to Wi-Fi. You can choose to set up as a Google TV (requires Google account) or a basic TV.
Troubleshooting
If you encounter issues:
- No power: Check the power cord connection and outlet. Unplug for 60 seconds and restart.
- No picture: Check antenna connections and tune to another station.
- No sound: Check volume levels, mute status, and sound settings.
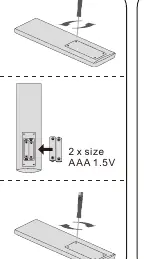
- Remote not responding: Replace batteries and ensure the remote is within 8 meters of the TV.
Warranty Policy
Sylvox offers a 12-month free warranty. For support, contact [email protected]. The warranty does not cover damage from improper use, unauthorized repairs, or external factors like lightning strikes.
Practical help
Common problems
No power
Check the power cord connection and outlet. Unplug for 60 seconds and restart the TV.
No picture
Check antenna connection and tune to another station. Adjust contrast and brightness settings.
Good picture but no sound
Increase volume, check mute status, and ensure external device volumes are not turned off.
No response to remote control
Replace batteries and ensure the remote is within 8 meters of the TV and the path is clear.
Before use
- Ensure 6 people are available for installation.
- Verify the mounting surface is strong enough to hold the TV weight.
- Check antenna connection.
- Pair the remote control with the TV.
- Ensure the TV is in a well-ventilated area.
Specs in practice
- Operating Temperature
- -22° to 122° F (-30° to 50°C)
Images and diagrams
- Remote control button layout and functions.
- Port layout for connecting external devices.
- Wall mounting bracket installation steps.
- Battery installation for the remote control.
Model compatibility
- Intended for outdoor and public use.
- VESA standard: 800 x 600 mm.
- Must use 8 wall-mounted screws for the 110-inch model.

Manual page author
Emily Carter
User documentation editor
Prepares concise manual descriptions and highlights the most useful setup, operation, and maintenance information for readers.