Hvac / Heat Pumps
User Guide for Taco 0034ePlus-F2 Circulator Pump
Quick guide for the Taco 0034ePlus-F2 high-efficiency circulator pump. Includes installation steps, operating modes, wiring instructions, troubleshooting error codes, and maintenance procedures.
Table of contents
Quick guide from the manual
The Taco 0034ePlus-F2 is a high-efficiency, wet-rotor circulator pump designed for hydronic heating, chilled water cooling, and domestic hot water systems. Before installation, ensure the system is filled with water or a maximum 50% water/glycol solution. The pump must be mounted with the motor in a horizontal position. Wiring requires a flexible conduit and connection to a properly grounded receptacle. The pump features five operating modes, which can be selected via the digital keypad.
Product description
The 0034ePlus is a variable speed circulator with an ECM permanent magnet motor and an advanced digital LED display. It is designed to replace single-speed and 3-speed circulators in its class, offering up to 85% power reduction compared to standard AC permanent split capacitor circulators. It includes features like the BIO Barrier to protect against contaminants and SureStart for automatic unblocking.
Installation
The circulator can be installed on either the supply or return side of the boiler, but it should always pump away from the expansion tank. Use the provided O-ring gaskets; do not use flat rubber gaskets. If installing at elevations over 5000 feet, a higher fill pressure of 20 psi minimum is required to prevent cavitation. Always add vibration dampeners to piping when mounting to wall or floor joists to reduce noise transmission.
Wiring
Disconnect AC power supply before wiring. Remove the terminal box cover and insert a wiring connector into the knockout hole. Use flexible conduit only. Connect the Line/Hot power to the L terminal, Neutral to the N terminal, and Ground to the G terminal. The green terminal plug can be removed to simplify wiring. Ensure the rubber cap plug is inserted to cover any unused knockout holes.
Operating modes
The pump features five operating modes, indicated by different LED colors:
- activeADAPT (Violet LED): Automatic, self-adjusting proportional pressure.
- Constant Pressure (Orange LED): Maintains constant pressure across 5 curve settings.
- Proportional Pressure (Green LED): Varies speed to maintain proportional pressure across 5 curve settings.
- Fixed Speed (Blue LED): Variable fixed speed settings from 1% to 100%.
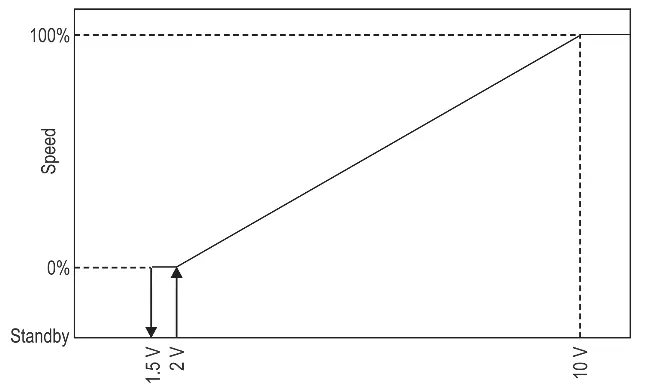
- 0-10V DC (Yellow LED): Analog external input or PWM pulse width modulation from a building control system.
To change modes, press the SET button for 2 seconds until the LED flashes, use the UP/DOWN buttons to select the mode, and press SET again to confirm.
Troubleshooting and maintenance
If the pump is noisy, check for insufficient suction pressure (cavitation) or foreign bodies in the impeller. If the pump is not running, verify power supply, check for tripped circuit breakers, or ensure the rotor is not blocked. A red LED indicates a locked or sticking rotor. To unlock, disconnect power, close isolating valves, remove the motor from the casing, and clean the impeller. If the pump still does not run, it may need replacement.
Practical help
Common problems
Pump is noisy
Check for insufficient suction pressure (cavitation) or foreign bodies in the impeller. Increase system suction pressure or disassemble the motor to clean the impeller.
Pump not running despite power
Verify power supply voltage, check for tripped circuit breakers, or check if the rotor is blocked. If blocked, perform the manual unlocking procedure.
Building does not get warm
The system may be air-bound. Vent the system and repeat fill and purge steps.
Red LED on display
Indicates a locked or sticking rotor. Attempt automatic release by cycling power, or perform the manual unlocking procedure.
Before use
- Ensure the system is filled with water or max 50% water/glycol solution.
- Verify the motor is mounted in a horizontal position.
- Check that the power supply matches the data on the nameplate.
- Ensure vibration dampeners are installed if mounting to wall or floor joists.
- Use flexible conduit for electrical connections.
- Flush the system of foreign matter before starting the circulator.
Specs in practice
- Maximum operating pressure
- 150 psi (10.3 bar). Do not exceed this pressure.
- Fluid temperature range
- 14°F (-10°C) to 230°F (110°C).
- Electrical specifications
- 115/208/230V, 50/60 Hz, single phase.
- Elevation limit
- Installations over 5000 feet require a minimum fill pressure of 20 psi.
Images and diagrams
- Piping diagrams show preferred locations for circulators on boiler supply and return lines.
- Wiring diagram illustrates the connection of Line, Neutral, and Ground to the terminal plug.
- Mounting diagrams show acceptable (horizontal) and unacceptable (vertical/upside down) motor orientations.
- Digital display diagrams explain how to navigate the technical menu and select operating modes.
Model compatibility
- Not for use in swimming pool or spa areas.
- Suitable for open loop potable water systems (Stainless Steel model only).
- Indoor use only.
- Do not use petroleum-based fluids or chemical additives as they void the warranty.

Manual page author
David Miller
Documentation analyst
Organizes user manual content into clear summaries, with attention to model details, product context, and everyday usability.