Plumbing / Bathroom Accessories
Installation Instructions for Taymor 02-D9688 Expandable Curved Shower Rod
Quick installation guide for the Taymor 02-D9688 Expandable Curved Shower Rod. Includes tools required, parts list, measurement reference guide, and step-by-step mounting instructions.
Table of contents
Manual images
Click an image to enlargeQuick guide from the manual
This document provides installation instructions for the Taymor 02-D9688 Expandable Curved Shower Rod. The rod is designed to expand up to 72 inches (182.8 cm) and provides extra shower space. Ensure your tub width does not exceed 72 inches before beginning installation.
Tools required
- Measuring tape
- Pencil
- 3/16 inch (5 mm) drill bit
- Drill
- Hammer
- Phillips screwdriver
Parts list
Ensure all components are present before starting:
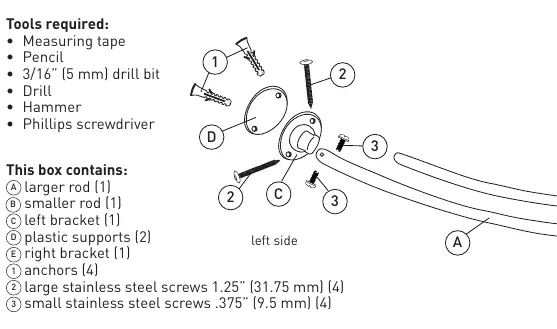
- Larger rod (A)
- Smaller rod (B)
- Left bracket (C)
- Right bracket (E)
- Plastic supports (2) (D)
- Anchors (4)
- Large stainless steel screws 1.25 inch (31.75 mm) (4)
- Small stainless steel screws .375 inch (9.5 mm) (4)
Measurements and reference guide
Before drilling, you must determine the correct distance from the front edge of the tub based on your tub's width. Measure 65 inches (165 cm) above the ledge of the tub on both sides to establish the height.
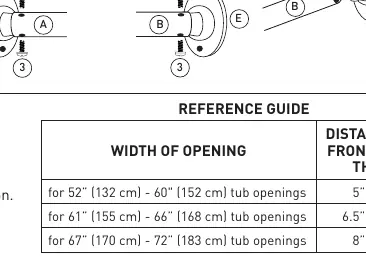
Reference Guide:
- For 52 inch - 60 inch tub openings: 5 inch (13 cm) distance from front edge.
- For 61 inch - 66 inch tub openings: 6.5 inch (16.5 cm) distance from front edge.
- For 67 inch - 72 inch tub openings: 8 inch (20 cm) distance from front edge.
Installation steps
- Measurements: Lay out components on a soft surface. Measure 65 inches (165 cm) above the tub ledge. Use the reference guide to mark the drilling position from the front edge of the tub.
- Position top anchors: Drill a hole into the wall or tile at the marked spot using a 3/16 inch (5 mm) drill bit. Gently tap the anchor into the hole until flush.
- Position bottom anchors: Align the top hole of the plastic support with the installed anchor. Mark the bottom hole through the support, ensuring it is straight. Drill the bottom hole and install the anchor.
- Install brackets: Place the bracket over the plastic support (ensure it points outwards). Secure using the large screws into the anchors. Repeat for both sides.
- Install rod: Insert the smaller rod (B) into the larger rod (A) with the smaller rod on the right. Position the rod over the brackets and secure using the small screws.
Safety precautions
- Do not allow children to climb, swing, or hang on the curtain or the rod.
- The rod is not designed to support a person pulling or leaning against it.
- Clean the rod by wiping with a damp cloth.
Customer service
For assistance, contact Taymor Customer Service:
West: 1-800-267-4774East: 1-800-387-7064Website: taymor.com
Official resources from the manual
Practical help
Common problems
Tub width exceeds 72 inches
The rod is not designed for openings wider than 72 inches (182.8 cm).
Rod is unstable or sagging
Ensure anchors are flush to the wall and all screws are tightened securely.
Before use
- Measure your tub width to determine the correct drilling distance.
- Ensure you have a 3/16 inch (5 mm) drill bit.
- Check that you have all parts: rods, brackets, supports, anchors, and screws.
- Lay out components on a soft surface to protect the finish.
Specs in practice
- Drill Bit Size
- 3/16 inch (5 mm).
Images and diagrams
- The reference guide table helps determine the distance from the front edge of the tub based on your specific tub opening width.
Model compatibility
- Designed for standard shower conditions.

Manual page author
Emily Carter
User documentation editor
Prepares concise manual descriptions and highlights the most useful setup, operation, and maintenance information for readers.