Plumbing / Toilets Urinals
User Manual for TOTO 0GU4292 Touchless Soap Dispenser
Quick guide and installation manual for the TOTO 0GU4292 Touchless Soap Dispenser. Includes setup, maintenance, troubleshooting, and specifications.
Table of contents
Manual images
Click an image to enlargeQuick guide from the manual
The TOTO 0GU4292 is a touchless soap dispenser designed for hygienic use. The system consists of a spout, a controller box, and a soap tank. Key installation requirements include maintaining specific distances between the dispenser and the faucet, and ensuring the controller is installed horizontally within the specified range. The system features an 'Installation Mode' to prime the soap lines, which is activated by holding a hand under the sensor for 8 seconds within the first 10 minutes of power-up.
Installation
Positioning: Ensure at least 4-3/4" (120 mm) of space between the dispenser and the faucet. The spout hole should be within 3-1/8" (80 mm) of the sink edge.

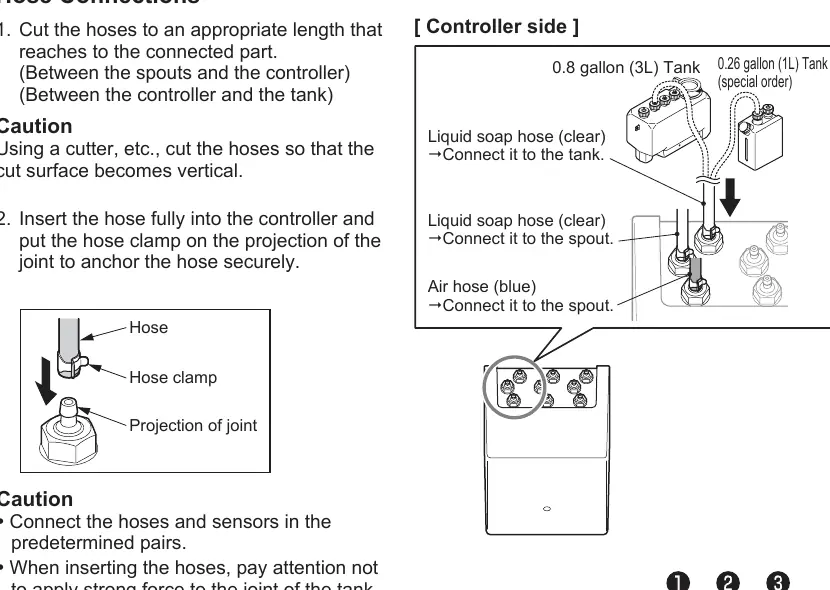
Spout: Insert the dispenser into the counter/sink hole and secure it with the provided washer and hex nut. Ensure cords and tubes are not crimped.
Controller: Mark screw positions for the anchoring plate. Install the controller horizontally on the wall. Do not use an electric screwdriver to tighten screws.
Tank: Anchor the tank to the floor or wall using the provided brackets. Ensure the tank is within 31-1/2" (800 mm) of the counter's upper face.
Hoses and Cords: Connect hoses and sensors in predetermined pairs. Ensure hoses are cut to the appropriate length and are not bent.
Operation
Place hands under the spout to dispense soap. The system dispenses a mousse-like soap for approximately 0.5 seconds. If hands remain in the detection range, it will dispense up to three times before requiring the hands to be moved away and back again.
Refilling the Tank
Refill the tank when the internal red sensor lamp starts blinking. Pour soap slowly through the built-in filter to avoid excessive bubbling. Ensure the cap is securely closed after refilling.
Maintenance
Nozzle: Clean the nozzle periodically if soap flow is obstructed. Use the provided hex key or Phillips screwdriver to remove the nozzle, then soak it in hot water and clean the filter and small holes with a soft brush or paper clip.
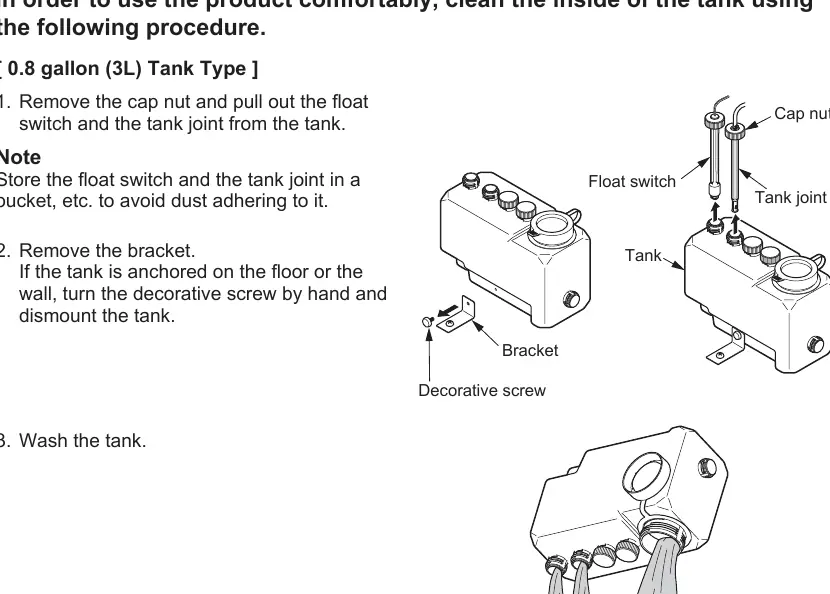
Inside the Tank: Periodically clean the inside of the tank. Remove the float switch and tank joint, wash the tank, and reassemble, ensuring all packings are correctly placed.
Troubleshooting
- No soap comes out: Check if soap is low, the sensor window is dirty, or if the tube/cable is disconnected.
- Soap won't stop running: Clean the sensor window.
- It doesn't dispense mousse: Check if the air tube is disconnected or if the soap viscosity is too high.
Practical help
Common problems
No soap comes out
Check if soap is low, the sensor window is dirty, or if the tube/cable is disconnected.
Soap won't stop running
Clean the sensor window.
It doesn't dispense mousse
Check if the air tube is disconnected or if the soap viscosity is too high.
Before use
- Ensure enough space for the IoT communication card (if applicable).
- Check for all parts listed in the manual.
- Ensure the installation surface is level.
- Verify the power supply is 120V AC.
- Ensure the tank is installed within the specified height range.
Specs in practice
- Sensor detection range
- 5-1/8" – 7-7/8" (130–200 mm), self-adjusting.
- Power supply
- 120V AC.
Images and diagrams
- Installation Completion Drawing shows the layout of the spout, controller, and tank connections.
- Nozzle maintenance diagrams show how to remove the screw and filter for cleaning.
Model compatibility
- Use only TOTO approved liquid soap.
- Do not use in humid locations like saunas or steam rooms.
- Do not use if room temperature drops below freezing.

Manual page author
Michael Turner
Technical manual editor
Reviews PDF manuals for structure, safety notes, and practical product details so readers can find the right information quickly.