Music / Vocal Effects
User Manual for TC Helicon VoiceTone C1 Pitch Correction Pedal
Quick start guide and user manual for the TC Helicon VoiceTone C1 pitch correction stompbox. Learn how to connect your microphone and instrument, adjust pitch correction settings, and use the pedal controls.
Table of contents
Quick Start Guide
The TC Helicon VoiceTone C1 is a 1-button stompbox designed for flexible pitch correction. This guide provides the necessary information to set up and operate the device effectively.
Device Controls
The VoiceTone C1 features several controls for adjusting your vocal sound:
- Key Selector: Selects a major key for pitch correction. The CH setting is either Chromatic (no instrument) or Chords (instrument connected).
- Mic Input Level Control: Adjusts the gain of the microphone input.
- Ground Lift: Press the button inward if you experience buzz or hum.
- Instrument Thru: Sends a copy of the instrument input signal to an amp or PA.
- Effect On/Off Footswitch: Toggles the pitch correction effect.
- Mic Control: Use with the optional MP-75 microphone (button in = on).
- Gender: Adjusts your vocal biology between male and female.
- Off/Hard: Adjusts the pitch correction attack from natural to robotic.
Setup and Connections
To set up your VoiceTone C1, follow these steps:
- Power: Connect the included 12 V / >= 400 mA power supply to the Power input.
- Microphone: Connect your microphone to the Mic input.
- Instrument: Connect your instrument to the Guide Instrument Input (optional, for chord-based pitch correction).
- Output: Connect the Out to a mixer or powered speaker.
- USB: Use the USB port for firmware updates using the included mini-USB cable.
Operation
The VoiceTone C1 provides real-time pitch correction. Use the Key Selector to set the desired key. If you are using an instrument, the CH setting allows the pedal to follow the chords you play. Use the Gender knob to shift the vocal character and the Off/Hard knob to determine how aggressively the pitch correction is applied, ranging from subtle natural correction to a hard-tuned robotic effect.
Safety Instructions
Please observe the following safety precautions:
- Do not expose the apparatus to rain or moisture.
- Do not remove the top cover; there are no user-serviceable parts inside.
- Refer all servicing to qualified personnel.
- Ensure the device is connected to a mains socket with a protective earthing connection.
- Do not install in confined spaces like bookcases.
- Keep away from heat sources such as radiators or amplifiers.
Practical help
Common problems
Buzz or hum in the audio signal.
Press the Ground Lift button inward to eliminate ground loop noise.
Signal is clipping (distorted).
Adjust the Mic Input Level Control until the Input Level LED is green; if it turns red, the signal is clipping.
Before use
- Ensure you have a 12V / >= 400 mA power supply.
- Connect your microphone to the Mic input.
- Connect your instrument to the Guide Instrument Input if using chord-based correction.
- Connect the output to a mixer or powered speaker.
- Check that the Key Selector is set to the correct key for your performance.
Specs in practice
- Key Selector
- Sets the major key for pitch correction; CH setting enables chord-based correction.
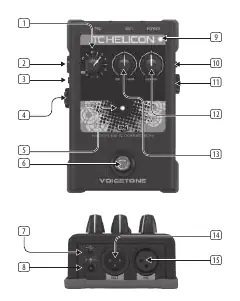
Images and diagrams
- The front panel contains the Key Selector, Mic Input Level, Effect LED, Footswitch, Input Level LED, Mic Control, Gender, and Off/Hard knobs.
- The rear panel contains the USB port, Power input, Instrument Thru, Guide Instrument Input, Out, and Mic input.
Model compatibility
- Compatible with the optional MP-75 microphone for Mic Control functionality.
- Requires a 12V DC power supply with at least 400 mA current.

Manual page author
David Miller
Documentation analyst
Organizes user manual content into clear summaries, with attention to model details, product context, and everyday usability.