Electronics / Security Cameras
User Manual for Tesla TTMY-09CHW Portable Air Conditioner
Quick guide for the Tesla TTMY-09CHW portable air conditioner. Includes installation, operation modes, water drainage, maintenance, and troubleshooting.
Table of contents
Manual images
Click an image to enlargeQuick guide from the manual
This portable air conditioner is designed for cooling and dehumidifying rooms. Before use, ensure the unit is placed on a flat, level surface with at least 18 inches (45cm) of clearance around it. Always transport the unit in a vertical position. If transported on its side, let it stand upright for 6 hours before plugging it in. Ensure the unit is connected to a properly grounded socket.
Description
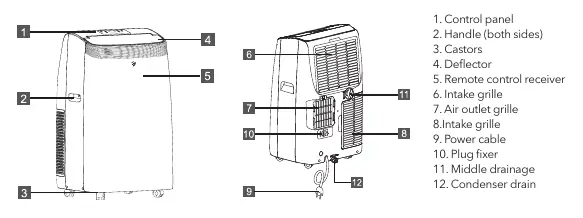
The unit features a control panel on top, handles on both sides, and castors for mobility. Key components include the intake and outlet grilles, a deflector, and drainage ports for water removal.
Installation
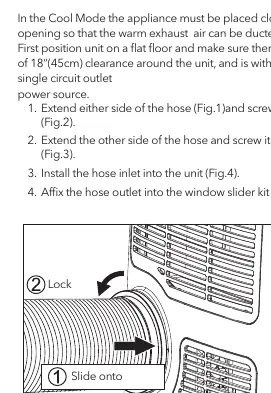
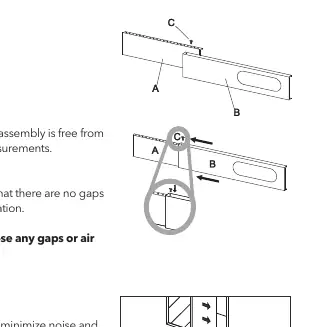
To exhaust hot air, the unit must be placed near a window. Extend the exhaust hose and attach the hose inlet and outlet. Connect the hose inlet to the unit and the hose outlet to the provided window slider kit. The window slider kit can be adjusted to fit most vertical and horizontal windows. Use the provided foam sealer to close any gaps.
Operation
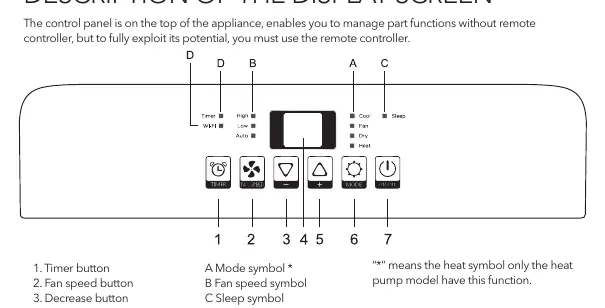
The unit offers several modes: Cool, Heat (on heat pump models), Fan, Dry, and Smart. Use the control panel or remote controller to select the mode, adjust temperature, and set fan speed (High, Low, Auto). The unit includes a timer function for delayed start or shutdown and a Sleep function for night-time operation.
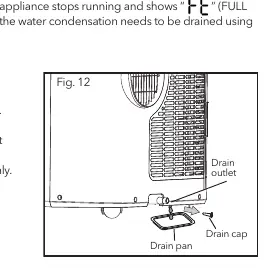
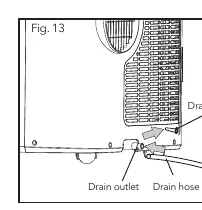
Water Drainage
When the internal tank is full, the unit will stop and display "Ft". You can drain water manually by placing a pan under the lower drain plug, or use the continuous drainage method by connecting a drain hose to the drain outlet. Ensure the drain hose is not higher than the drain outlet to allow proper water flow.
Cleaning and Maintenance
Clean the air filter every week of operation. Use a vacuum cleaner to remove dust or wash it in warm water (max 40°C) if very dirty. Clean the cabinet with a slightly damp cloth and dry it. Do not use harsh chemicals or water to wash the unit directly.
Troubleshooting
If the unit does not start, check the power supply and safety device. If it does not cool, ensure windows and doors are closed and there are no heat sources in the room. If an unpleasant smell is present, clean the air filter. For error codes like "PF" or "Ft", refer to the self-diagnosis section in the manual.
Practical help
Common problems
Appliance does not come on
Check if it is plugged in, if there is power, or if the internal safety device has tripped. Wait 30 minutes if the safety device tripped.
Appliance works for a short time only
Check for bends in the air exhaust hose or obstructions preventing air discharge.
Appliance does not cool the room
Close windows, doors, and curtains. Remove heat sources. Ensure the exhaust hose is attached.
Unpleasant smell during operation
Clean the air filter.
Before use
- Check the nameplate for the correct refrigerant gas type
- Ensure the unit is transported in a vertical position
- Allow at least 18 inches (45cm) of clearance around the unit
- Ensure the unit is placed on a firm, level surface
- Connect to a properly rated grounded socket
- Remove all accessories from the packaging
Specs in practice
- 18 inches (45cm) clearance
- Minimum space required around the unit to ensure efficient airflow and operation.
Images and diagrams
- Control panel layout showing buttons for Timer, Fan Speed, Mode, and Power.
- Window slider kit assembly showing how to connect panels and lock them in place.
- Water drainage methods showing manual, continuous, and middle drainage setups.
Model compatibility
- Requires a properly grounded electrical socket.
- Not suitable for installation in laundry rooms.
- Room size must be greater than 13m2 for safe operation with R290 refrigerant.

Manual page author
Michael Turner
Technical manual editor
Reviews PDF manuals for structure, safety notes, and practical product details so readers can find the right information quickly.