Automotive / Electric Vehicles
User manual for Tesla Smart Camera PIR Battery 11S
Quick guide for the Tesla Smart Camera PIR Battery 11S. Learn how to install, connect to Wi-Fi, configure the app, and troubleshoot common issues.
Table of contents
Manual images
Click an image to enlargeQuick Start Guide
To begin using your Tesla Smart Camera PIR Battery 11S, ensure you have a 2.4GHz Wi-Fi network available, as 5GHz networks are not supported. Download the Tesla Smart app from the App Store or Google Play, register an account, and follow the in-app instructions to add your device by scanning the QR code.
What's in the Box
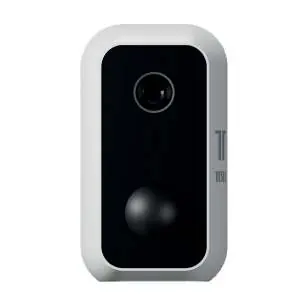
- Smart Camera PIR Battery
- Power adapter
- USB cable
- Screws (2 packages)
- Bracket (A)
- Bracket (B)
- User manual
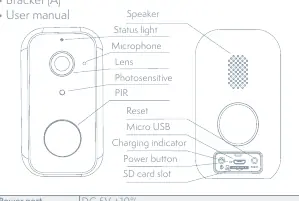
Device Overview
The camera features a status light, microphone, lens, photosensitive sensor, and PIR sensor on the front. The rear/bottom includes a power button, reset button, micro USB port, and SD card slot. The status light indicates the device state: solid red (turning on/malfunction), blinking red (awaiting/connecting to Wi-Fi), blinking blue (connecting), and solid blue (running correctly).
Installation
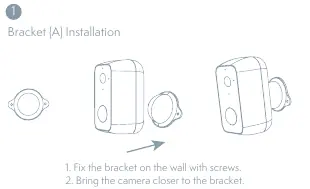
Bracket (A) Installation
- Fix the bracket on the wall using the provided screws.
- Bring the camera closer to the bracket to mount it.
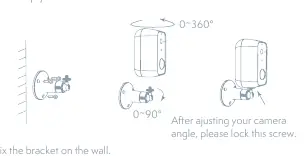
Bracket (B) Installation
- Fix the bracket on the wall.
- Install the camera into the bracket and lock it with the screw.
- Adjust the camera angle (0-360° horizontal, 0-90° vertical) and tighten the screw to secure the position.
Connection
Ensure your router, mobile phone, and camera are close to each other during the setup process. The camera supports 2.4GHz Wi-Fi only. SSID and password length should not exceed 24 characters. Scan the QR code displayed on your phone with the camera lens; you will hear a sound when the configuration is successful.
Troubleshooting
If the device cannot be previewed, check your network connection and move the camera closer to the router. If the device is still in the app list after a reset, you must remove it manually within the app. If the SD card is not recognized, ensure it is formatted as FAT32 and insert it after a power cut.
Technical Specifications
- Resolution: 1920 x 1080
- Power Supply: DC 5V, 1A, 9000mAh battery
- Battery Life: Up to 3 months
- Connectivity: Wi-Fi 2.4GHz IEEE 802.11b/g/n
- Storage: MicroSD card (max 128GB) or Cloud
- Dimensions: 57 x 62 x 100 mm
Practical help
Common problems
Device cannot be previewed
Check network status, move camera closer to the router, or reset the device and add it again.
Device still appears in app list after reset
Resetting only clears network configuration. You must manually remove/delete the device from the app.
SD card not recognized
Insert SD card after a power cut. Ensure it is formatted as FAT32 and is functioning correctly.
Not receiving notifications
Ensure the app is running, notification permissions are enabled in the app, and system-level SMS/notification permissions are granted on your phone.
Before use
- Ensure your Wi-Fi network is 2.4GHz (5GHz is not supported).
- Record your Wi-Fi SSID and password.
- Ensure SSID and password length do not exceed 24 characters.
- Download the Tesla Smart app.
- Charge the camera battery fully.
Specs in practice
- Battery Capacity
- 9000mAh (two 21700 lithium-ion batteries) providing up to 3 months of life.
Images and diagrams
- Power button: Press for 3 seconds to turn on/off.
- Reset button: Press and hold for 5 seconds to reset.
- Status light: Red/Blue indicators show power, connection, and operational status.
Model compatibility
- Supports 2.4GHz Wi-Fi networks only.
- Compatible with iOS and Android via Tesla Smart app.

Manual page author
David Miller
Documentation analyst
Organizes user manual content into clear summaries, with attention to model details, product context, and everyday usability.