Garden / Outdoor Furniture
Assembly Instructions for The Home Depot Outdoor Armchair
Quick assembly guide for The Home Depot outdoor armchair. Includes parts list, step-by-step assembly instructions, and important care tips for your furniture.
Quick answers from the manual
Quick answer
- This manual provides assembly instructions for The Home Depot outdoor armchair, including a parts list and step-by-step assembly diagrams. p. 1, 3
Key actions
- Assemble the chair frame p. 3
Problems and fixes
Screws are difficult to align
Keep screws loose until all are inserted, then tighten.
p. 2Maintenance and reset
- Protect cushions from extreme weather and direct sun. p. 2
Where to find it in the PDF
- Assembly Instructions p. 1
- Important Tips p. 2
- Parts and Assembly p. 3
Table of contents
Manual images
Click an image to enlargeImportant Assembly Information
Before beginning the assembly, please review the following guidelines to ensure a successful setup:
- Do not tighten screws fully until all screws and holes have been connected successfully.
- Thread the screws slightly first, leaving them loose until all screws are in place, then tighten them all.
- Do not discard the packing boxes until all parts are assembled successfully.
- If the glass is broken during shipping, do not touch it with bare hands.
Parts List
Ensure all components are present before starting:

- A: Side Frame (1PC)
- B: Side Frame (1PC)
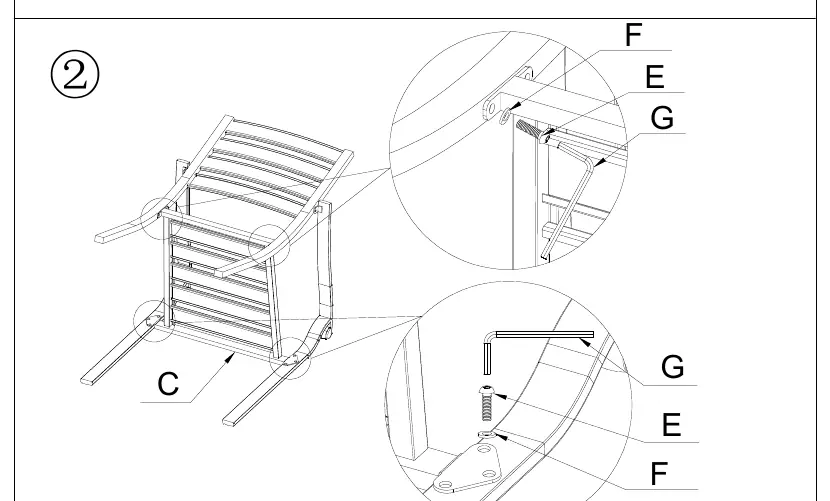
- C: Seat (1PC)
- D: Backrest (1PC)
- E: M6 x 15 Screws (12PC)
- F: M6 Washers (12PC)
- G: Allen Key (1PC)
Assembly Instructions
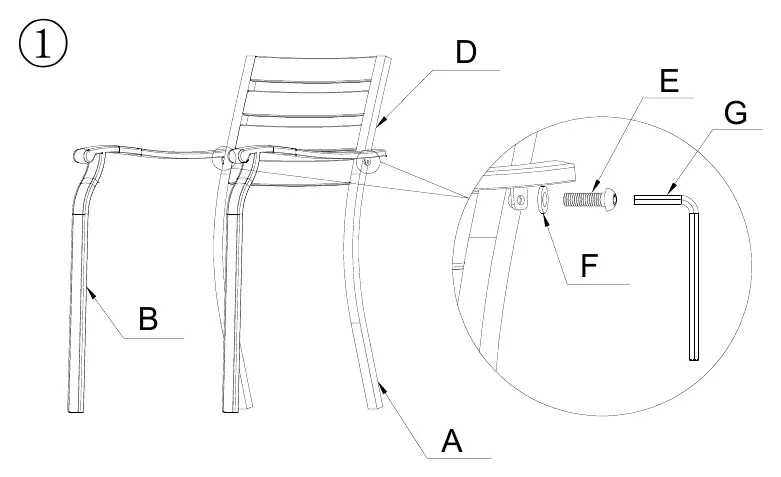
Step 1
Attach the side frames (A and B) to the backrest (D). Align the holes and secure them using the M6 x 15 screws (E) and M6 washers (F). Use the provided Allen key (G) to tighten the screws partially.
Step 2
Attach the seat (C) to the assembled frame. Align the holes and secure them using the remaining M6 x 15 screws (E) and M6 washers (F). Once all screws are in place, fully tighten all screws on the chair.
Care and Maintenance
To maintain the condition of your outdoor furniture:
- Do not expose cushions (if included) to direct, burning sun for long periods.
- Cover the furniture set or store cushions indoors during rainy or snowy weather.
Manufacturer information
The Home Depot
Practical help
Common problems
Screws do not align or fit
Do not tighten screws fully until all screws and holes are connected. Keep them loose during the initial assembly.
Wobbly chair after assembly
Ensure all screws were threaded slightly first, then tighten them all only after the entire chair is assembled.
Before use
- Verify all parts (A-G) are present according to the parts list.
- Keep packing boxes until assembly is complete.
- Ensure you have the provided Allen key (G).
Images and diagrams
- Step 1: Shows the connection of side frames to the backrest.
- Step 2: Shows the connection of the seat to the frame.
Model compatibility
- Cushions should be stored indoors during rainy or snowy weather.

Manual page author
David Miller
Documentation analyst
Organizes user manual content into clear summaries, with attention to model details, product context, and everyday usability.