Garden / Outdoor Furniture
Patio Furniture Swivel Chair and Side Table Assembly Guide
Assembly instructions for the Patio Furniture Swivel Chair and Side Table. Includes parts lists, step-by-step assembly guides, safety precautions, and warranty information.
Quick answers from the manual
Quick answer
- This manual provides assembly instructions for the Patio Furniture Swivel Chair and the Patio Side Table, including parts lists, safety precautions, and warranty details. p. 1, 10
Key actions
- Assemble the Swivel Chair p. 6, 7, 8
- Assemble the Side Table p. 11, 12
Maintenance and reset
- Check all bolts for tightness before use and periodically check and tighten bolts as necessary. p. 3
Where to find it in the PDF
- Swivel Chair Assembly p. 6, 7, 8
- Side Table Assembly p. 11, 12
Table of contents
Manual images
Click an image to enlargeImportant Information
Before beginning assembly, please read and understand the entire manual. Ensure you have a large assembly area and a solid surface to work on. Due to the weight of the furniture, four or more people are required for the assembly of the swivel chair. Always wear protective gloves to avoid injury from sharp edges. Check all bolts for tightness before use and periodically check and tighten them as necessary.
Patio Furniture Swivel Chair Assembly
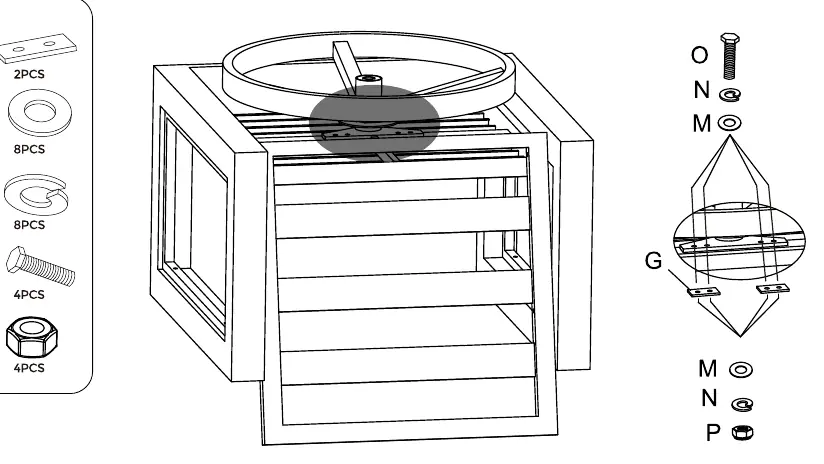
Parts List: Back, Seat, Left Arm, Right Arm, TR, Holder, Sheet, M6 Washer, M6 Wrench, Spanner, Bolt M6x35, Bolt M6x55, M8 Washer, Spring Washer, Bolt M8x50, Nut, Back Cushion, Seat Cushion.
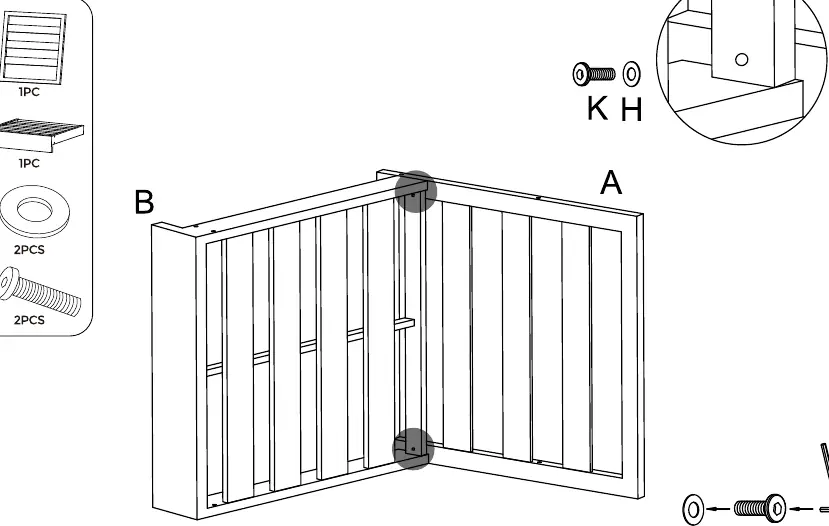

- Step 1: Attach the Back (A) to the Seat (B) using Bolts (K) and Washers (H).
- Step 2: Attach the Right Arm (D) to the assembly using Bolts (K, L) and Washers (H).
- Step 3: Attach the Left Arm (C) to the assembly using Bolts (K, L) and Washers (H).
- Step 4: Insert the TR (E) into the Holder (F).
- Step 5: Secure the Holder assembly to the chair base using Sheets (G), Washers (M), Spring Washers (N), Bolts (O), and Nuts (P).
- Step 6: Place the Back Cushion (Q) and Seat Cushion (R) onto the chair.
Patio Side Table Assembly
Parts List: Upper, Leg, Lower, Washer, Bolt M6x35, Wrench.
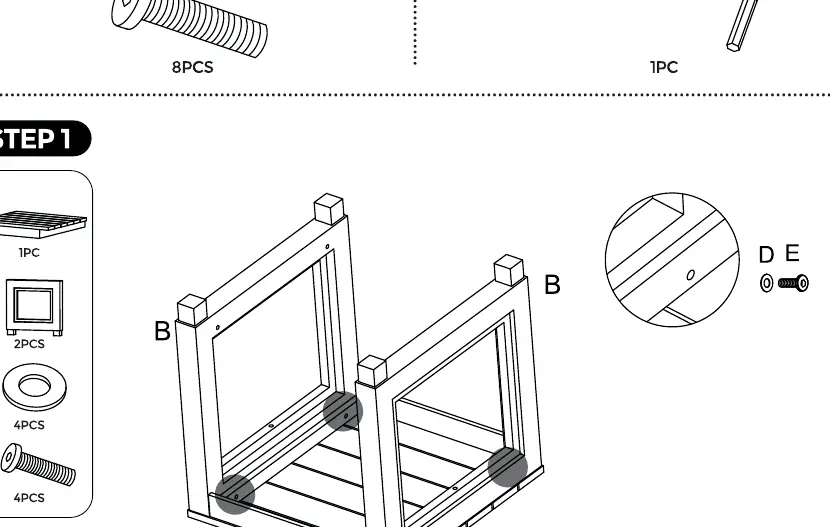

- Step 1: Attach the Legs (B) to the Upper (A) using Bolts (E) and Washers (D).
- Step 2: Attach the Lower (C) to the legs using Bolts (E) and Washers (D).
Warranty Information
The free warranty period lasts one year from the date of receipt. If components are damaged due to non-human-induced reasons, they will be replaced free of charge. After the warranty period expires, replacement components are available at cost price. Please gather photos of damaged parts and your order number before contacting support.
Manufacturer information
The Home Depot
Practical help
Common problems
Missing parts
Compare the parts in the box with the parts list provided in the manual.
Damaged parts
Gather photos of the damaged parts and your order number before contacting customer support.
Difficulty moving or assembling
The furniture is heavy; four or more people are required for the swivel chair assembly.
Before use
- Verify all parts against the parts list
- Wear protective gloves during assembly
- Ensure assembly is performed on a solid surface
- Check all bolts for tightness before use
- Periodically check and tighten bolts as necessary
Images and diagrams
- The manual includes exploded views of parts (Accessories Display) for both the chair and table.
- Assembly steps use callouts to show specific bolt and washer placement.
- A QR code is provided on page 2 for an installation video.
Model compatibility
- The swivel chair requires 4+ people for assembly.
- The furniture is designed for outdoor use but should be cleared of heavy snow or rain to prevent damage.

Manual page author
Emily Carter
User documentation editor
Prepares concise manual descriptions and highlights the most useful setup, operation, and maintenance information for readers.