Furniture / Storage Cabinets
Installation Guide for The Home Depot 115-VOLT Window Air Conditioner
A comprehensive installation guide for The Home Depot 115-VOLT window air conditioner, covering window requirements, assembly, panel installation, and securing the unit.
Table of contents
Manual images
Jump to the sectionQuick guide from the manual
This document provides essential installation instructions for The Home Depot 115-VOLT window air conditioner. Proper installation is critical for safety and performance. Key requirements include a standard double-hung window with an opening width of 23 to 36 inches. It is highly recommended that two people perform the installation to ensure safety and prevent damage to the unit.
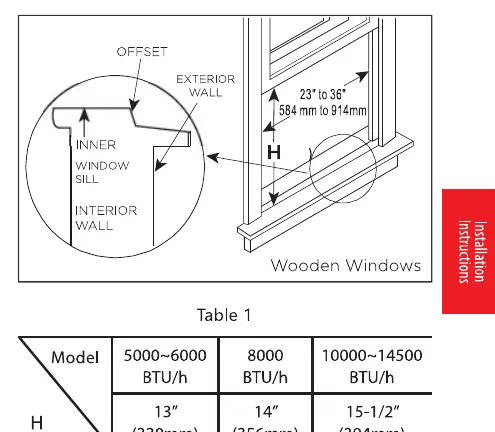
Window Requirements
The unit is designed for standard double-hung windows. Ensure the lower sash can open sufficiently to provide a clear vertical opening. The rear of the unit must be outdoors to allow for proper heat removal and condensate drainage.
Preparation and Assembly
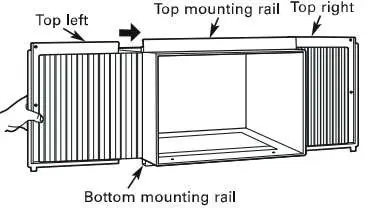
Before installing the unit in the window, prepare the air conditioner by attaching the top rail. Align the holes in the top rail with those on the top of the unit and secure it firmly using the provided 3/8-inch screws. Ensure all four screws are securely fastened for safety.
Installing Accordion Panels
Slide the accordion panels into the side rails of the cabinet. Ensure the panels are securely seated within the frame channels. These panels are offset to provide the necessary 5/16-inch pitch to the rear of the unit, which is vital for proper condensate management.
Installing the Air Conditioner
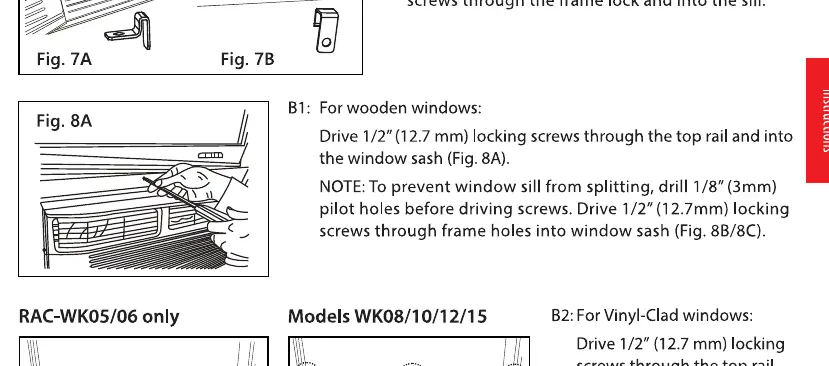
Place the unit into the window opening, ensuring the bottom of the frame rests against the window sill. The unit must be tilted back slightly (about 3 to 4 degrees downward to the outside) to prevent condensate from leaking inside. Extend the side panels against the window frame and secure the unit using the provided frame locks and screws. For wooden windows, use the appropriate locking screws through the top rail and frame locks into the sill.
Removing the Unit
To remove the air conditioner, turn it off and disconnect the power cord. Remove the sash seal, unscrew the sash lock, and remove the screws installed through the top rail and side panel frames. Carefully slide the accordion panels closed and lift the unit from the window, being cautious not to spill any accumulated condensate.
Manufacturer information
The Home Depot
Practical help
Common problems
Condensate leaking inside the room
Ensure the unit is tilted back 3 to 4 degrees toward the outside to allow proper drainage through the overflow hole.
Window sill splitting during screw installation
Drill 1/8-inch pilot holes before driving the locking screws into the window sash.
Unit does not fit in the window
Verify the window opening width is between 23 and 36 inches and that the window type is a standard double-hung window.
Before use
- Ensure two people are available for installation.
- Verify window opening width is 23-36 inches.
- Check that all required hardware (screws, panels, seals) is present.
- Ensure a Phillips screwdriver, level, and tape measure are available.
- Confirm the rear of the unit will be outdoors, not in a garage or enclosed space.
Specs in practice
- Window Opening Width
- Must be between 23 and 36 inches (584mm to 914mm) for proper fit.
- Weather Stripping
- Used on 8-15K models to minimize air leaks between the unit and the window frame.
Images and diagrams
- Fig. 5 illustrates the required backward tilt of the unit for proper drainage.
- Fig. 8A-8C show the correct placement of locking screws for different window types.
- Fig. 11 demonstrates the application of weather stripping to seal gaps.
Model compatibility
- Weather stripping is only for WK08/10/12/15 models.
- Top rail assembly is required for models with a capacity of less than 10000 BTU/h.
- Installation procedures vary slightly between wooden windows and vinyl-clad windows.

Manual page author
Michael Turner
Technical manual editor
Reviews PDF manuals for structure, safety notes, and practical product details so readers can find the right information quickly.