General / Other Manuals
Operation Manual for Titan PowrCoat Airless Sprayer
Comprehensive operation and maintenance guide for the Titan PowrCoat series air-powered airless sprayers. Includes setup, safety procedures, cleaning, and troubleshooting for models 05331045C, 05331064C, and 05331072C.
Table of contents
Manual images
Jump to the sectionQuick guide from the manual
The Titan PowrCoat series are air-powered airless sprayers designed for high-pressure coating applications. Safety is paramount: Airless units develop extremely high spraying pressures that can cause severe injection injuries. Never point the gun at yourself or others, and always use the trigger lock when not spraying. Ensure the unit is properly grounded before operation to prevent static discharge and potential fire or explosion.
Setup
- Connect the siphon hose to the fluid section and the bleed hose to the bleed valve. Ensure connections are wrench-tight.
- Attach a minimum of 50 feet of 3/8-inch nylon airless spray hose to the material outlet fitting.
- Fill the oil cup 1/2 full with Piston Lube to extend packing life.
- Verify the air compressor meets the power requirements specified in the technical data section.
- Ensure the unit is properly grounded using the provided grounding cable.
Operation
Preparing a new sprayer: New units are shipped with test fluid. Flush the system with a compatible cleaning agent before use.
Spraying:
- Place the siphon hose into the paint container.
- Close the shutoff valve and turn on the air compressor.
- Turn the air regulator to the lowest pressure setting.
- Open the bleed valve and the shutoff valve.
- Increase air pressure until the sprayer cycles evenly and material flows freely from the bleed hose.
- Close the bleed valve and increase pressure to the desired level for atomization.
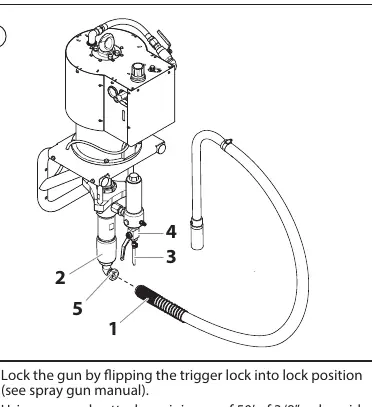
Pressure Relief Procedure: Always perform this procedure before shutting down, servicing, or cleaning the unit:
- Lock the spray gun trigger.
- Close the shutoff valve.
- Slowly open the bleed valve to relieve system pressure.
- Hold the metal part of the gun against a metal waste container and trigger the gun to release remaining pressure in the hose.
- Lock the gun trigger.
Cleaning and Maintenance
Daily Maintenance:


- Lubricate the upper packings with Piston Lube. Do not overfill.
- Clean the inlet screen daily to prevent clogging.
Cleaning the Air Filter: Check the air filter after every use. Remove the front shroud, unthread the filter housing, and clean the filter with warm, soapy water if dirty.
Filter Assembly Maintenance: Regularly clean the high-pressure filter to prevent poor spray patterns. Soak the filter element in solvent to loosen hardened paint.
Troubleshooting
If the sprayer is not performing correctly, check the following:
- Spitting gun: Check for air leaks in the system, clean the gun, or adjust the needle assembly.
- Gun will not shut off: Replace worn needle and seat or adjust the needle assembly.
- Motor stops: Check for loose piston rod connections, broken trip springs, or lack of lubrication in the air motor.
- Pump delivers on upstroke only: Clean the foot valve, thin the material, or check for air leaks on the siphon side.
Practical help
Common problems
Spitting gun
Inspect connections for air leaks, disassemble and clean the gun, or adjust/replace the needle assembly.
Gun will not shut off
Replace worn or broken needle and seat, or adjust the needle assembly.
Motor stops at top or bottom of stroke
Tighten piston rod connection, inspect trip springs, or check Air-Care fluid level in the automatic lubricator.
Pump delivers on upstroke only
Clean foot valve assembly, thin material, or tighten connections on the siphon side.
Pump moves up and down fast but does not deliver material
Refill material container, remove siphon hose and prime the pump, or straighten/tighten the siphon hose.
Before use
- Ensure the unit is properly grounded.
- Check all connections for leaks.
- Fill the oil cup 1/2 full with Piston Lube.
- Verify the air compressor meets the power requirements.
- Lock the spray gun trigger.
- Inspect the high-pressure hose for cuts, leaks, or abrasion.
Specs in practice
- Pressure Ratio
- The ratio of air pressure input to fluid pressure output (e.g., 45:1 means 100 PSI air input results in 4500 PSI fluid output).
- Max. operating pressure
- The maximum fluid pressure the sprayer can safely produce.
- Max. air inlet pressure
- The maximum air pressure allowed from the compressor to the air motor.
- Max. viscosity
- The maximum thickness of material the pump can handle (50,000 mPa·s).
Images and diagrams
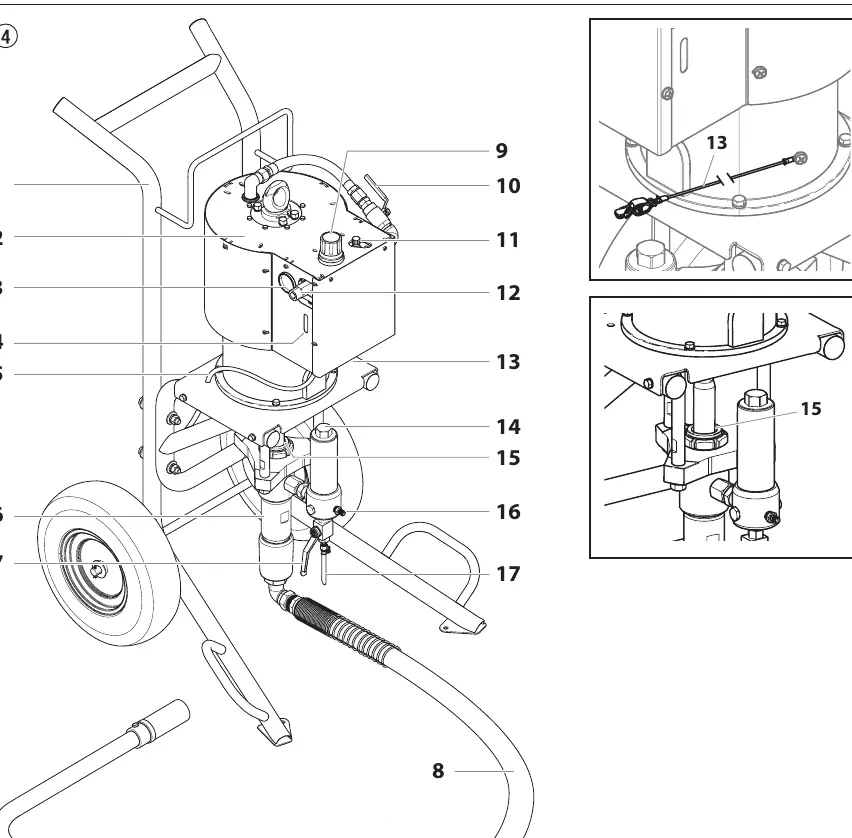
- 1: Cart assembly
- 3: Air pressure gauge
- 4: Air filter / moisture separator
- 6: Fluid pump
- 9: Air regulator
Model compatibility
- Use only original Titan high-pressure hoses.
- Do not use paint or solvent containing halogenated hydrocarbons (e.g., chlorine, bleach, methylene chloride) as they are incompatible with aluminum.
- Use only manufacturer-authorized parts.

Manual page author
Michael Turner
Technical manual editor
Reviews PDF manuals for structure, safety notes, and practical product details so readers can find the right information quickly.