General / Service Manuals
TRIO Polus Lampas Trio Salmon 100cm Instruction Manual
Comprehensive installation and safety guide for the TRIO Polus 100cm outdoor lighting fixture, including wiring instructions and mounting specifications.
Table of contents
Product Overview
The TRIO Polus 100cm is a high-quality outdoor lighting fixture designed for durability and efficient illumination. This product is engineered to withstand outdoor conditions, featuring an IP44 rating which ensures protection against splashing water. It is an ideal solution for pathways, gardens, or entrance areas, providing both aesthetic appeal and functional lighting.
Safety Instructions
Before beginning any installation work, it is critical to read the safety instructions provided in the manual. Ensure that the power supply is completely disconnected before starting the installation to prevent electrical shock. The installation should be performed by a qualified professional or a person with sufficient knowledge of electrical systems. Always verify that the local voltage matches the requirements of the lamp (230V~50Hz).
Installation Process
The installation process involves securing the base of the lamp to a stable surface. The manual provides clear diagrams for mounting the fixture using the included hardware. Once the base is secured, the electrical connection must be made. The lamp uses a connector box system. Ensure that the wires are correctly inserted into the terminals: Neutral (N), Earth (Ground), and Live (L). Double-check that all connections are tight and that no loose wires are exposed. The design allows for a clean, professional finish once the housing is attached to the base.
Technical Specifications and Maintenance
The TRIO Polus 100cm operates on a 230V~50Hz power supply and utilizes a 11W LED light source. The product contains a light source of energy efficiency class F. Maintenance is minimal; however, it is recommended to periodically clean the exterior of the lamp with a soft, damp cloth to remove dirt and debris. Do not use abrasive cleaners or chemicals that could damage the finish. If the light fails to turn on, check the power supply and the integrity of the electrical connections. If the issue persists, consult a professional electrician. Do not attempt to modify the internal components of the lamp, as this will void the warranty and may pose a safety risk.
Disposal
When the product reaches the end of its service life, it should be disposed of in accordance with local environmental regulations. Do not discard the fixture with regular household waste. Many components are recyclable, and proper disposal helps protect the environment.
Practical help
Common problems
Light does not turn on
Check the power supply, ensure the circuit breaker is on, and verify that all electrical connections in the connector box are secure.
Before use
- Read all safety instructions carefully
- Ensure power supply is disconnected
- Verify local voltage matches 230V~50Hz
- Check that all mounting hardware is present
- Ensure the installation surface is stable
Specs in practice
- Energy Class F
- The energy efficiency rating of the included light source.
Images and diagrams
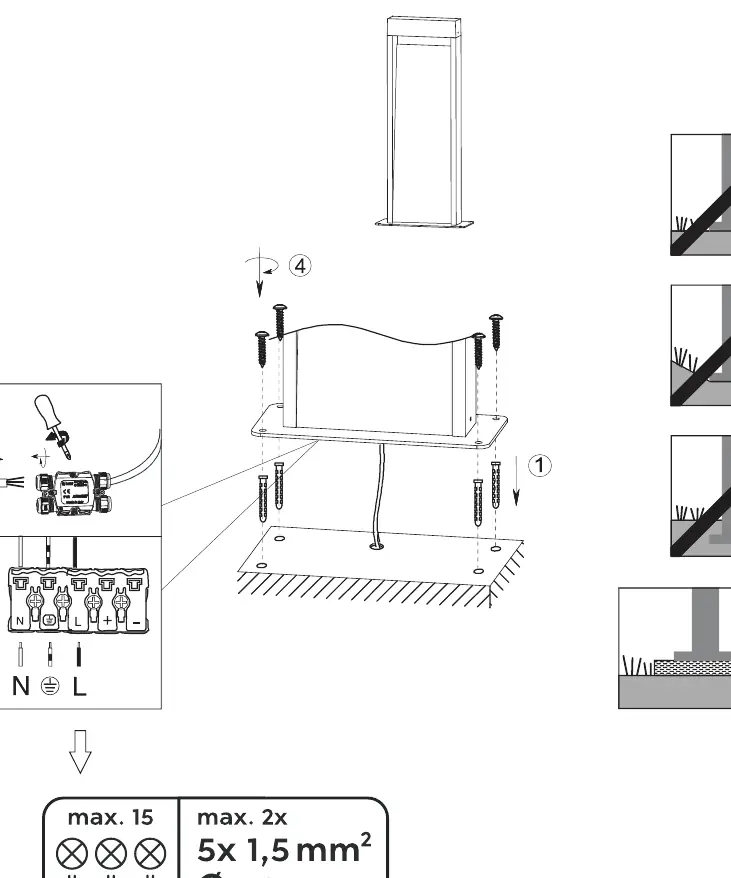
- Step 1: Secure the base plate to the ground using the provided screws and anchors.
- Step 2: Prepare the electrical cable for connection.
- Step 3: Connect the wires to the terminal block (N, Earth, L).
- Step 4: Attach the lamp housing to the base plate.
Model compatibility
- Suitable for outdoor use due to IP44 rating.
- Requires a 5x 1.5mm² cable for installation.

Manual page author
Emily Carter
User documentation editor
Prepares concise manual descriptions and highlights the most useful setup, operation, and maintenance information for readers.