Electronics / Remote Controls
Installation Manual for Unbranded 16GS-29257 LED Recessed Light Kit
Learn how to install the Unbranded 16GS-29257 ultra-slim LED recessed light kit. This guide covers hole cut sizes, wiring instructions, and safety requirements for a successful installation.
Table of contents
Important Installation Information
This guide provides instructions for the installation of the Unbranded 16GS-29257 LED recessed light kit. Before beginning, ensure that the supply voltage corresponds to the rated product voltage of 120V 60Hz. The product must be installed by a qualified electrician in accordance with the National Electrical Code and local codes.
Hole Cut Sizes:
- 4" Round: 108mm
- 4" Square: 108mm x 108mm
- 6" Round: 157mm
- 6" Square: 157mm x 157mm
- 8" Round: 187mm
- 8" Square: 187mm x 187mm
Installation Steps
- Disconnect Power: Ensure the fixture is disconnected from the J-Box before starting. Open the J-Box.
- Wiring: Connect the wires as shown in the diagram using wire nuts to ensure a proper connection. Close the J-Box once finished.
- J-Box Placement: Insert the J-Box into the cut hole, leaving the connection cable outside. Connect the fixture to the J-Box by inserting the cable and securing it with a cap.
- Fixture Installation: Push the spring-loaded clips upwards and insert the fixture base into the mounting hole. Release the clips to pull the fixture into place against the ceiling.
- Finalize: Once assembly is complete, turn the power on to ensure the fixture is operating properly.
Safety Warnings
Risk of Personal Injury: Read all instructions carefully and observe all warnings. Always wear necessary safety equipment when opening, handling, installing, and maintaining this product.
Risk of Electrical Shock: This product must be installed by a professional familiar with the construction and operation of the product.
Risk of Fire: Consult with a qualified electrician to ensure the correct branch circuit conductor is utilized. The minimum conductor rating requirement is 90°C (194°F) to be code compliant.
Practical help
Common problems
Fixture does not fit in the ceiling hole
Verify that the hole cut size matches the specific fixture model (4", 6", or 8" round/square).
Electrical hazard during installation
Ensure the supply voltage is 120V 60Hz and that the installation is performed by a qualified electrician.
Before use
- Verify supply voltage is 120V 60Hz.
- Ensure power is disconnected from the J-Box.
- Check that the conductor rating is at least 90°C (194°F).
- Confirm the hole cut size matches the fixture dimensions.
- Ensure all necessary safety equipment is worn.
Specs in practice
- Conductor Rating
- Minimum 90°C (194°F) required for code compliance.
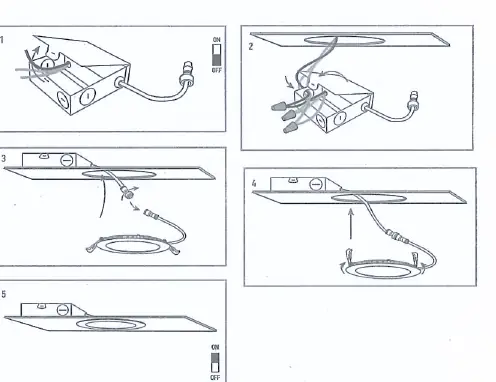
Images and diagrams
- Step 1: Open the J-Box after disconnecting power.
- Step 2: Connect wires using wire nuts.
- Step 3: Insert J-Box into the ceiling hole and connect the fixture cable.
- Step 4: Push spring clips upward to insert the fixture into the ceiling.
Model compatibility
- Compatible with 4-inch, 6-inch, and 8-inch round or square hole cuts.

Manual page author
Michael Turner
Technical manual editor
Reviews PDF manuals for structure, safety notes, and practical product details so readers can find the right information quickly.