Health / Personal Care
User Manual for Sunny Health & Fitness 077S Upright Row-N-Ride Exerciser
Comprehensive user guide for the Sunny Health & Fitness 077S Upright Row-N-Ride Exerciser. Includes detailed assembly instructions, adjustment procedures, battery replacement, and meter operation.
Table of contents
Manual images
Click an image to enlargeQuick Guide
The Sunny Health & Fitness 077S Upright Row-N-Ride Exerciser is designed for indoor home use. Before starting any exercise program, consult your physician. Ensure the equipment is placed on a solid, flat surface with at least 2 feet (60 cm) of clearance on all sides. The maximum weight capacity is 220 lbs (100 kg).
Safety Information
- Adult use only: Keep children and pets away from the equipment.
- Maintenance: Regularly check that all nuts and bolts are securely tightened. Discontinue use if you hear unusual noises or find defective components.
- Environment: Store in a cool, dry place to prevent corrosion.
- Usage: Do not use for therapeutic purposes.
Assembly Instructions
The assembly requires the included spanner (Tool A). Follow these steps:
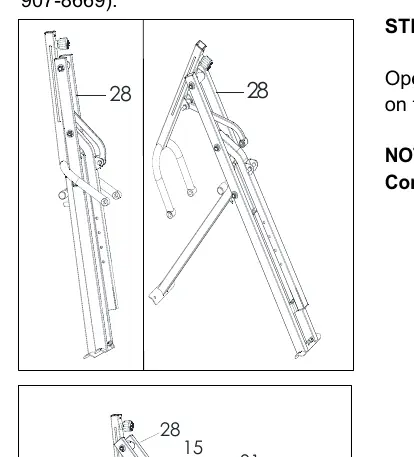


- Main Frame: Open the Main Frame (No. 28). Ensure the Pin (No. 29) is inserted into the Front Connecting Tube (No. 32).
- Stabilizers: Attach the Front Stabilizer (No. 36) and Rear Stabilizer (No. 38) to the frame using the provided bolts, nuts, and washers.
- Seat & Handlebar: Insert the Connecting Tube (No. 15) into the seat bracket. Attach the Handlebar (No. 4) to the Handlebar Tube (No. 7) and secure.
- Meter: Attach the Meter (No. 41) to the handlebar tab.
- Pedals: Attach the Left and Right Pedals (No. 13 & 40) to the Pedal Connecting Tube (No. 9) by tightening clockwise.
- Finalizing: Connect the Exercise Bands (No. 42) to the hooks on the Main Frame (No. 28).
Battery Installation & Replacement
The meter requires 1 AA battery.
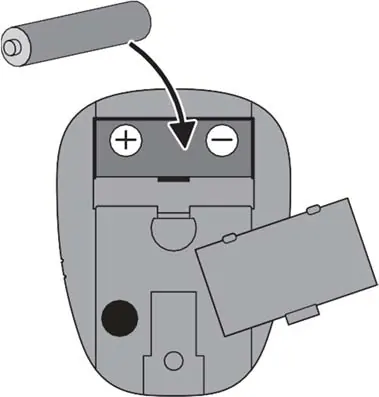
- Press the buckle on the battery cover on the back of the Meter (No. 41) to remove it.
- Install 1 AA battery, ensuring correct polarity (+ and -).
- Replace the cover.
Exercise Meter
The meter tracks your workout progress:
- TIME: Workout duration (00:00-99:59).
- COUNT (CNT): Accumulated strokes during exercise (0-9999).
- CALORIES (CAL): Estimated calories burned (0-9999).
- TOTAL COUNT (TOT.CNT): Total strokes since battery installation.
- SCAN: Automatically cycles through functions.
Operation: The meter turns on automatically when exercise begins or when the MODE button is pressed. Hold the MODE button for 4 seconds to reset all values.
Adjustments
- Handlebar: Loosen Knob (No. 10) to raise or lower the Handlebar Tube (No. 7).
- Seat: Loosen Knob (No. 21) to adjust the Seat Cushion (No. 18) position.
- Seat Tube: Lift the Seat Connecting Tube (No. 31), remove Pin (No. 29), and adjust the Seat Tube (No. 25) to change exercise difficulty. Do not extend past the "MAX" line.
- Exercise Bands: Adjust difficulty by hooking/unhooking Exercise Bands (No. 42) from the Main Frame or Seat Connecting Tube.
- Balance: Adjust the End Cap (No. 37) on the rear stabilizer if the bike is unstable.
Folding Instructions
- Adjust the Seat Tube (No. 25) to the lowest level using the Pin (No. 29).
- Ensure Exercise Bands (No. 42) are disconnected from the Main Frame.
- Adjust the Handlebar Tube (No. 7) to the lowest level using Knob (No. 10).
- Fold the product by holding the Handlebar (No. 4).
Official resources from the manual
Practical help
Common problems
Bike is unstable or wobbling
Adjust the End Cap (No. 37) on the rear stabilizer until the bike is level with the floor.
Exercise is too difficult or too easy
Adjust the Seat Tube (No. 25) height or change the connection point of the Exercise Bands (No. 42).
Meter is not displaying data
Check the battery installation in the meter; ensure the + and - poles are correctly aligned.
Before use
- Ensure all nuts and bolts are securely tightened.
- Place the equipment on a solid, flat surface.
- Ensure at least 2 feet (60 cm) of free space around the equipment.
- Check for any defective or worn components.
- Ensure the area is cool and dry.
Specs in practice
- Max Weight Capacity
- 220 lbs (100 kg)
- Battery Type
- 1 x AA battery for the meter
- Meter Auto-Off
- Shuts off automatically after 4 minutes of inactivity
Images and diagrams
- The Exploded Diagram (Page 4) identifies all parts by number for assembly and replacement.
- Assembly steps (Pages 7-10) provide visual guidance for connecting the frame, stabilizers, and handlebars.
Model compatibility
- Designed for indoor and home use only.
- Not intended for commercial or therapeutic use.

Manual page author
Emily Carter
User documentation editor
Prepares concise manual descriptions and highlights the most useful setup, operation, and maintenance information for readers.