Power / Batteries & Chargers
User Manual for Utilitech 18-Inch Oscillating Pedestal Fan
Quick guide for the Utilitech 18-Inch Oscillating Pedestal Fan (SD18-9RR). Includes assembly steps, operating instructions, remote control usage, maintenance, and safety warnings.
Table of contents
Manual images
Click an image to enlargeQuick Guide
This manual provides instructions for the Utilitech 18-Inch Oscillating Pedestal Fan. Key operations include using the control panel or remote to adjust speed, setting the timer, and controlling oscillation. The fan requires assembly before use and includes a safety fuse in the plug.
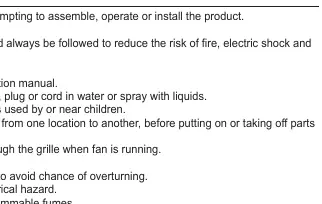
Safety Information
- Electrical Safety: This appliance has a polarized plug. Do not modify it. If it does not fit, contact a qualified electrician.
- Usage: For household use only. Do not use near windows, curtains, or in the presence of flammable fumes.
- Operation: Never insert fingers or objects through the grille while the fan is running. Always unplug before cleaning or moving.
- Warning: Do not use with any solid-state speed control device.
Package Contents
Ensure all parts are present before assembly:
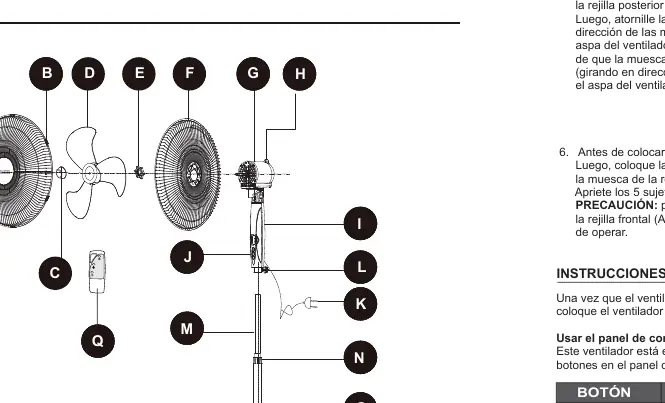
- Front Grille, Rear Grille, Fan Blade
- Motor Housing, Pillar, Base
- Adjustable Pole, Upper Pole
- Remote Control
- Hardware: Grille Clips, Blade Knob, Mounting Nut, Height Adjustment Knobs
Assembly Instructions
- Base Assembly: Insert the Pillar (O) into the Base (P) and turn while pushing to ensure it is fully seated.
- Height Adjustment: Loosen the Height Adjustment Knob (N) on the pillar, pull out the Height Adjustable Pole (M) to the desired height, and tighten the knob.
- Upper Pole Attachment: Loosen the Adjustable Pole Tightening Knob (L) on the Upper Pole (I). Fit the Upper Pole onto the Height Adjustable Pole (M) and tighten the knob.
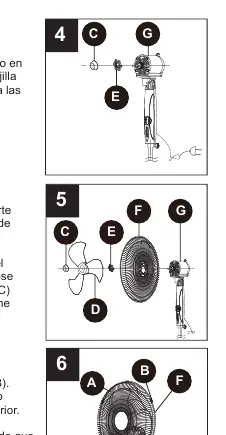
- Motor and Grille: Remove the Blade Knob (C) and Rear Grille Mounting Nut (E) from the Motor Housing (G). Place the Rear Grille (F) on the motor housing, ensuring pegs fit into holes, and secure with the Mounting Nut (E).
- Blade and Front Grille: Install the Fan Blade (D) onto the shaft, ensuring the notch fits over the pin. Secure with the Blade Knob (C). Attach the Front Grille (A) to the Rear Grille (F) and snap the 5 Grille Clips (B) shut.
Operating Instructions
Once assembled, place on a dry, level surface and plug into a 120V AC outlet.
Control Panel and Remote
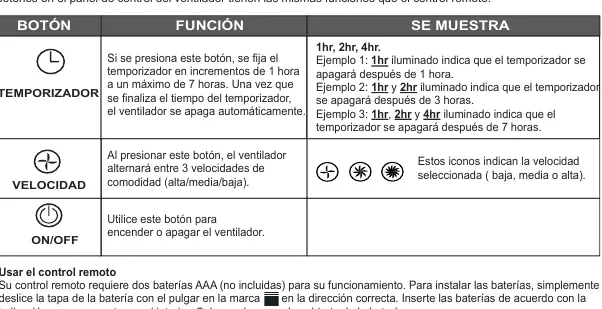
- ON/OFF: Turns the fan on or off.
- SPEED: Cycles through 3 comfort speeds (Low, Medium, High).
- TIMER: Sets the timer in 1-hour increments up to 7 hours. The fan shuts off automatically when the time expires.
Adjustments
- Oscillation: Press the oscillation knob on top of the motor housing to start horizontal oscillation. Pull it up to stop.
- Tilt: Gently push the fan head up or down to adjust the tilt angle.
- Remote Control: Requires two AAA batteries (not included). Slide the battery cover to install.
Care and Maintenance
- Cleaning: Turn off and unplug the fan. Wipe with a soft, lint-free cloth. Use a vacuum hose to clean vents on the rear of the motor housing. Do not submerge in water.
- Storage: Disassemble and clean before storing. Keep in a dry place. Do not wrap the cord tightly around the fan.
Fuse Replacement
If the fan stops working, the fuse in the plug may have blown.
- Unplug the fan.
- Slide the fuse cover on the plug open.
- Use a small screwdriver to pry the fuse out by its metal ends.
- Replace with a new 2.5 Amp, 125 Volt fuse.
- Slide the fuse cover closed.
Manufacturer information
Utilitech
Practical help
Common problems
Fan does not turn on
Check if the fuse in the plug is blown. Replace with a 2.5 Amp, 125 Volt fuse if necessary.
Slight odor during initial use
This is normal for new appliances and will disappear quickly.
Oscillation not working
Ensure the oscillation knob on top of the motor housing is pushed down.
Before use
- Verify all parts are present according to the package contents list.
- Ensure the fan is placed on a dry, level surface.
- Check the power cord for any cuts or abrasion marks.
- Install two AAA batteries in the remote control.
- Ensure the front and rear grilles are securely fastened with all 5 clips.
Images and diagrams
- The parts diagram identifies all components (A-Q) including grilles, poles, and knobs.
- Assembly steps 4-6 illustrate the specific order for mounting the rear grille, fan blade, and front grille.
- The fuse replacement diagram shows how to slide the cover and pry the fuse out using a screwdriver.
Model compatibility
- For household use only; not for commercial or industrial use.
- Do not use with any solid-state speed control device.
- Requires 120V AC electrical outlet.

Manual page author
Emily Carter
User documentation editor
Prepares concise manual descriptions and highlights the most useful setup, operation, and maintenance information for readers.