HVAC / Parts & Accessories
Installation Instructions for Viessmann Vitodens 200-W WB2B Gas Valve
Official installation guide for the gas valve on Viessmann Vitodens 200-W WB2B boilers. Includes safety requirements, step-by-step replacement procedures, orifice identification charts, and torque specifications.
Quick answers from the manual
Quick answer
- This manual provides instructions for replacing the gas valve on Viessmann Vitodens 200-W WB2B boilers. It includes safety requirements, installation steps, and gas type adjustment settings. p. 1, 2, 3, 4
Key actions
- Accessing the burner assembly p. 1
- Replacing the gas valve p. 2, 3, 4
First start
- Set adjusting screw on gas valve to 1 for natural gas or 2 for liquid propane gas. p. 2, 3, 4
Problems and fixes
Gas leaks
Check the gas pipe seals to ensure that there are no leaks.
p. 2, 3, 4Technical specifications
| Parameter | Value | Meaning | Pages |
|---|---|---|---|
| Tightening torque (C) | 22 lb.ft (30 Nm) or 16.2 lb.ft (22 Nm) | Torque for gas connection pipe fasteners | p. 2, 3, 4 |
| Tightening torque (F) | 35 lb.in. (4 Nm) | Torque for Allen screws | p. 2, 3, 4 |
Where to find it in the PDF
- Safety and Access p. 1
- Installation (Sizes 19, 26, 35) p. 2
- Installation (Sizes 45, 60) p. 3
- Installation (Sizes 80, 105) p. 4
Table of contents
Manual images
Click an image to enlargeQuick Guide from the Manual
This document provides instructions for the installation of the gas valve (Part Number 7836324) on Viessmann Vitodens 200-W WB2B boilers. All service work must be performed by a licensed professional heating contractor. Ensure the main power and fuel supply are turned off before beginning any work.
Safety and Installation Requirements
- Professional Installation: Installation, adjustment, service, and maintenance must be performed by a licensed professional heating contractor.
- Power and Fuel: Ensure main power to the equipment is off and the main fuel supply valve is closed.
- Replacement Parts: Use only original Viessmann or Viessmann-approved replacement parts.
- Leak Prevention: After installation, check all gas pipe seals to ensure there are no leaks. Gas leaks can lead to explosions.
Accessing the Burner Assembly
- With electrical power and fuel supply off, open the control cover and switch the ON/OFF boiler control switch to OFF.
- Remove the front enclosure panel.
Gas Valve Installation
The installation procedure varies slightly by boiler size. Follow the steps below:
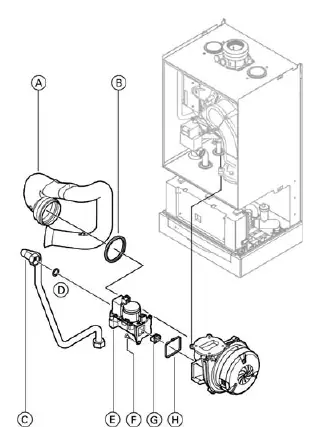
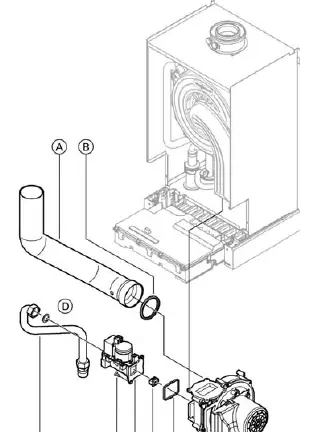
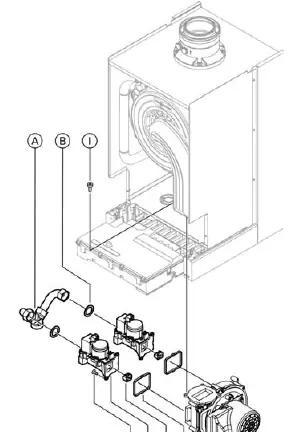
- Remove the Venturi extension and gasket.
- Loosen the gas connection pipe.
- Remove the two 4 mm Allen screws and remove the gas valve.
- Remove and discard the shipping plug in the replacement gas valve outlet before installing the orifice.
- Remove the orifice from the old gas valve using pliers and insert it into the new gas valve.
- Gas Type Adjustment: Set the adjusting screw on the gas valve to 1 for natural gas or 2 for liquid propane gas.
- Reassemble the components in reverse order and torque fasteners according to the specifications.
- Install the front enclosure panel and place the boiler back in operation.
Identification of the Fixed Gas Orifice
Refer to the specific chart for your boiler size (19, 26, 35, 45, 60, 80, or 105) to identify the correct orifice color and dimensions (D1/D2). Ensure the stamped number on the orifice matches the requirements for your specific boiler model.
Manufacturer information
Viessmann Climate Solutions
Practical help
Common problems
Gas leaks after installation
Check all gas pipe seals immediately to ensure there are no leaks.
Incorrect gas type operation
Ensure the adjusting screw on the gas valve is set to 1 for natural gas or 2 for liquid propane.
Before use
- Ensure main power to the equipment is off.
- Ensure the main fuel supply valve to the boiler is closed.
- Verify the correct orifice is being used for the specific boiler size.
- Have a 4 mm Allen key and pliers ready.
- Ensure new gas connection pipe gasket and profile gasket are available.
Specs in practice
- Gas Valve Adjusting Screw
- Set to 1 for natural gas, 2 for liquid propane gas.
- Fastener Torque (C)
- 22 lb.ft (30 Nm) for sizes 19-35; 16.2 lb.ft (22 Nm) for sizes 45-105.
- Fastener Torque (F)
- 35 lb.in. (4 Nm) for all models.
Images and diagrams
- Exploded view showing the gas valve, Venturi extension, and connection pipes.
- Orifice identification chart detailing color, stamped number, and dimensions (D1/D2).
Model compatibility
- Compatible with Vitodens 200-W WB2B series.
- Orifice specifications differ based on boiler size (19, 26, 35, 45, 60, 80, 105).

Manual page author
David Miller
Documentation analyst
Organizes user manual content into clear summaries, with attention to model details, product context, and everyday usability.