Computers / PC Components
User Manual for ZOTAC GeForce RTX 3080 GAMING Trinity LHR Graphics Card
Quick installation guide for the ZOTAC GeForce RTX 3080 GAMING Trinity LHR graphics card. Includes step-by-step hardware installation, driver setup, monitor connection instructions, and safety precautions.
Table of contents
Manual images
Click an image to enlargeQuick Guide from the Manual
This document provides essential instructions for installing your ZOTAC GAMING GeForce graphics card. Before beginning, ensure your computer is powered off and disconnected from the power source. The installation process involves physically mounting the card into the PCI Express x16 slot, securing it, connecting the necessary power cables, and installing the latest NVIDIA GeForce drivers for optimal performance.
Graphics Card Installation
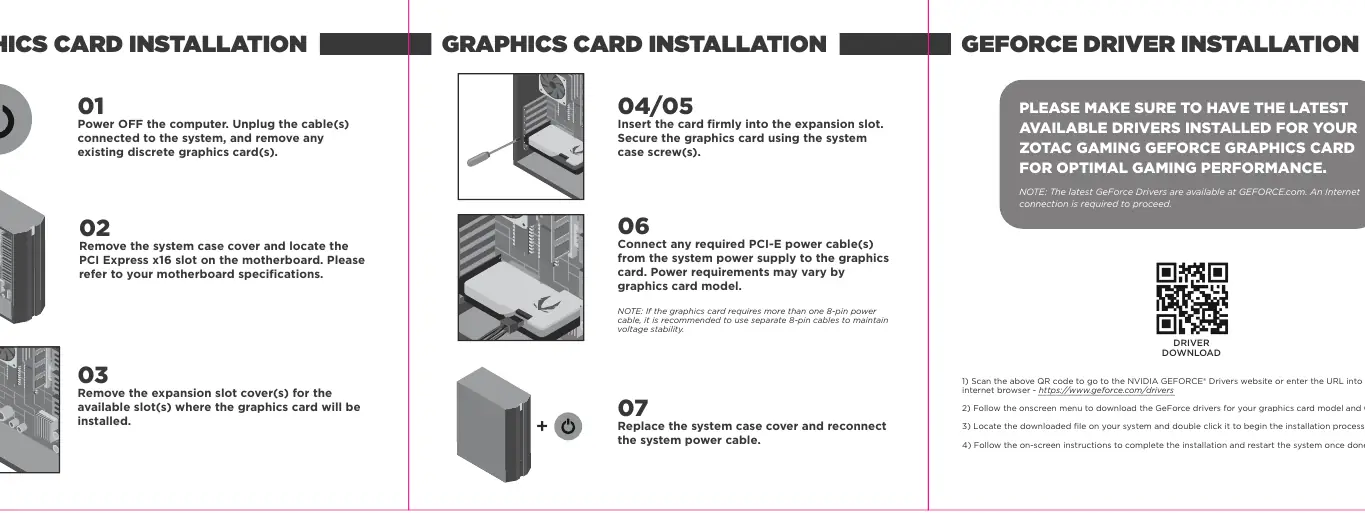
- Power Off: Turn off the computer and unplug the power cable. Remove any existing discrete graphics cards.
- Prepare Case: Remove the system case cover and locate the PCI Express x16 slot on your motherboard.
- Remove Slot Cover: Remove the expansion slot cover(s) corresponding to the slot where the card will be installed.
- Insert Card: Firmly insert the graphics card into the expansion slot.
- Secure Card: Use the system case screws to secure the graphics card bracket to the case.
- Connect Power: Connect the required PCI-E power cables from your power supply to the graphics card. If the card requires more than one 8-pin power cable, use separate cables from the power supply to ensure voltage stability.
- Finish: Replace the system case cover and reconnect the power cable.
GeForce Driver Installation
To ensure optimal gaming performance, you must install the latest drivers:
- Visit the official NVIDIA GeForce drivers website at GEFORCE.com/drivers.
- Follow the on-screen menu to select your specific graphics card model and operating system.
- Download the driver file, locate it on your system, and double-click to begin the installation process.
- Follow the on-screen instructions to complete the installation and restart your system.
Connecting a Monitor
The graphics card supports various display outputs. Ensure your monitor cable is securely connected to the appropriate port on the back of the graphics card. Supported interfaces typically include HDMI, DisplayPort, DVI, and VGA.

Safety Precautions
- Static Electricity: Do not remove the card from its anti-static packaging until you are ready to install it. Use a grounded wrist strap or touch the metal surface of the system chassis to discharge static electricity before handling.
- Electrical Safety: Ensure your power supply meets the minimum wattage requirements for the graphics card.
- Operation Safety: Do not touch the card or block the fans while in operation. The backplate and heatsink may become hot under heavy load; allow at least 5 minutes for the card to cool down after powering off before handling.
- Photosensitive Epilepsy: Be aware that fast image changes or flashes of light in video games may induce epileptic fits in some individuals.
Official resources from the manual
Manufacturer information
ZOTAC Technology Pte. Limited
Practical help
Common problems
Graphics card not detected or system won't boot
Ensure the card is firmly seated in the PCI Express x16 slot and that all required PCI-E power cables are fully connected.
Voltage instability or performance issues
If the card requires multiple 8-pin power cables, use separate cables from the power supply rather than a single daisy-chained cable.
Driver installation fails
Ensure you have an active internet connection and are downloading the correct driver version for your specific GPU model and OS from GEFORCE.com.
Before use
- Power off the computer and unplug the AC power cord.
- Remove any existing discrete graphics cards.
- Verify your power supply unit (PSU) meets the wattage requirements for the card.
- Prepare a grounded wrist strap or touch the system chassis to discharge static electricity.
- Ensure you have the latest drivers downloaded from GEFORCE.com.
Specs in practice
- PCI Express x16
- The standard high-speed interface slot on the motherboard used for graphics cards.
- 8-pin Power Cable
- Auxiliary power connector required for high-performance graphics cards.
- LHR (Lite Hash Rate)
- Indicates the card has a built-in limiter for cryptocurrency mining performance.
Images and diagrams
- The installation diagram illustrates the 7-step process: powering off, opening the case, removing slot covers, inserting the card, screwing it in, connecting power cables, and closing the case.
- The monitor connection diagram displays the available output ports: HDMI, DisplayPort, DVI, and VGA.
Model compatibility
- Requires a motherboard with a PCI Express x16 slot.
- Requires a power supply with sufficient wattage and appropriate PCI-E power connectors.
- Requires an internet connection for driver installation.

Manual page author
Emily Carter
User documentation editor
Prepares concise manual descriptions and highlights the most useful setup, operation, and maintenance information for readers.