Computers / Laptops
User Manual for ASUS ROG Strix Aura 1000W Power Supply Unit
Quick start guide for the ASUS ROG Strix Aura 1000W power supply unit. Includes installation steps, connector details, safety warnings, and operating environment specifications.
Table of contents
Quick guide from the manual
This guide provides essential information for installing and operating your ASUS ROG Strix Aura 1000W power supply unit. Always ensure the system is powered off and unplugged before performing any installation or cable management tasks.
Product overview
The power supply unit features a rear panel with the following controls and connectors:
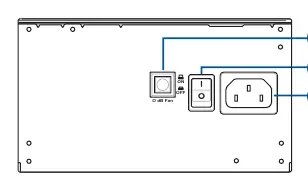
- 0 dB Fan button: Pressing this button disables the 0dB function, allowing the fan to spin continuously. Availability of this function may vary by model.
- Power switch: Used to turn the power supply on (I) or off (O).
- Power connector: The input for the AC power cord.
Installation
Follow these steps to install your power supply unit:
- Follow your chassis manual instructions to secure the power supply unit into the chassis using the provided mounting screws.
- Connect the bundled modular cables to the power supply unit.
- Connect the power connectors to your motherboard and peripheral devices:
- Main Power Connector (24-pin or 20-pin): Connect to the motherboard's main power socket.
- CPU +12V Power Connector (4+4 pin): Connect to the CPU power socket on the motherboard.
- Peripheral Power Connector (4-pin): Connect to peripheral devices as needed.
- PCI-E +12V Power Connector (6+2 pin): Connect to your PCI-E graphics card.
- SATA Power Connector: Connect to devices with a Serial ATA interface.
- Connect the power supply unit to a power source using the bundled power cord.
- Flip the Power Switch to the I position to turn on the unit.
Safety information
Warning: High voltages are present inside the power supply unit. Never attempt to open the case, repair, or clean the internal components. Doing so is extremely dangerous and will immediately void your warranty.
- Do not insert any objects into the power supply unit.
- Do not obstruct the fan or ventilation area.
- Use only the modular cables bundled with the unit.
- Do not use the unit near water or in high-temperature/high-humidity environments.
- Operating Environment: Temperature: 0°C to 50°C; Relative Humidity: 20% to 80%.
- This unit is designed for integration into a computer and is not intended for external or outdoor use.
Manufacturer information
ASUSTeK Computer Inc.
Practical help
Common problems
Fan is not spinning
Check if the 0dB function is enabled. Press the 0dB button to disable it and allow the fan to spin at all times.
System does not power on
Ensure the power switch is in the 'I' position and the power cord is securely connected to both the wall outlet and the PSU.
Before use
- Ensure the system is turned off.
- Unplug all power cables from the system and attached devices.
- Verify the power supply unit is compatible with your chassis.
- Ensure you have all bundled modular cables ready.
Specs in practice
- Operating Temperature
- 0°C to 50°C
- Relative Humidity
- 20% to 80%
- 0dB Function
- Allows the fan to stop spinning under low load for silent operation.
Images and diagrams
- 1: 0dB Fan button
- 2: Power switch
- 3: Power connector
Model compatibility
- Designed for integration into a computer.
- Not intended for external or outdoor usage.

Manual page author
Emily Carter
User documentation editor
Prepares concise manual descriptions and highlights the most useful setup, operation, and maintenance information for readers.