General / Other Manuals
Acaia Orion Mini Bean Doser User Guide
Quick start guide for the Acaia Orion Mini Bean Doser, covering power operation, dosing procedures, preset weight adjustments, and auto-dosing mode settings.
Table of contents
Quick guide from the manual
This guide provides essential instructions for operating the Acaia Orion Mini Bean Doser. It covers basic power controls, manual and automatic dosing procedures, and how to configure preset weights for consistent coffee bean dosing.
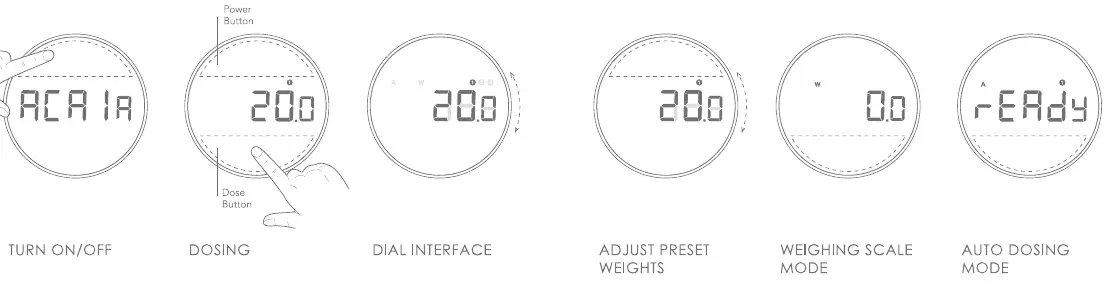
Turn on/off
To turn the device on, press the Power Button. To turn the device off, double-tap the Power Button.
Dosing
To start dosing, press the Dose Button. Press the button again to manually stop the dosing process. At the end of each dose, you can press the Dose Button again to add 1-2 beans. To empty the hopper, press and hold the Dose Button for five seconds, then press the Dose Button again to reset the dose.
Dial interface
Use the dial to toggle between presets, switch modes, or adjust preset weight values.
Adjust preset weights
To adjust preset weights, follow these steps:
- Press the Power Button to enter the preset weight setting.
- Rotate the dial to change the value.
- Press the Power/Dose Button to save the preset value.
Weighing scale mode
Press the Dose Button to tare the weight.
Auto dosing mode
To use the auto-dosing mode, follow these steps:
- Press and hold the Power Button for five seconds.
- Use the dial to select Auto mode.
- Press the Power Button to confirm the mode.
- Press the Dose Button to enter Ready mode. The device will then begin auto-tare and auto-dosing.
Manufacturer information
Acaia
Practical help
Common problems
Need to empty the hopper
Press and hold the Dose Button for five seconds, then press the Dose Button again to reset.
Need to stop dosing manually
Press the Dose Button during the dosing process.
Before use
- Ensure the device is placed on a stable surface
- Check that the hopper is properly seated
- Verify the device is connected to a 120V power source
Specs in practice
- Power Button
- Used for power control, entering settings, and confirming modes.
Images and diagrams
- The interface consists of a circular display with a Power Button and a Dose Button.
- The display shows current weight, mode indicators (A, W), and preset numbers (1, 2, 3).
Model compatibility
- This device is designed for 120V power supply.

Manual page author
David Miller
Documentation analyst
Organizes user manual content into clear summaries, with attention to model details, product context, and everyday usability.