Lighting / Fixtures
User Manual for ADJ Saber Spot RGBW LED Light
Quick guide for the ADJ Saber Spot RGBW LED light. Learn about DMX setup, operating modes, system menu navigation, daisy chaining, and maintenance.
Table of contents
Manual images
Click an image to enlargeQuick guide from the manual
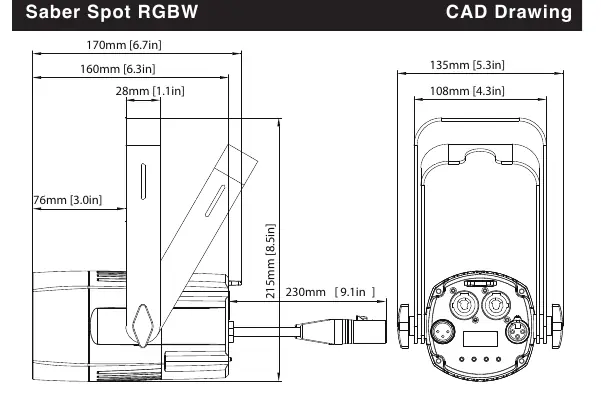
The ADJ Saber Spot RGBW is a DMX-intelligent LED fixture designed for indoor use in theaters, studios, and retail environments. This manual covers installation, DMX setup, system menu navigation, and maintenance. Always ensure the unit is mounted in a safe, stable manner and allow at least 6 inches (15cm) of ventilation space between the device and any wall.
Installation and Setup
The fixture features an automatic voltage switch, allowing it to be plugged into power sources worldwide. For DMX control, use an approved 110 Ohm shielded DMX cable. When daisy-chaining multiple fixtures, ensure the shortest cable path is used. For longer cable runs, use a 120 Ohm terminator on the last fixture in the chain to prevent signal errors.

DMX Cabling
The unit uses 3-pin XLR terminals for DMX input and output. If using 5-pin DMX cables, a proper cable adapter is required. When making your own cables, ensure the shield conductor does not touch the XLR outer casing to avoid short circuits.
Power Cord Daisy Chain
You can connect multiple fixtures to one another using the PowerCON input and output sockets. The maximum number of fixtures that can be connected is 38 at 110V and 68 at 240V. Always check the max amp rating of each fixture before linking.
System Menu Navigation
Use the MENU, ENTER, UP, and DOWN buttons to navigate the settings. Press ENTER to confirm a selection. Press and hold the MENU button for at least 3 seconds to save changes. The display locks after 30 seconds of inactivity; press the MENU button for 3 seconds to unlock.
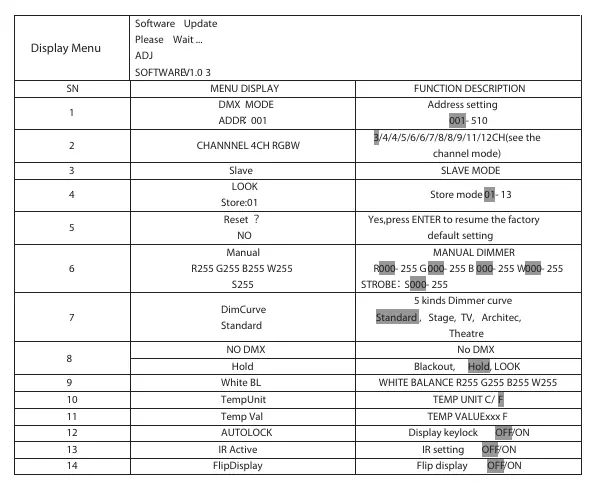
- DMX MODE: Set the DMX address (001-510).
- CHANNEL: Select the desired DMX channel mode (3, 4, 5, 6, 7, 8, 9, 11, or 12 channels).
- SLAVE: Set the unit as a slave in a master/slave configuration.
- LOOK: Run a built-in show mode.
- RESET: Restore factory default settings.
- MANUAL: Manually adjust LED intensity and strobe rate.
- DimCurve: Select from 5 dimmer curves (Standard, Stage, TV, Architectural, Theatre).
- NO DMX: Choose the behavior when the DMX signal is lost (Look, Blackout, or Hold).
- White BL: Balance RGBW colors for white output.
- TempUnit/Temp Val: Check fixture temperature in Celsius or Fahrenheit.
- AUTOLOCK: Enable/disable automatic display lock.
- IR Active: Enable/disable IR remote control.
- FlipDisplay: Rotate the display 180 degrees.
Operating Modes
The fixture supports three main operating modes: Show Mode, RGBW Dimmer Mode, and DMX Control. In Master/Slave operation, link up to 16 units together using DMX cables. The master unit controls the programs, and slave units follow.
Maintenance
Periodic cleaning is essential to optimize light output. Frequency depends on the environment (smoke, fog, dust). Use a normal glass cleaner and a soft cloth to wipe the outside casing and external optics. Use a brush to clean cooling vents and the fan grill. Clean external optics every 20 days and internal optics every 30-60 days.
Manufacturer information
ADJ Products, LLC
Practical help
Common problems
No light output in RGBW Dimmer Mode
Ensure the strobe setting is set to value 255.
Before use
- Check shipping carton for damage.
- Ensure local power outlet matches required voltage.
- Verify DMX cables are 110 Ohm shielded.
- Ensure proper ventilation (6 inches/15cm from wall).
- Install frost filters if required for the desired beam angle.
Specs in practice
- PowerCon Daisy Chain
- Max 38 fixtures at 110V, 68 fixtures at 240V.
- DMX Channel Modes
- 12 modes ranging from 3 to 12 channels.
Images and diagrams
- Figure 1: DMX cable connection requirements.
- Figure 2: DMX 3-pin XLR wiring diagram.
- Figure 4: DMX line termination using a 120 Ohm resistor.
Model compatibility
- Compatible with UC IR remote (sold separately).
- Compatible with Airstream IR app.
- Indoor use only.

Manual page author
Emily Carter
User documentation editor
Prepares concise manual descriptions and highlights the most useful setup, operation, and maintenance information for readers.