Lighting / Stage Lighting
User Manual for ADJ Inno Pocket Spot Moving Head
Comprehensive user guide for the ADJ Inno Pocket Spot moving head LED fixture. Includes installation, DMX setup, system menu navigation, operation modes, and maintenance instructions.
Table of contents
Manual images
Click an image to enlargeQuick guide from the manual
The ADJ Inno Pocket Spot is a DMX-intelligent, moving head, mini LED fixture designed for theaters, studios, and retail environments. This guide provides essential information for safe installation, DMX configuration, and operation. Always ensure the unit is mounted securely and kept away from flammable materials. For optimal performance, use DMX-512 compliant cables and ensure proper termination on the last fixture in your chain.
Safety Precautions
- Indoor Use Only: Using this product outdoors voids all warranties.
- Electrical Safety: Do not expose the unit to rain or moisture. Ensure the power outlet matches the required voltage. Do not remove the cover; there are no user-serviceable parts inside.
- Heat Management: Keep the fixture away from heat sources like radiators or stoves. Allow at least 6 inches (15cm) of space between the device and any wall for proper ventilation.
- Eye Safety: Avoid looking directly into the light source.
Mounting
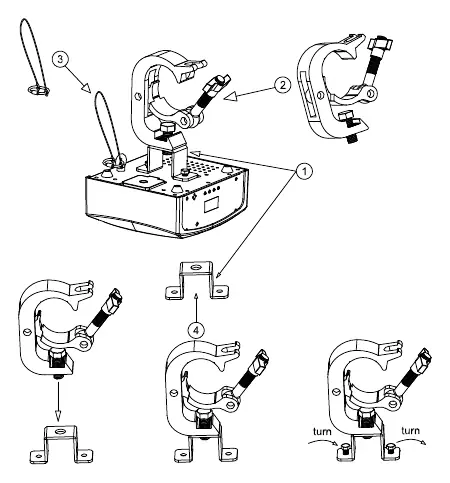
The Inno Pocket Spot can be mounted hanging upside-down from a ceiling or set on a flat, level surface. Never mount the unit on its side. When installing overhead, the trussing must be able to hold 10 times the weight of the unit. Always secure the unit with a secondary safety cable attached to the eyehole screw on the base.
DMX Setup
The fixture supports DMX-512 protocol with 9 or 11 channel modes. To ensure proper data transmission:
- Use approved 110-120 Ohm shielded DMX cables.
- Daisy chain units using the XLR connectors (Male for input, Female for output).
- Use a terminator (120 Ohm resistor) on the last fixture in the chain to prevent signal errors.
- The DMX address is set electronically via the front panel menu.
System Menu
Access the system menu by pressing the MENU button. Use the UP and DOWN buttons to navigate and ENTER to confirm settings. Key menu functions include:
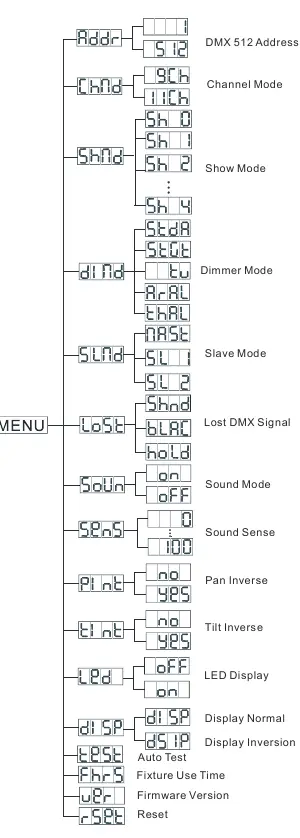
- ADDR: Set the DMX address.
- CHND: Select 9-channel or 11-channel mode.
- SHND: Select factory show programs (0-4).
- DIND: Choose dimmer curves (Standard, Stage, TV, Architectural, Theater).
- SLND: Configure Master/Slave settings.
- LOST: Define behavior if DMX signal is lost (Hold, Show Mode, or Blackout).
- SOUN: Activate/deactivate Sound Active mode.
- SENS: Adjust sound sensitivity (0-100).
- PINT/TINT: Pan and Tilt inversion.
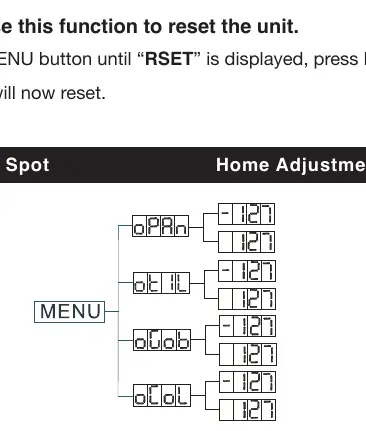
- RSET: Reset the unit.
Operation Modes
The unit offers three primary operating modes:
- DMX Control: Allows full control via a universal DMX-512 controller.
- Sound Active: The unit reacts to the beat of the music. Sensitivity can be adjusted in the menu.
- Show Mode: Runs one of four preprogrammed shows.
- Master-Slave: Link up to 16 units together. One unit acts as the Master, and others follow its program.
Maintenance
Periodic cleaning is required to maintain light output, especially in environments with smoke or fog. Use a soft cloth and glass cleaner for the outer casing and lenses. Clean cooling vents and the fan grill with a brush. If the unit fails to light, check the external fuse located on the rear panel and replace it if necessary.
Manufacturer information
ADJ Products, LLC
Practical help
Common problems
No light output
Check if the external fuse on the rear panel has blown and ensure the fuse holder is properly seated.
Unit does not respond to sound
Ensure the sound sensitivity (SENS) is set correctly. Note that low frequencies (bass) trigger the unit; quiet or high-pitched sounds may not activate it.
Before use
- Inspect the shipping carton for damage.
- Ensure the power outlet matches the required voltage.
- Mount the unit in a safe, stable location.
- Install the supplied safety cable for overhead mounting.
- Use 110-120 Ohm shielded DMX cables for data connections.
Images and diagrams
- Mounting: Shows attachment of the clamp and safety cable to the base.
- DMX Wiring: Details the pin configuration for 3-pin XLR connectors.
- System Menu: Illustrates the menu tree structure for navigation.
Model compatibility
- Compatible with UC-IR infrared remote (not included).
- Compatible with universal DMX-512 controllers.

Manual page author
Michael Turner
Technical manual editor
Reviews PDF manuals for structure, safety notes, and practical product details so readers can find the right information quickly.