Home Appliances / Hair Dryers
User Manual for Adler AD 7750 Convector Heater
Quick guide for the Adler AD 7750 convector heater. Includes assembly instructions, operation steps, safety warnings, and maintenance tips.
Quick answers from the manual
Quick answer
- The Adler AD 7750 is a convector heater with two power settings (1000W/2000W), an adjustable thermostat, overheat protection, and a tip-over safety switch. p. 7
Key actions
- Assemble wheels p. 6
- Operate heater p. 7
First start
- Assemble wheels before first use p. 6
Show 4 more answers Show less
Problems and fixes
Heater turns off automatically
Overheat protection triggered. Unplug, remove obstructions, and let cool for 30 minutes.
p. 7Maintenance and reset
- Clean grilles and wipe exterior with damp cloth p. 7
Technical specifications
| Parameter | Value | Meaning | Pages |
|---|---|---|---|
| Power | 1800-2000W | Maximum power consumption | p. 7 |
Where to find it in the PDF
- Safety instructions p. 5, 6
- Assembly and Operation p. 7
Table of contents
Manual images
Click an image to enlargeQuick guide from the manual
The Adler AD 7750 is a convector heater designed for indoor use. It features two power settings (1000W and 2000W), an adjustable thermostat, overheat protection, and a tip-over safety switch. Ensure the device is placed on a flat, stable surface with at least 1 meter of clearance from other objects.
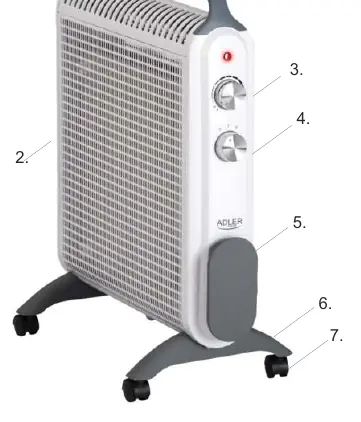
Safety instructions
- Do not cover the heater while in operation to avoid overheating and fire risk.
- Keep flammable materials (furniture, curtains, clothes) at least 1 meter away from the device.
- Do not use the heater in small rooms where people who cannot leave the room independently are present, unless under constant supervision.
- Do not use the device in high humidity areas like bathrooms or near water.
- If the device falls into water, unplug it immediately.
- Do not use the device if the power cord is damaged.
Assembly
Before first use, the wheels must be attached to the base:
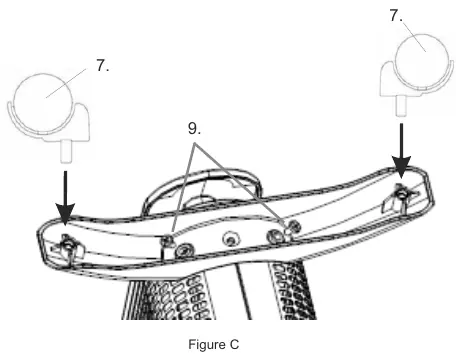
- Place the heater carefully upside down.
- Press the wheel (7) into the hole.
- Insert the screw (9) into the round hole of the wheel base and tighten it firmly with a screwdriver.
- Repeat for the second wheel base.
- Turn the device back to the upright position.
Operation
- Place the heater on a flat, stable surface.
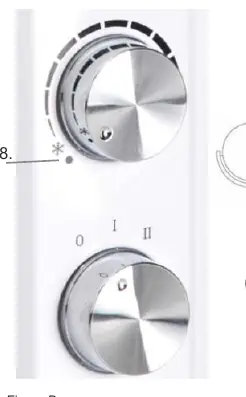
- Ensure the heating knob (5) is in the OFF position and the thermostat knob (4) is in the OFF position (8).
- Plug the device into a suitable power outlet.
- Turn the heating knob (5) to the desired power setting: I for 1000W or II for 2000W.
- Turn the thermostat knob (4) clockwise to the maximum setting. Once the desired room temperature is reached, turn the knob slowly counter-clockwise until you hear a click and the indicator lamp (3) turns off. The heater will then maintain the set temperature by cycling on and off.
- To turn off the device, turn the heating knob (5) to zero and the thermostat knob (4) to the OFF position (8).
Safety devices
- Overheat protection: Automatically shuts off the heater if it overheats. If this happens, unplug the device, remove any obstructions, and let it cool for 30 minutes.
- Tip-over safety switch: Automatically shuts off the heater if it is knocked over.
Cleaning and maintenance
Ensure the device is cool before cleaning. Unplug the device from the power outlet. Keep the air inlet and outlet grilles clean. Wipe the exterior with a damp cloth and buff with a dry cloth. Do not use detergents or abrasives. Do not immerse the device in water.
Manufacturer information
Adler Europe Group
Practical help
Common problems
Heater emits smell or smoke on first use
This is normal for new heaters or after long periods of disuse. The smell and fumes will disappear after a short time of operation.
Heater turns off automatically
Check for obstructions at the air inlets or outlets. If the device overheats, it will shut off. Unplug, remove obstructions, and let it cool for 30 minutes.
Before use
- Ensure wheels are correctly assembled
- Place on a flat, stable surface
- Maintain 1 meter distance from other objects
- Ensure the heater is not covered
- Check that the power cord is not damaged
Show more Show less
Images and diagrams
- Figure A: Device overview showing handle, grilles, knobs, and wheels.
- Figure B: Close-up of thermostat and heating knobs.
- Figure C: Wheel assembly instructions.

Manual page author
Michael Turner
Technical manual editor