Smart Home / Smart Displays
Quick Start Guide for Amazon Fire TV 2-Series
A comprehensive quick start guide for the Amazon Fire TV 2-Series. Includes instructions for unboxing, base installation, wall mounting, remote pairing, network setup, and troubleshooting.
Quick answers from the manual
Quick answer
- The Amazon Fire TV 2-Series setup involves attaching the stand legs or wall mount, inserting batteries into the remote, connecting to power and internet, and following the on-screen instructions. p. 1, 2, 3
Key actions
- Pair the remote by inserting batteries and pressing the Home button if necessary. p. 2
- Connect to the internet via Ethernet or Wi-Fi during the on-screen setup. p. 3
First start
- Insert batteries into the remote, connect the TV to power, and follow the on-screen setup prompts. p. 1, 2, 3
Problems and fixes
No picture, no sound
Check power connection, ensure TV is not muted, and verify the correct input source.
p. 3Technical specifications
| Parameter | Value | Meaning | Pages |
|---|---|---|---|
| Ethernet | 10/100 Mbps | Wired network speed | p. 2 |
Where to find it in the PDF
- Setup and Installation p. 1
- Ports and Remote p. 2
- Network and Troubleshooting p. 3
Table of contents
Quick guide from the manual
This guide provides the essential steps to set up your Amazon Fire TV 2-Series. Before beginning, ensure you have a Phillips screwdriver and scissors. The package includes the TV, remote, stand legs, batteries, and screws. Do not plug the power cord into the wall until all other devices have been connected.
Installation
Base installation
To install the stand legs:
- Remove the TV, legs, and accessories from the packaging.
- Place the TV face down on a large, flat surface.
- Attach the legs to the TV using the included screws.
Wall mounting
If mounting the TV on a wall, ensure the wall can support the weight of the TV and mount assembly. Follow the instructions provided with your wall mount. Use only screws suitable for your wall material.
- 32" TVs: Use M4 screws, 8 mm length.
- 40" TVs: Use M6 screws, 12 mm length.
Getting to know your Fire TV
The back of the TV features several ports for connectivity:
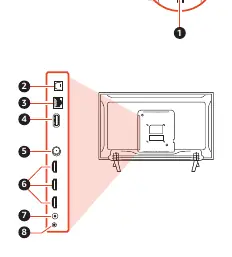
- Power button: Press to turn the TV on or put it in standby.
- Optical output (S/PDIF): Connect an optical cable to a receiver or soundbar.
- Ethernet/LAN: Connect to your internet modem or home network (10/100 Mbps).
- USB: Connect USB devices.
- Antenna/Cable: Connect a coaxial cable or antenna.
- HDMI ports: Connect gaming consoles, cable boxes, or satellite boxes.
- IR emitter port: Connect an IR emitter cable.
- Audio out/Headphone: Connect headphones or an analog soundbar.
Operation and Setup
Remote pairing
Insert two AAA batteries into the remote. The Fire TV Alexa Voice Remote should pair automatically. If it does not, press the Home button to initiate pairing.
Network connection
You can connect your TV to the internet via:
- Wired: Connect an Ethernet cable to the port on the back of the TV.
- Wireless: Select your Wi-Fi network from the on-screen list and enter your password.
Troubleshooting
If you encounter issues:
- No picture, no sound: Ensure the power cord is connected, the TV is not muted, and the correct input source is selected.
- Network issues: Verify the Ethernet cable is connected or check your Wi-Fi password.
Practical help
Common problems
No picture or sound
Check that the power cord is connected, the TV is not muted, and the correct input source is selected.
Network connection failure
Verify the Ethernet cable is securely connected or re-enter your Wi-Fi password.
Before use
- Phillips screwdriver
- 2 AAA batteries
- Wall mount (if wall mounting)
Specs in practice
- Optical output
- Used for connecting external audio equipment like soundbars.
Images and diagrams
- Base installation: Shows how to attach the two legs to the bottom of the TV.
- Remote layout: Identifies buttons including Alexa voice, navigation, and playback controls.
Model compatibility
- 32-inch models require M4 screws (8 mm length) for wall mounting.
- 40-inch models require M6 screws (12 mm length) for wall mounting.

Manual page author
David Miller
Documentation analyst
Organizes user manual content into clear summaries, with attention to model details, product context, and everyday usability.