Home Appliances / Small Kitchen Appliances
User Manual for Ariete Vintage 2-Slice Toaster
Quick guide for the Ariete Vintage 2-Slice Toaster. Learn how to operate, toast, defrost, reheat, and maintain your appliance safely.
Quick answers from the manual
Quick answer
- The Ariete Vintage toaster is designed for toasting, defrosting, and reheating bread. Always empty the crumb tray after use and run the device empty for a few minutes before the first use. p. 1, 3
Key actions
- Toasting: Insert bread, set browning level, push lever down. Press stop (E) to cancel. p. 3
- Defrosting: Insert bread, set knob to 1, push lever, press defrost button (G). p. 3
- Reheating: Insert bread, push lever, press reheat button (F). p. 3
First start
- Run the toaster empty for a few minutes to eliminate manufacturing odors. p. 3
Show 3 more answers Show less
Problems and fixes
Smoke/smell on first use
This is normal; run the device empty for a few minutes.
p. 3Maintenance and reset
- Empty the crumb tray after every use. Wipe the exterior with a damp, non-abrasive cloth. p. 3
Where to find it in the PDF
- Device Overview p. 1
- Usage Instructions p. 3
Table of contents
Quick guide from the manual
The Ariete Vintage 2-Slice Toaster is designed for private use to toast, defrost, and reheat bread. Before using the device for the first time, it is recommended to run it empty for a few minutes to eliminate any manufacturing odors; the device may smoke slightly during this process. Always ensure the crumb tray is emptied after every use to prevent fire hazards.
Device description
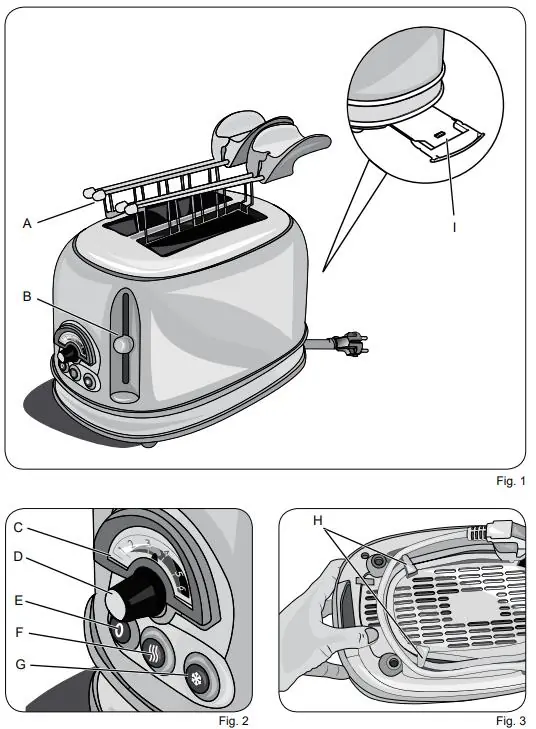
- A: Tongs
- B: Lowering lever
- C: Browning indicator
- D: Browning control knob
- E: Stop button
- F: Reheat button
- G: Defrost button
- H: Cord storage
- I: Crumb tray
Operating instructions
Toasting
- Insert a bread slice into the slot (use tongs A if needed).
- Set the desired browning level using the knob (D).
- Push the lever (B) down to start.
- The bread will pop up automatically when finished.
- Press the stop button (E) to cancel at any time.
Defrosting
- Insert frozen bread into the slot.
- Turn the knob (D) to setting "1".
- Push the lever (B) down.
- Press the defrost button (G). The button light will remain on during the process.
Reheating
- Insert bread into the slot.
- Push the lever (B) down.
- Press the reheat button (F). The button light will remain on during the process.
Cleaning and maintenance
Always unplug the device and allow it to cool completely before cleaning. Do not immerse the toaster in water or other liquids. Do not use chemical cleaners or sharp metal tools inside the device.
- Crumb tray: Empty the crumb tray (I) after every use.
- Exterior: Clean with a damp, non-abrasive cloth and a few drops of mild detergent. Dry thoroughly.
Safety instructions
- Do not use the device if the power cord or the unit is damaged.
- Keep the device and cord out of reach of children.
- Do not use near flammable materials like curtains.
- Do not insert metal objects (like knives or forks) into the toaster.
- Do not force large or broken slices into the slots.
- Always unplug the device before cleaning.
Manufacturer information
Ariete
Practical help
Common problems
Smoke or smell during first use
This is normal for a new device. Run the toaster empty for a few minutes before the first use.
Bread stuck or difficult to remove
Use the provided tongs (A) to remove bread. Do not use metal knives or forks.
Fire hazard
Empty the crumb tray (I) after every use and do not operate near flammable materials.
Before use
- Check that the voltage matches the rating plate
- Ensure hands are dry before plugging in
- Place on a stable surface away from flammable materials
- Run empty for a few minutes to remove manufacturing odors
Show more Show less
Images and diagrams
- B: Lowering lever
- D: Browning control knob
- E: Stop button
- F: Reheat button
- G: Defrost button
Model compatibility
- For private use only, not for industrial or professional use.

Manual page author
David Miller
Documentation analyst