Home Appliances / Small Kitchen Appliances
Flama 2237FL Blender User Manual
Quick guide for the Flama 2237FL blender. Includes assembly, operation, cleaning, safety warnings, and troubleshooting steps.
PDF source: Français · summary: English
Quick answers from the manual
Quick answer
- The Flama 2237FL is a blender for domestic use. It features a 2-minute maximum continuous operation limit, after which it must cool down. Always ensure the cup is locked onto the motor unit before starting. p. 4, 6, 16, 18
Key actions
- Assemble the blender by turning the cup clockwise on the motor unit until it clicks. p. 6, 18
- Clean the blender cup and blades by hand; do not put blades in the dishwasher. p. 5, 17
First start
- Unpack the device, wash the blender cup, lid, and measuring cup in warm soapy water, and dry thoroughly. p. 6, 18
Show 2 more answers Show less
Problems and fixes
Appliance does not work
Check power connection and ensure the cup is correctly mounted.
p. 7, 19
Appliance switches off
Motor overheating; unplug and wait 30 minutes.
p. 7, 19Where to find it in the PDF
- Safety Instructions p. 3, 4, 9, 10
- Operation and Usage p. 6, 12, 18, 24
- Cleaning and Maintenance p. 5, 11, 17, 23
Table of contents
Manual images
Click an image to enlargeQuick guide from the manual
The Flama 2237FL blender is designed for domestic use. Key operational limits include a maximum continuous usage time of 2 minutes. If this limit is exceeded, allow the appliance to cool down for at least 1 minute before using it again. Do not process boiling liquids or glutinous substances like jam or marmalade.
Description of the appliance
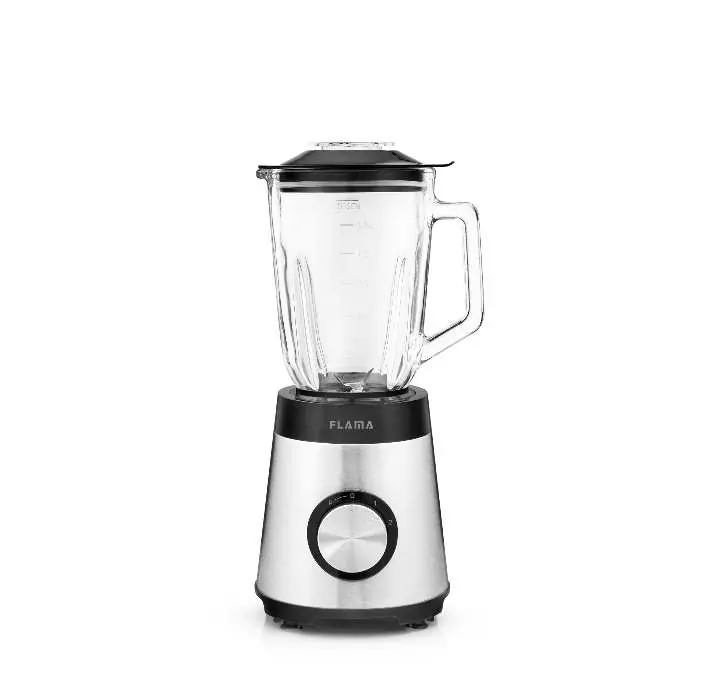
- 1. Measuring cup
- 2. Blender lid
- 3. Blender cup
- 4. Blades
- 5. Motor unit
- 6. Speed/mode selector
Operation
Before first use, unpack the device and wash the blender cup, lid, and measuring cup in warm soapy water. Never immerse the motor unit in water.
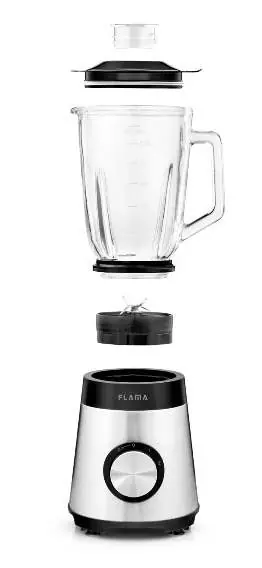
Assembly: Ensure the power cord is unplugged and the speed selector is at position 0. Place the blender cup on the motor unit and turn it clockwise until a click is heard. The appliance will not operate if the cup is not correctly mounted.
Usage: Place ingredients into the cup, ensuring you do not exceed the MAX level. Secure the lid and measuring cup. Plug in the appliance and select the desired speed:
- 1: Minimum speed
- 2: Maximum speed
- 0: Stop
- P: Pulse (intermittent operation at maximum speed)
When finished, turn the selector to 0 and wait for the blades to stop completely before removing the cup.
Cleaning and maintenance
Always disconnect the appliance from the power outlet before cleaning. Do not use sharp utensils or abrasive solvents. The motor unit should only be wiped with a damp cloth and dried; never immerse it in water. The blades are sharp; handle with caution. Note that the blades are not dishwasher safe.
Troubleshooting
If the appliance does not work, ensure it is plugged in and the cup is correctly assembled. A slight burning smell during the first few uses is normal. If the motor overheats and the device switches off, unplug it and wait 30 minutes before restarting. If the blades do not rotate, check for poor assembly or cut ingredients into smaller pieces.
Safety instructions
Keep the appliance and cord out of the reach of children. Do not touch moving parts. Always use the blender with the lid and measuring cup in place. Do not place hot ingredients in the blender; allow them to cool for a few minutes first. If the power cord is damaged, it must be replaced by an authorized Flama technical service.
Manufacturer information
FLAMA, SA
Practical help
Common problems
Appliance does not work
Ensure it is plugged into the mains and the blender cup is correctly mounted on the motor unit.
Slight burning smell during operation
This is normal during the first few uses. If it persists, ensure the motor is not overloaded.
Appliance switches off during use
Motor overheating. Unplug and wait 30 minutes before using again.
Blades do not rotate
Check for incorrect assembly or cut ingredients into smaller pieces.
Jar leaks
Check that the blender cup and blade assembly are correctly mounted.
Before use
- Ensure the blender cup is properly mounted on the motor unit (listen for the click).
- Check that the speed selector is in the '0' position before plugging in.
- Ensure ingredients are not boiling hot.
- Do not exceed the MAX level mark on the blender cup.
- Ensure the lid and measuring cup are securely in place.
Show more Show less
Images and diagrams
- The exploded view shows the assembly order: motor unit at the base, followed by the blade assembly, blender cup, lid, and measuring cup.
Model compatibility
- Designed exclusively for domestic use.
- Not suitable for professional or industrial use.

Manual page author
David Miller
Documentation analyst