Tools / Power Tools
User Manual for Arrow FN50 Flooring Nailer and Stapler
Quick guide for the Arrow FN50 3-in-1 flooring nailer and stapler. Includes setup, air supply requirements, loading instructions, maintenance, and troubleshooting.
Table of contents
Manual images
Click an image to enlargeQuick guide from the manual
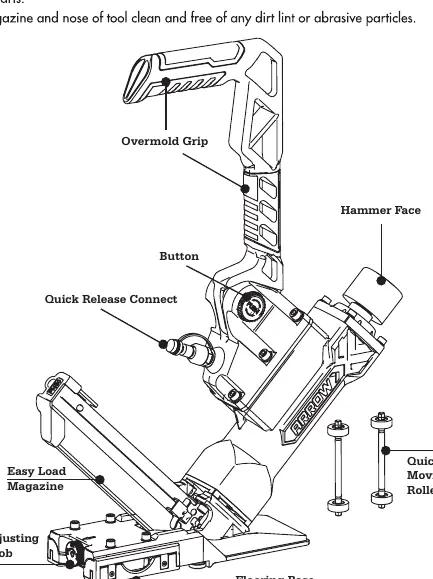
The Arrow FN50 is a 3-in-1 flooring nailer and stapler designed for professional and DIY flooring installation. It is compatible with 15.5GA flooring staples, 16GA L-cleats, and 16GA T-cleats ranging from 1-1/2" to 2" (38-50mm). Always wear safety glasses and ear protection during operation. Ensure the air supply is regulated between 70-100 PSI (5-7 bar) and that the work area is clear of debris.
Air Supply
Proper air supply is critical for tool performance and longevity:
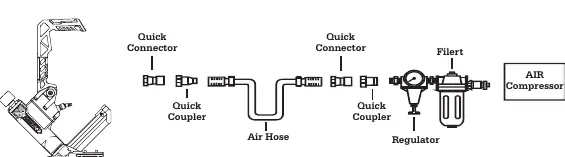
- Use clean, dry, and regulated compressed air at 70-100 PSI (5-7 bar).
- A filter-regulator-lubricator system is required and should be placed as close to the tool as possible.
- Install a quick connector on the tool and a quick coupler on the hose for better performance.
- Ensure all connections are sealed to prevent air loss.
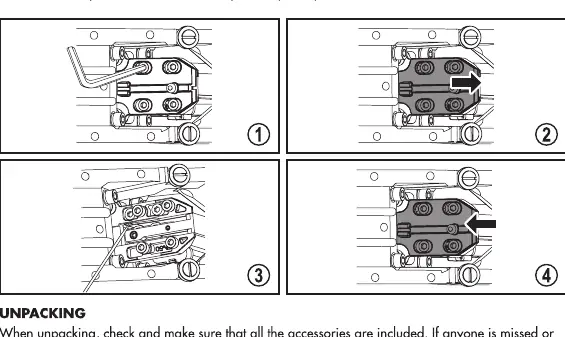
Loading and Operation
Loading Fasteners:
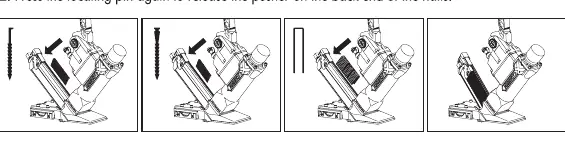
- Pull the pusher to the tail of the clip and hang it on the locating pin.
- Load the nails/staples from the upper part of the magazine.
- Press the locating pin again to release the pusher.
Operation:
- Test the driving depth on a sample piece of wood before starting.
- Connect the tool to the air supply.
- Hold the long arm and press the base to the work surface.
- Strike the hammer face with a hammer to drive the fastener.
- Lift the tool off the work surface.
Adjustments
Flooring Base Adjustment: Rotate the adjusting knob to match the thickness of your flooring. The tool is designed to fit 5/8" and 3/4" thick flooring wood. Ensure the mark on the knob aligns with the thickness specification.
Maintenance
Regular maintenance ensures tool longevity:
- Lubrication: Add a few drops of pneumatic tool oil through the air inlet before every operation or after 1 hour of continuous use. Do not use detergent oil.
- Cleaning: Keep the magazine and nose of the tool clean. Use non-flammable cleaning solutions if necessary, but do not soak the tool.
- Inspection: Regularly check for worn O-rings, seals, and loose screws.
Clearing Jams
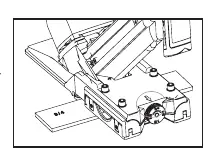
If a fastener becomes jammed:
- Disconnect the tool from the air supply.
- Loosen the four screws holding the cover plate.
- Slide down and remove the cover plate.
- Remove the jammed fasteners.
- Replace the cover plate and tighten the screws.
Troubleshooting
If the tool is not performing correctly, check the following:
- Air Leaks: Tighten poppet actuator screws or replace worn O-rings.
- Lack of Power/Slow Cycle: Add lubricant or check if air pressure is too low.
- Intermittent Feeding: Replace damaged coil springs, ensure you are using standard fasteners, or clean the magazine and drive guide.
Manufacturer information
Arrow Tool Group
Practical help
Common problems
Air leaking in Cylinder Cover
Tighten poppet actuator screws or replace the O-ring.
Lack of power or slow to cycle
Add pneumatic tool oil or check if air supply pressure is too low.
Shooting no fastener or intermittent feeding
Replace damaged coil spring, use standard fasteners, or clean the magazine and drive guide.
Before use
- Wear safety glasses and ear protection.
- Ensure air supply is regulated between 70-100 PSI (5-7 bar).
- Check that the air hose is free of obstructions.
- Verify the correct fastener type (15.5GA staples, 16GA L-cleats, or 16GA T-cleats).
- Ensure the work area is clear of debris.
Specs in practice
- Operating Pressure
- Must be maintained between 70-100 PSI (5-7 bar) for optimal performance.
Images and diagrams
- Page 7 illustrates the correct air supply setup, including the regulator, filter, and quick connectors.
- Page 10 provides a visual guide for clearing jams by removing the cover plate.
- Page 12 contains a full schematic and parts list for the FN50.
Model compatibility
- Compatible with 15.5GA flooring staples (1-1/2" to 2").
- Compatible with 16GA L-cleats (1-1/2" to 2").
- Compatible with 16GA T-cleats (1-1/2" to 2").
- Adjustable base fits 5/8" and 3/4" flooring thickness.

Manual page author
David Miller
Documentation analyst
Organizes user manual content into clear summaries, with attention to model details, product context, and everyday usability.