Lighting / Fixtures
Artika Arlo 1-Light LED Pendant User Manual
Quick guide for the Artika Arlo 1-Light LED Pendant (PDT1-AR). Includes installation steps, wiring instructions, height adjustment, and safety warnings.
Table of contents
Manual images
Click an image to enlargeQuick guide from the manual
This document provides installation and safety instructions for the Artika Arlo 1-Light LED Pendant. Before starting, ensure the main electrical supply is turned off at the circuit breaker. The manufacturer recommends installation by a certified electrician, especially where local building codes require it. If you intend to use a dimmer switch, it must be compatible with LED lighting.
Safety warnings
- Risk of electrical shock: Always turn off the breaker at the panel before installing or performing maintenance.
- Indoor use only: Do not use this product outdoors.
- Dimmer compatibility: If using a dimmer, it must be LED compatible.
- Compliance: This device complies with Part 15 of the FCC Rules and Canada (IC) regulations.
Height adjustment
The pendant height can be adjusted before installation:
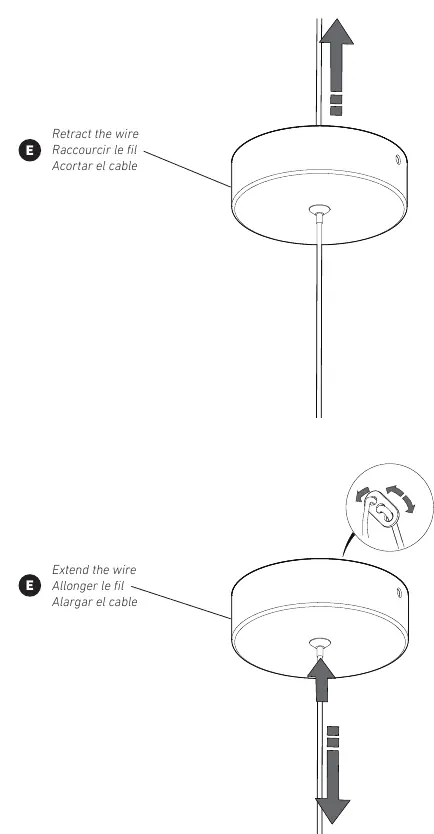
- To retract the wire: Pull the wire up into the canopy.
- To extend the wire: Push the wire release mechanism to allow the wire to slide down.
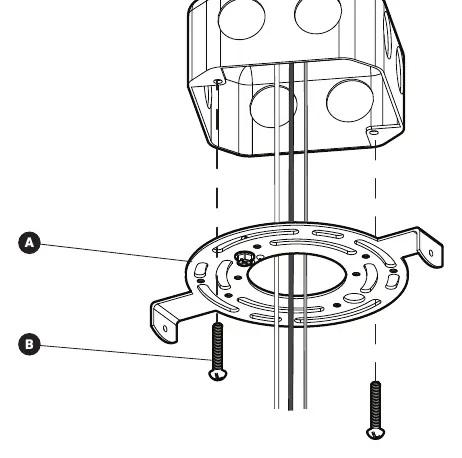
Mounting bracket installation
Attach the mounting bracket to the junction box using the provided junction box screws. Ensure the bracket is securely fastened before proceeding to the wiring step.
Connecting the wires
Connect the wires from the fixture to the house supply wires using the provided wire connectors:
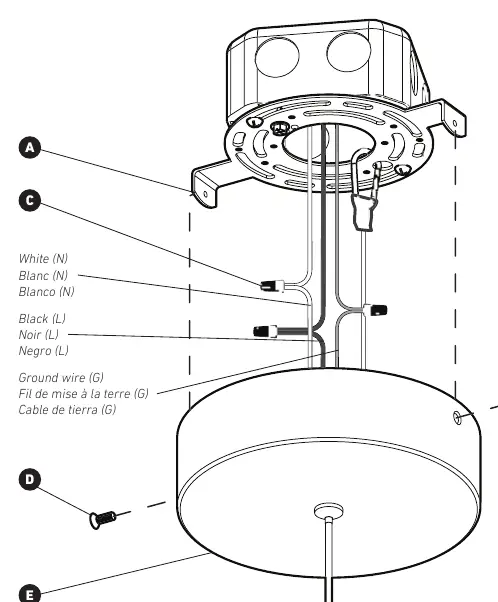
- White (N): Connect the white wire from the fixture to the white (neutral) supply wire.
- Black (L): Connect the black wire from the fixture to the black (live) supply wire.
- Ground (G): Connect the ground wire from the fixture to the ground supply wire.
Once wires are connected, secure the canopy to the mounting bracket using the canopy screws.
Warranty
Artika For Living Inc. offers a five (5) year limited warranty on manufacturing defects for residential use only. The warranty is non-transferable and requires the original sales receipt for claims. It does not cover improper installation, misuse, or normal wear and tear.
Manufacturer information
Artika
Practical help
Common problems
Light does not turn on
Verify that the main circuit breaker is turned on and check that all wire connections are secure.
Flickering light
Ensure the dimmer switch being used is compatible with LED lighting.
Before use
- Turn off the main electrical supply at the fuse box or circuit breaker.
- Verify that the dimmer switch is LED compatible if one is being used.
- Ensure all hardware (mounting bracket, screws, wire connectors) is included.
- Confirm that the installation location is indoors and suitable for a pendant light.
Specs in practice
- Residential use only
- The product is not designed for commercial or outdoor applications.
Images and diagrams
- The wiring diagram illustrates the connection of the White (Neutral), Black (Live), and Ground wires using the provided wire connectors.
- The height adjustment diagram shows how to retract or extend the pendant wire through the canopy.
Model compatibility
- Compatible with LED-compatible dimmers only.

Manual page author
Emily Carter
User documentation editor
Prepares concise manual descriptions and highlights the most useful setup, operation, and maintenance information for readers.