Lighting / Fixtures
Installation Manual for Artika Bloom LED Wall Light 0375-WD
Quick installation guide for the Artika Bloom LED Wall Light (0375-WD). Includes mounting instructions, wiring steps, CCT color temperature adjustment, and safety warnings.
Table of contents
Manual images
Click an image to enlargeImportant Information
The Artika Bloom LED Wall Light (0375-WD) is designed for both indoor and outdoor residential use. This document provides the necessary steps for proper installation and configuration. It is recommended that this product be installed by a certified electrician in accordance with local electrical and building codes.
Safety Warnings
- Electrical Shock Hazard: Always turn off the main electrical supply at the fuse box or circuit breaker before starting installation or maintenance.
- Dimmer Compatibility: If using a dimmer switch, ensure it is compatible with LED lighting.
- Professional Installation: In some regions, it is a legal requirement for this type of product to be installed by a certified electrician.
Included Hardware
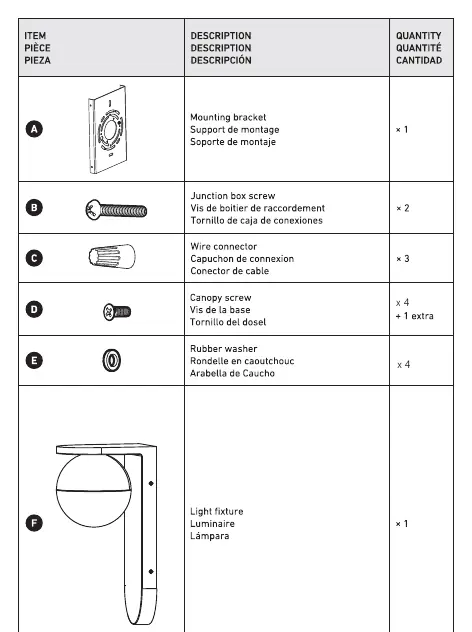
- Mounting bracket
- Junction box screws (x2)
- Wire connectors (x3)
- Canopy screws (x4 + 1 extra)
- Rubber washers (x4)
Installation Steps
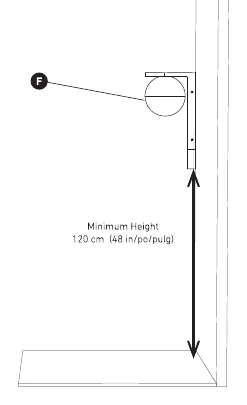
1. Minimum Clearance: Plan the desired height for the fixture. A minimum height of 120 cm (48 inches) is recommended.
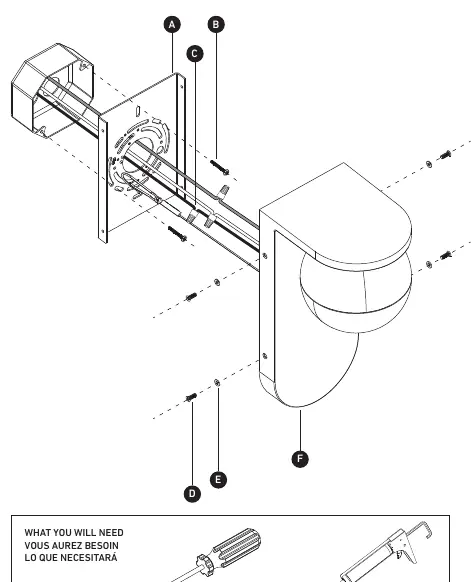
2. Mounting Bracket: Secure the mounting bracket to the junction box using the provided junction box screws.
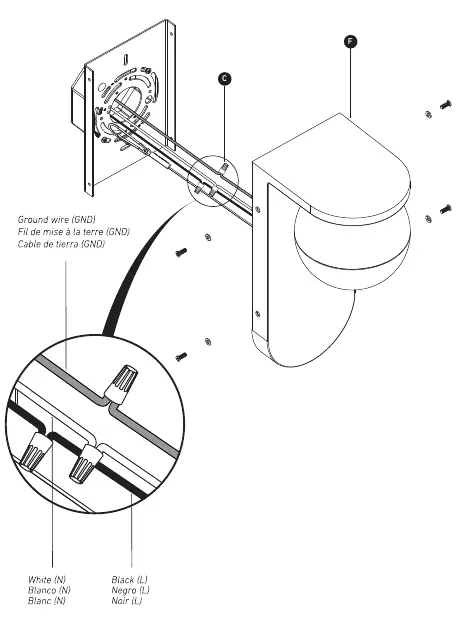
3. Connecting the Wires: Connect the fixture wires to the house supply wires using the provided wire connectors. Ensure the ground wire (GND) is connected to the house ground wire, the white wire (N) to the neutral wire, and the black wire (L) to the live wire.
4. Fixture Installation: Attach the light fixture to the mounting bracket using the canopy screws and rubber washers.
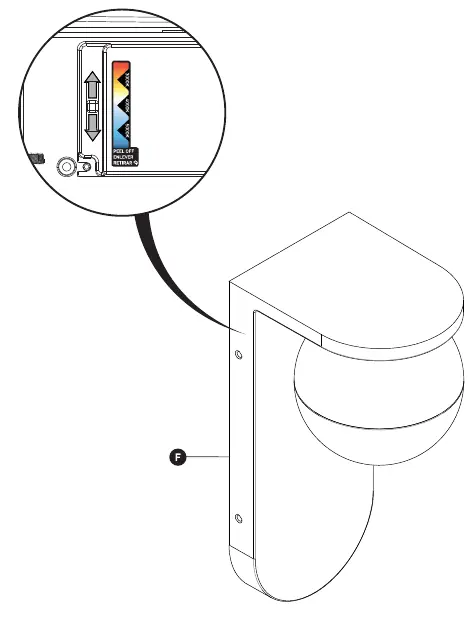
Tunable White Technology
This fixture features Tunable White Technology (CCT). You can adjust the color temperature of the light using the switch located on the fixture. The available settings are 3000K, 4000K, and 5000K.
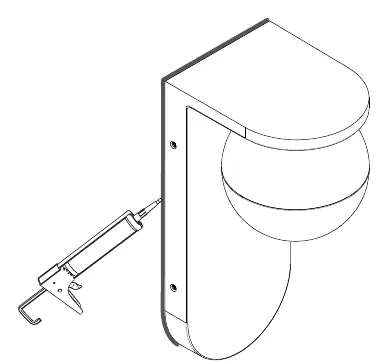
Maintenance and Sealant
After installation, apply sealant around the fixture base to prevent moisture ingress. Note: We recommend keeping the bottom of the fixture unsealed to maintain a drainage area in case of water infiltration.
Manufacturer information
Artika
Practical help
Common problems
Light does not turn on
Verify that the circuit breaker is on and that all wire connections are secure and correctly matched (Black to Black, White to White, Ground to Ground).
Flickering light
If using a dimmer switch, ensure it is specifically rated for LED compatibility.
Water inside the fixture
Ensure the bottom of the fixture is left unsealed to allow for proper drainage.
Before use
- Turn off the main electrical supply at the fuse box or circuit breaker.
- Ensure you have a screwdriver and sealant ready.
- Verify the mounting surface is suitable for the fixture.
- Check that your dimmer switch (if applicable) is LED compatible.
- Plan for a minimum installation height of 120 cm (48 inches).
Specs in practice
- CCT (Correlated Color Temperature)
- Allows adjustment of the light color between 3000K (warm), 4000K (neutral), and 5000K (cool).
- Minimum Clearance
- The minimum distance of 120 cm (48 inches) required from the ground for proper installation.
Images and diagrams
- The hardware list identifies the mounting bracket, screws, and wire connectors needed.
- The wiring diagram illustrates connecting the ground, neutral, and live wires using the provided connectors.
- The sealant application diagram shows where to apply sealant while leaving the bottom open for drainage.
Model compatibility
- Suitable for indoor or outdoor residential use.
- Requires an LED-compatible dimmer switch if dimming is desired.

Manual page author
Michael Turner
Technical manual editor
Reviews PDF manuals for structure, safety notes, and practical product details so readers can find the right information quickly.