Home Appliances / Refrigerators
Automate Push 5 Channel Remote Control User Guide
A comprehensive guide for the Automate Push 5 Channel Remote Control. Includes instructions for battery replacement, motor pairing, setting limits, and remote configuration.
Table of contents
Manual images
Click an image to enlargeQuick guide from the manual
The Automate Push 5 Channel Remote Control is designed for managing motorized shades. This guide covers the initial setup, including pairing, limit setting, and daily operation. Ensure all programming is completed for all motors before locking the remote to prevent accidental changes.

Safety and Warnings
- Battery Hazard: Contains a coin/button cell battery. Keep away from children. If swallowed, seek immediate medical attention.
- Environment: Do not expose to water, moisture, or extreme temperatures.
- Operation: Installation and programming should be performed by a qualified installer.
- Compliance: This device complies with FCC and ISED regulations.
Battery Replacement
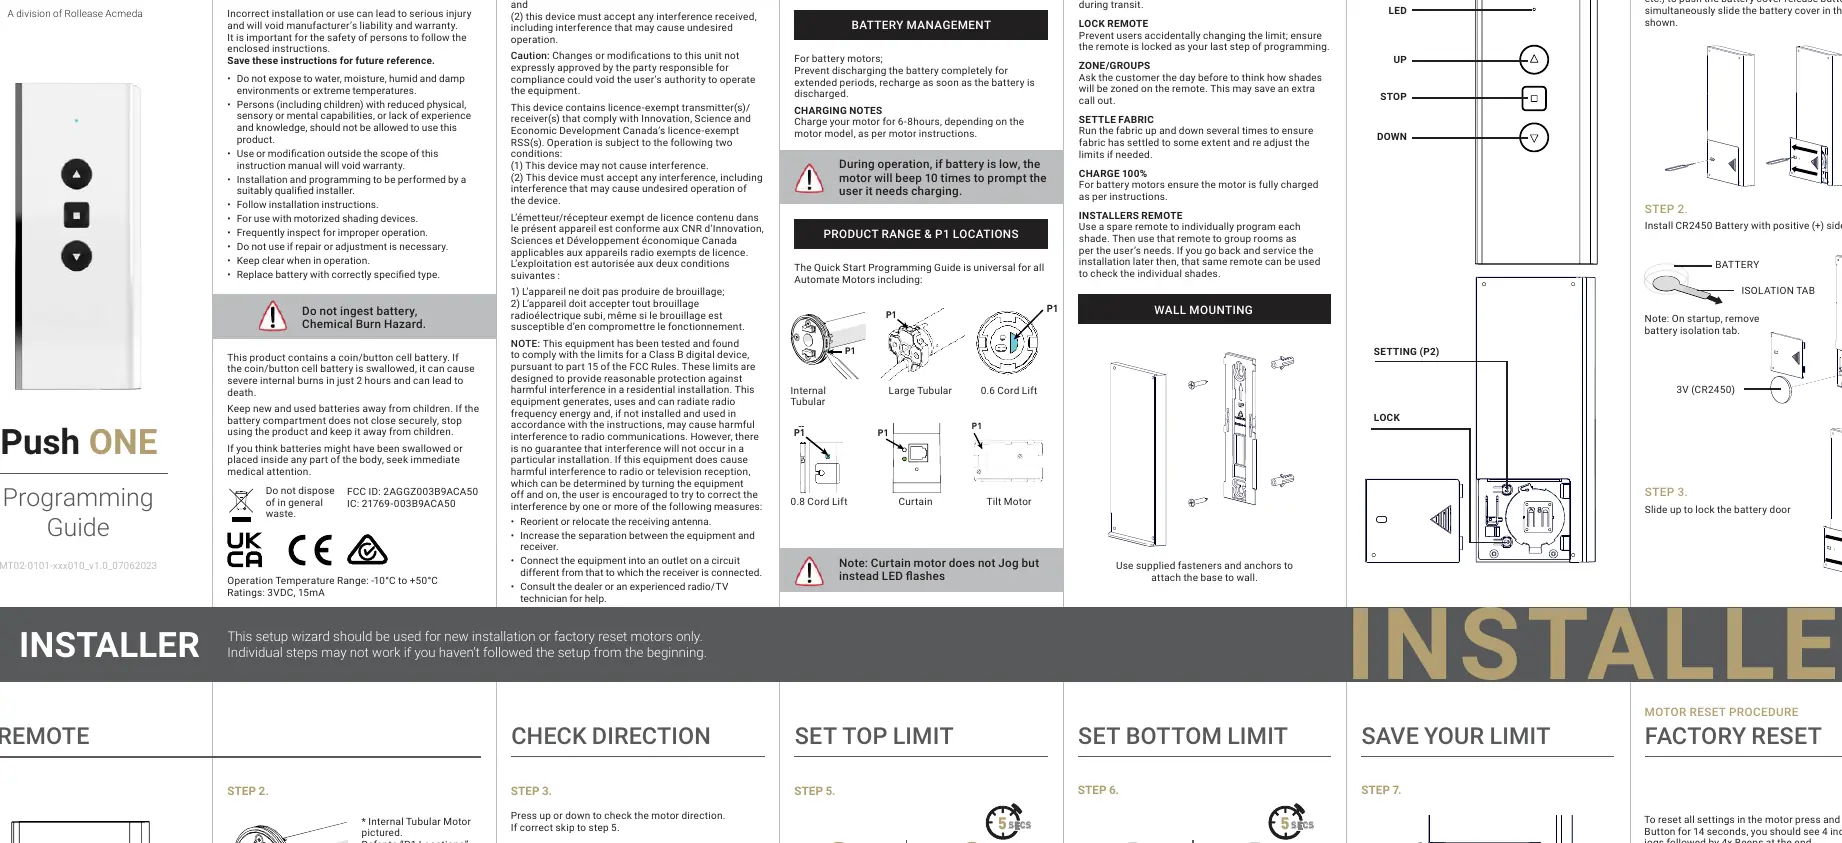
- Use a tool (such as a SIM card pin or mini screwdriver) to push the battery cover release button.
- Slide the battery cover in the direction shown.
- Install a CR2450 battery with the positive (+) side facing up.
- Slide the cover back to lock.
- Note: Remove the battery isolation tab on startup.
Programming and Setup
Check Direction
Press the UP or DOWN button to check the motor direction. If the direction needs to be reversed, press and hold the UP and DOWN arrows together for 5 seconds until the motor jogs. This is only possible during initial setup.
Set Limits
- Top Limit: Move the shade to the desired top position using the UP arrow. Press and hold the UP and STOP buttons together for 5 seconds to save.
- Bottom Limit: Move the shade to the desired bottom position using the DOWN arrow. Press and hold the DOWN and STOP buttons together for 5 seconds to save.
Factory Reset
To reset all settings, press and hold the P1 button on the motor for 14 seconds. You should see 4 independent jogs followed by 4 beeps.
User Operations
Controlling Shades
Use the UP, DOWN, and STOP buttons to control the shade position. Press STOP at any point to halt movement.
Favorite Position
- Move the shade to the desired position.
- Press the P2 button on the remote.
- Press the STOP button on the remote.
- Press the STOP button again to confirm.
Lock and Unlock Remote
- Lock: Press and hold the Lock button for 6 seconds until the LED shows solid.
- Unlock: Press and hold the Lock button for 6 seconds until the LED flashes.
Installer Best Practices
- Sleep Mode: Put the motor into sleep mode before shipping to prevent activation during transit.
- Zones/Groups: Plan zoning with the customer before programming.
- Settle Fabric: Run the fabric up and down several times to ensure it settles before finalizing limits.
- Charge: Ensure the motor is fully charged (6-8 hours) before installation.
Practical help
Common problems
Motor does not respond
Check if the battery isolation tab has been removed or if the battery needs replacement (CR2450).
Shade moves in the wrong direction
Press and hold the UP and DOWN arrows together for 5 seconds during initial setup to reverse the motor direction.
Cannot change limits
The remote is likely locked. Perform the Unlock Remote procedure by holding the Lock button for 6 seconds.
Motor beeps 10 times
The battery is low and requires charging.
Before use
- Remove the battery isolation tab from the remote.
- Ensure the motor is fully charged (6-8 hours).
- Identify the P1 button location on your specific motor type (Internal Tubular, Cord Lift, Tilt Motor).
- Have a small tool (SIM pin or screwdriver) ready for battery cover removal.
- Plan your zoning/grouping strategy before programming.
Specs in practice
- Battery Type
- CR2450 (3V coin cell).
- Operating Temperature
- -10°C to +50°C.
Images and diagrams
- The P1 button location varies depending on the motor type (Internal Tubular, Cord Lift, Tilt Motor). Refer to the specific motor instructions.
- The LED indicator on the remote provides feedback (solid for locked, flashing for unlocked).
Model compatibility
- Universal for all Automate Motors.
- Requires separate Rollease Acmeda System Assembly Manual for hardware-specific assembly.

Manual page author
David Miller
Documentation analyst
Organizes user manual content into clear summaries, with attention to model details, product context, and everyday usability.