Lighting / Fixtures
User Manual for BEGA 12140P Ceiling and Wall Light
Quick guide for the BEGA 12140P ceiling and wall light. Includes installation steps, wiring instructions, LED unit replacement, and technical specifications.
Table of contents
Quick guide from the manual
The BEGA 12140P is an indoor ceiling and wall luminaire. Important: Installation and commissioning must be performed by a qualified electrician in accordance with national safety regulations. The luminaire features a bayonet closure for the synthetic diffuser and is DALI-controllable. Ensure the provided gaskets are used during installation to maintain the integrity of the housing.
Product Description
This luminaire consists of a metal housing with a white finish and an impact-resistant synthetic diffuser (IK10). It is designed for indoor use where soft and uniform light distribution is required. The unit includes a BEGA Thermal Switch to protect temperature-sensitive components.
Installation
- Preparation: Ensure the power supply is disconnected.
- Cable Entry: Pass the mains supply cable through the grommet into the luminaire housing.
- Mounting: Fix the luminaire housing to the mounting surface using the provided or suitable fixing material. It is imperative to use the enclosed gaskets.
- Wiring: Dismantle the mains supply cable by approximately 60 mm. Pull silicone sleeves over the wires. Make the earth and electrical connections to the terminals.
- Digital Control: For digital control, use the connecting terminal marked DA, DA. If this terminal is not used, the luminaire operates at full light output.
- Diffuser Attachment: Place the synthetic diffuser onto the housing, ensuring the cam pins fit into the notches. Screw the diffuser in by turning it clockwise to secure it.
Maintenance and LED Replacement
The LED unit can be replaced by qualified persons using standard tools. To replace the unit:
- Disconnect the luminaire from the main supply.
- Unscrew the synthetic diffuser by turning it counter-clockwise.
- Disassemble the LED unit.
- Install the replacement LED unit, following the specific installation instructions provided with the replacement part.
- Reattach the synthetic diffuser by turning it clockwise.
Technical Data
- Voltage: 220-240 V, 0/50-60 Hz
- Safety Class: I
- Impact Strength: IK10 (Protection against mechanical impacts < 20 joules)
- Weight: 2.5 kg
- DALI: Controllable (0 DALI addresses)
Accessories
Optional metal trim rings are available in three finishes (white, palladium, glossy silver) and must be ordered separately.
Manufacturer information
BEGA
Practical help
Common problems
Diffuser is loose or vibrating
Ensure the cam pins are correctly aligned in the notches of the synthetic diffuser and that it has been turned clockwise until fully secured.
Luminaire not operating at full output
If the DALI terminals (DA, DA) are connected to a control system, ensure the system is configured correctly. If no control is desired, ensure these terminals are left unconnected for full output.
Before use
- Ensure power is disconnected before starting installation
- Verify the mounting surface is suitable for the luminaire
- Ensure a qualified electrician is performing the installation
- Use the provided gaskets during mounting
- Check that the mains cable is stripped by approximately 60 mm
Specs in practice
- Safety Class I
- The luminaire must be connected to an earth conductor.
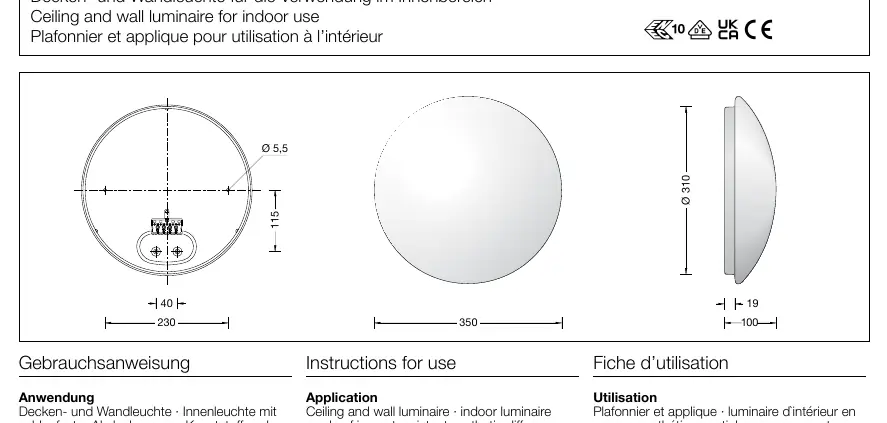
Images and diagrams
- The dimensional drawing shows a mounting hole distance of 230 mm and a total diameter of 310 mm.
Model compatibility
- Optional trim rings available (Part numbers: 13 004, 13 005, 13 006)
- Compatible with DALI control systems

Manual page author
David Miller
Documentation analyst
Organizes user manual content into clear summaries, with attention to model details, product context, and everyday usability.