Lighting / Fixtures
User Manual for BEGA 12132 Ceiling and Wall Luminaire
Quick guide for the BEGA 12132 ceiling and wall luminaire. Includes installation instructions, wiring, LED unit replacement, and technical specifications.
Table of contents
Quick guide from the manual
This luminaire is designed for indoor use. Installation and commissioning must only be carried out by a qualified electrician in accordance with national safety regulations. The manufacturer accepts no liability for damage caused by improper use or installation.
Installation
Follow these steps to install the luminaire:
- Pass the mains supply cable through the grommet into the luminaire housing.
- Fix the luminaire housing to the mounting surface using the enclosed or other suitable fixing material.
- Important: It is imperative to use the enclosed gaskets.
- Dismantle the mains supply cable approximately 60 mm.
- Make the earth and electrical connections to the terminals.
- Place the glass onto the luminaire housing, ensuring the cam pins fit into the notches of the glass.
- Secure the glass by turning it clockwise. This ensures a safe and vibration-resistant hold.
LED Unit Replacement
The LED unit can be replaced by qualified persons using standard tools:
- Disconnect the luminaire from the main supply.
- Unscrew the glass from the luminaire housing by turning it counter-clockwise.
- Replace the LED unit with the correct replacement part (refer to the label in the luminaire for the specific designation).
- Screw the glass back onto the luminaire housing by turning it clockwise.
Note: A defective glass must be replaced.
Technical Data
- Operating Voltage: 220-240 V ~ 50-60 Hz
- Protection Class: I
- Impact Strength: IK02 (Protection against mechanical impacts < 0.2 joules)
- Weight: 2.9 kg
- Overvoltage Protection: Protected in accordance with DIN EN 61547.
Accessories and Spares
Optional metal trim rings are available in three finishes (white, palladium, glossy silver) and must be ordered separately. Spare glass and LED units (2700K, 3000K, 4000K) are available for maintenance.
Manufacturer information
BEGA
Practical help
Common problems
Glass is loose or not secure
Ensure the cam pins on the housing fit correctly into the notches of the glass and turn the glass clockwise until it is firmly locked.
LED unit failure
Disconnect power, remove the glass by turning counter-clockwise, and replace the LED unit with the specific spare part corresponding to the original color temperature (2700K, 3000K, or 4000K).
Before use
- Ensure installation is performed by a qualified electrician.
- Verify the mounting surface is suitable for the luminaire.
- Ensure all enclosed gaskets are used during installation to maintain integrity.
- Prepare the mains supply cable by stripping approximately 60 mm.
- Check that the mains voltage matches the 220-240 V requirement.
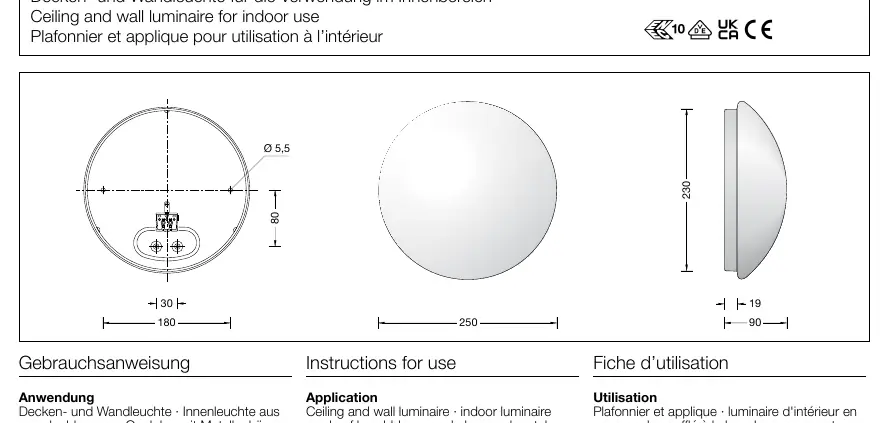
Images and diagrams
- The dimension diagram on page 1 shows the mounting hole distance (180 mm) and the overall diameter (250 mm).
Model compatibility
- Optional trim rings are available in white (13 001), palladium (13 002), and glossy silver (13 003).

Manual page author
David Miller
Documentation analyst
Organizes user manual content into clear summaries, with attention to model details, product context, and everyday usability.