Electronics / Audio
User Manual for Behringer XENYX QX1202USB/QX1002USB Mixer
Quick start guide and user manual for the Behringer XENYX QX1202USB and QX1002USB mixers. Includes setup instructions, control descriptions, gain staging, and technical specifications.
Table of contents
Manual images
Click an image to enlargeQuick guide from the manual
This guide provides essential information for setting up and operating your Behringer XENYX QX1202USB or QX1002USB mixer. Before connecting any equipment, ensure you have the correct power supply and that all gain controls are turned fully counterclockwise to prevent damage to your speakers or hearing.
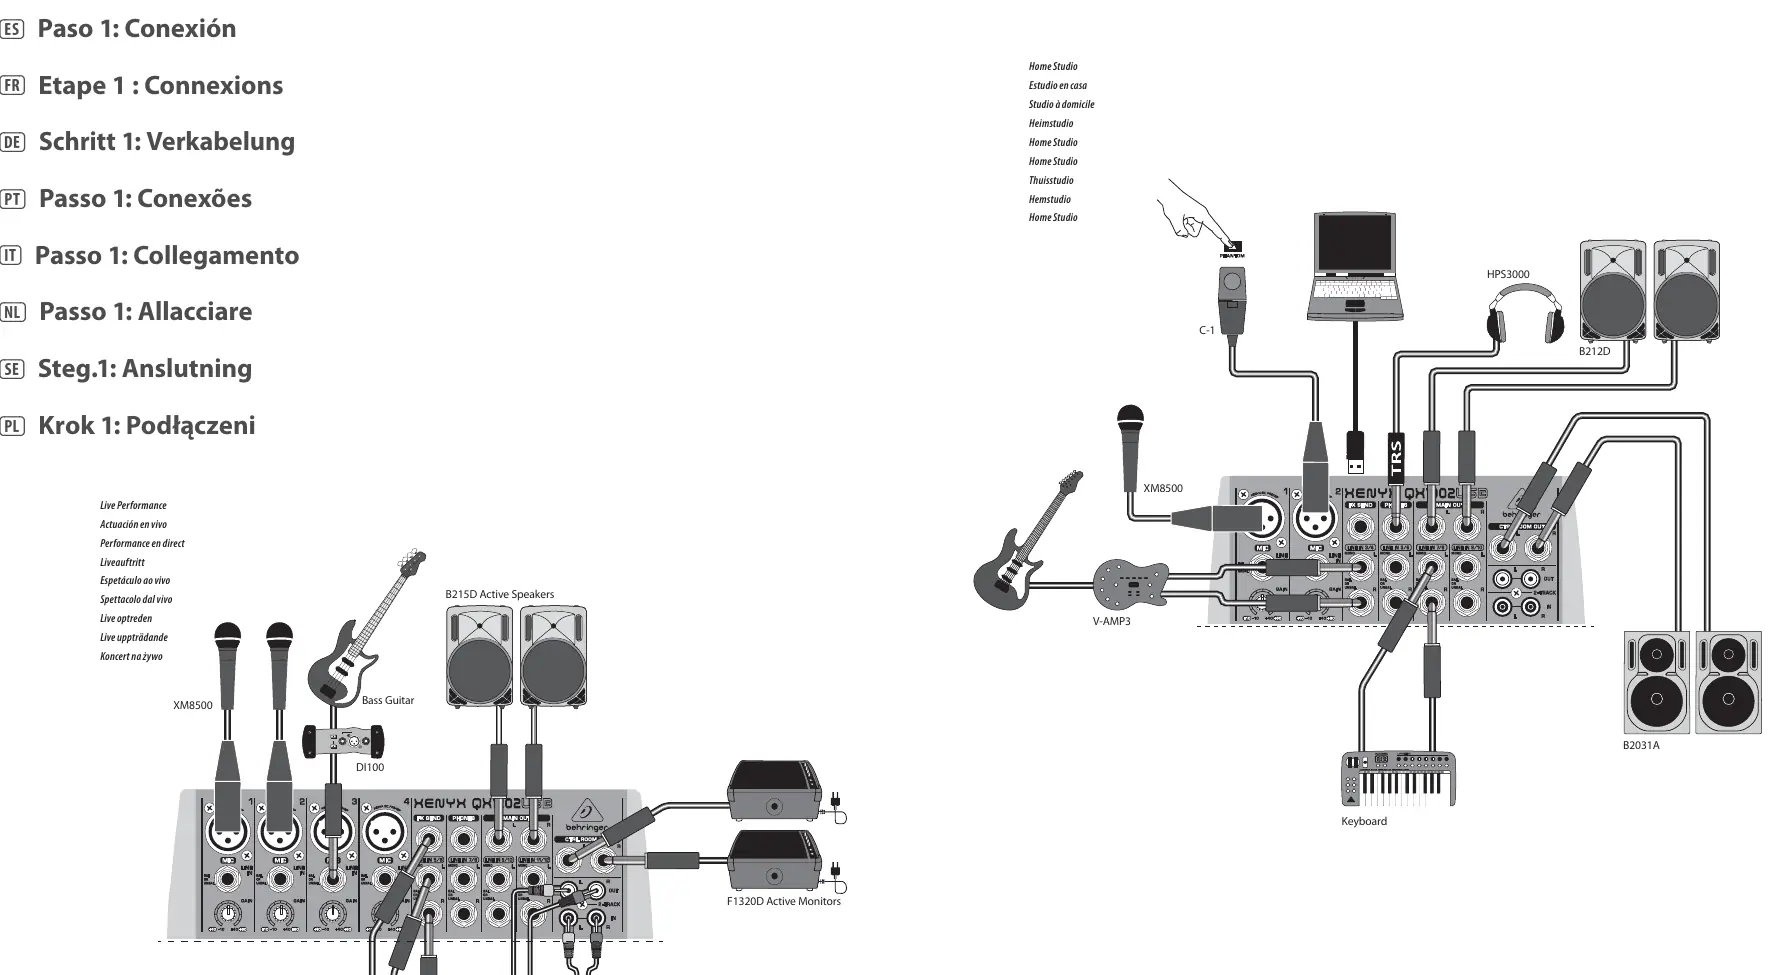
Hook-up
The mixer allows for various connections including microphones, instruments (guitars, keyboards), and external recording devices. Use the provided hook-up diagram to identify the correct ports for your setup. Always use high-quality, professional cables for connections.
Controls
The mixer features several key control elements:
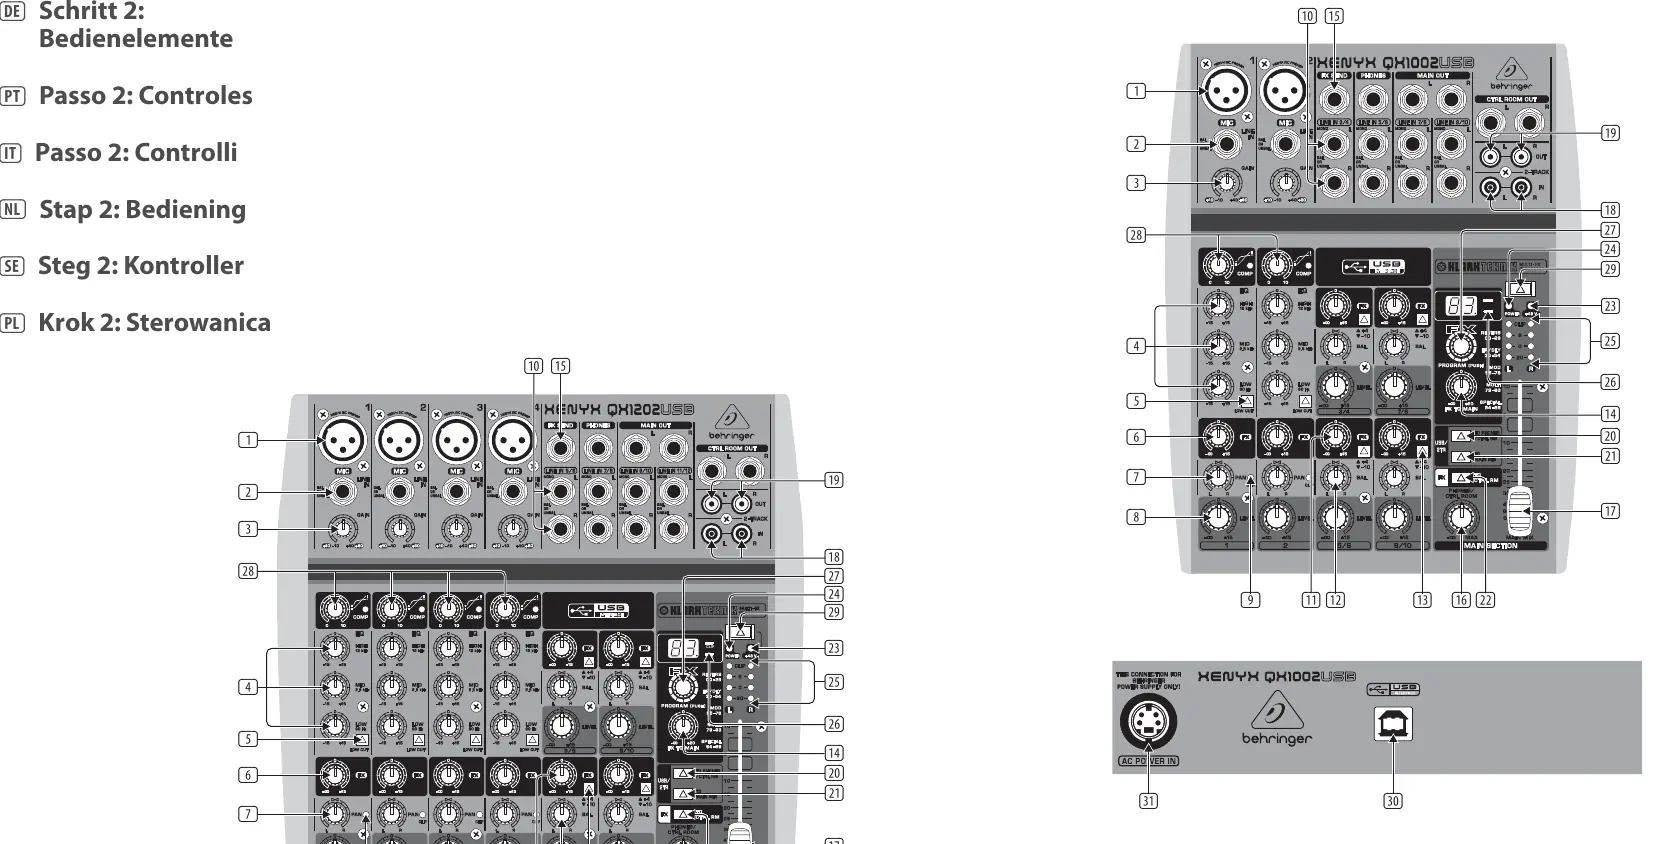
- MIC: Balanced XLR input for microphones with switchable +48V phantom power for condenser mics.
- LINE IN: Balanced 1/4" inputs for line-level signals.
- GAIN: Adjusts input amplification. Always turn fully counterclockwise before connecting or disconnecting sources.
- EQ: 3-band equalizer for adjusting high, mid, and low frequencies.
- LOW CUT: Steep filter to eliminate unwanted low-frequency noise.
- FX: Sends signals to the internal effects processor or external devices.
- PAN/BAL: Determines the signal position in the stereo image.
- LEVEL: Determines the channel signal level in the main mix.
- PHANTOM: Activates +48V power for condenser microphones.
Getting started
To correctly set the gains of the channels:
- Set the LEVEL controls of the input channels to their center positions (0 dB).
- Use the GAIN controls to increase the input amplification until signal peaks show 0 dB on the level meter.
- When recording to digital recorders, ensure the peak meter does not go into overload, as digital distortion is undesirable and can render recordings useless.
Presets List
The mixer includes a built-in Klark Teknik effects processor. Use the PROGRAM control to dial in the desired effect number. The number will blink on the display; press the PROGRAM control to confirm your selection.
Safety and Maintenance
- Do not remove the top cover; there are no user-serviceable parts inside.
- Do not expose the unit to rain or moisture.
- Ensure proper ventilation; do not install in confined spaces.
- Always use the included power adapter.
- Disconnect the unit during lightning storms or when unused for long periods.
Manufacturer information
Behringer
Practical help
Common problems
Distortion in the signal
Check the CLIP LED. If it lights up, reduce the GAIN control until the LED stops illuminating.
No sound from effects
Ensure the FX control on the channel is not turned all the way to the left (-∞) and the FX TO MAIN control is turned up.
Microphone not working
If using a condenser microphone, ensure the +48V PHANTOM power button is pressed.
Before use
- Verify the mains voltage matches your region.
- Turn the GAIN control fully counterclockwise before connecting or disconnecting any signal source.
- Ensure the mixer is placed in a well-ventilated area.
- Use high-quality professional cables for all connections.
Specs in practice
- +4 dBu vs -10 dBV
- Input sensitivity settings; +4 dBu is for studio levels, -10 dBV is for home recording.
- Phantom Power (+48V)
- Required voltage for condenser microphones.
Images and diagrams
- The Hook-up diagram illustrates how to connect microphones, instruments, speakers, and recording devices.
- The Controls diagram identifies all knobs, buttons, and ports on the mixer surface.
Model compatibility
- The mixer cannot be bus-powered via USB; always use the included power adapter.
- You cannot use both the microphone and line input of a single channel simultaneously.

Manual page author
David Miller
Documentation analyst
Organizes user manual content into clear summaries, with attention to model details, product context, and everyday usability.