Electronics / Audio
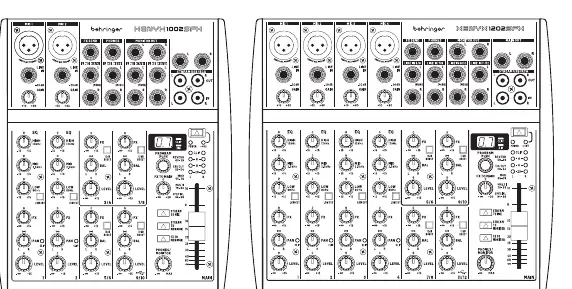
Behringer XENYX 1002SFX and 1202SFX Analog Mixer
Quick start guide for the Behringer XENYX 1002SFX and 1202SFX analog mixers. This guide covers connection diagrams, control functions, gain staging procedures, and internal effects presets.
Table of contents
Manual images
Click an image to enlargeQuick Start Guide
The Behringer XENYX 1002SFX and 1202SFX are premium analog mixers featuring USB streaming interfaces and internal effects. This guide provides essential information for setting up and operating your mixer.
Safety Instructions
- Always ensure the device is connected to a grounded power outlet.
- Do not open the chassis; there are no user-serviceable parts inside.
- Keep the device away from water, moisture, and heat sources.
- Use only the power adapter specified by the manufacturer.
- Disconnect the power plug during lightning storms or when the device is not in use for long periods.
- Operate only in non-tropical climates at altitudes below 2000 meters.
Connection Applications
The mixer is designed for various setups, including live performances and home studios.
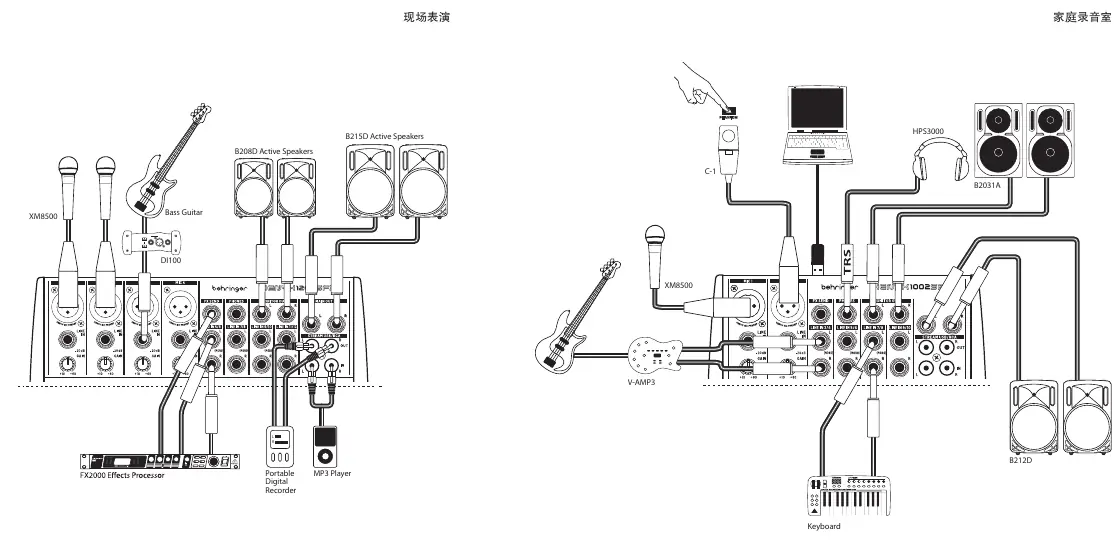
- Live Performance: Connect microphones (XM8500), instruments (Bass Guitar, V-AMP3), and external effects processors to the input channels. Connect active speakers (B215D, B208D) to the main outputs.
- Home Studio: Connect microphones, keyboards, and instruments. Use the USB interface to connect to a computer for recording. Connect studio monitors (B2031A, B212D) and headphones (HPS3000) for monitoring.
Control Overview
The mixer features a comprehensive control layout:
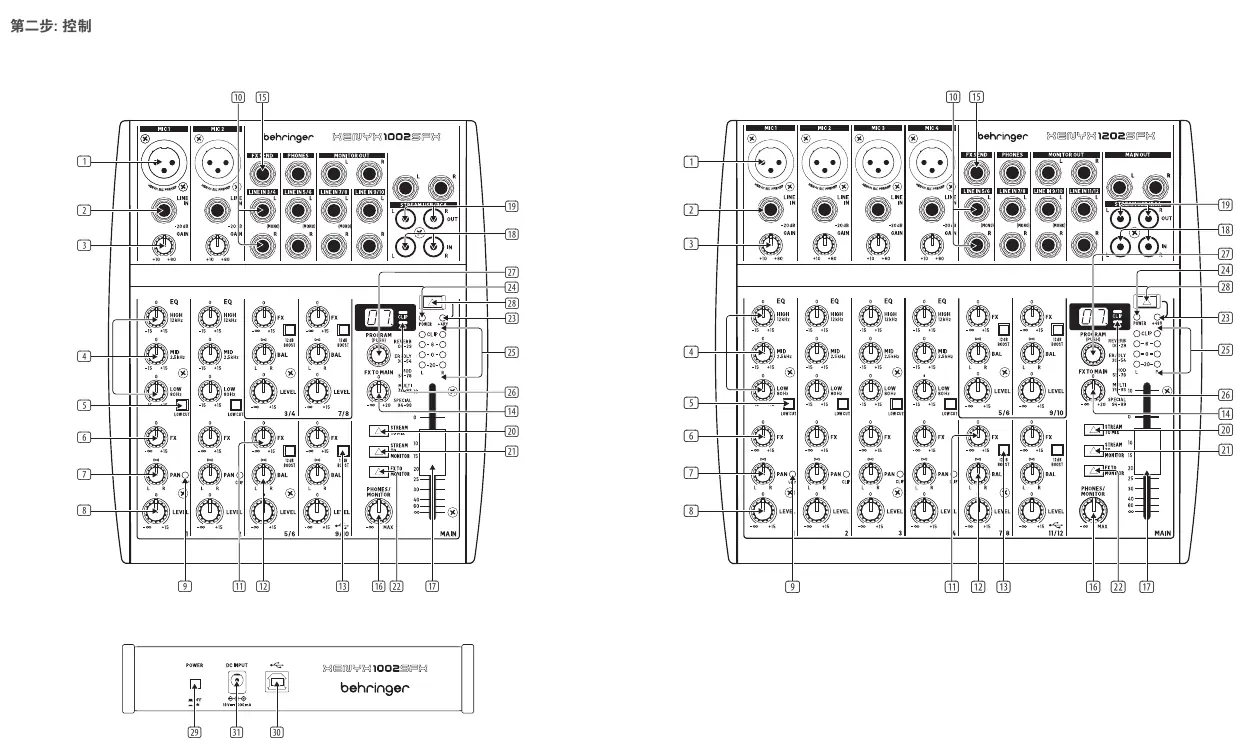
- Mic/Line Inputs: XLR inputs for microphones with +48V phantom power and 1/4" TRS line inputs.
- Gain Control: Adjusts the input amplification. Always turn counter-clockwise before connecting/disconnecting sources.
- EQ: 3-band equalizer for shaping the sound of each channel.
- FX Send: Controls the amount of signal sent to the internal effects processor or external devices.
- Pan/Bal: Determines the signal position in the stereo field.
- Level: Adjusts the channel volume in the main mix.
- Main Mix: Master fader to control the overall output volume.
- USB/Stream: Controls for routing USB and stream inputs to the main mix or monitor outputs.
Setting Gain
Proper gain staging is critical for high-quality audio:
- Set the channel LEVEL control to the center position (0 dB).
- Slowly increase the GAIN control while playing the source signal.
- Adjust until the peak LED on the meter only flashes occasionally during the loudest parts of the performance.
- Avoid overloading the signal, as digital distortion is undesirable and can ruin recordings.
Internal Effects Presets
The mixer includes a built-in effects processor with 100 presets, categorized into:
- Reverb: Various chambers, rooms, halls, and plates.
- Early Reflections / Delay: Ambience, delays, and echoes.
- Modulation: Chorus, flanger, phaser, tremolo, and detune effects.
- Special FX: LFO filters, talkbox, overdrive, and distortion.
Technical Specifications
- Mic EIN: 132 dB, A-weighted.
- Frequency Response: 10 Hz – 150 kHz (+10 dB gain).
- Power Supply: 100-240V AC, 50/60 Hz.
- USB: 48 kHz, 16-bit, class-compliant.
- Dimensions (1002SFX): 50 x 195 x 248 mm.
- Dimensions (1202SFX): 50 x 250 x 248 mm.
Manufacturer information
Behringer
Practical help
Common problems
Distortion or clipping
Reduce the GAIN control until the peak LED only flashes occasionally.
No sound output
Check power connection, ensure the GAIN is turned up, and verify the MAIN MIX fader is raised.
Feedback loop
If returning external effects through stereo channels, keep the channel FX control at minimum.
Before use
- Ensure the power adapter matches the local voltage.
- Turn off power amplifiers and speakers before connecting cables.
- Set all GAIN controls to minimum (counter-clockwise) before connecting sources.
- Verify that the phantom power (+48V) is only active if using condenser microphones.
Specs in practice
- +48V Phantom Power
- Voltage required to power condenser microphones.
Images and diagrams
- Front panel layout showing all input channels, EQ, FX, and master controls.
- Connection diagrams for live performance and home studio setups.
Model compatibility
- The mixer is not USB bus-powered; it requires the included external power adapter.
- USB interface is UAC2 class-compliant for computer connectivity.

Manual page author
Emily Carter
User documentation editor
Prepares concise manual descriptions and highlights the most useful setup, operation, and maintenance information for readers.